background image

Clearing jams

47

Print media


Before reaching the standard output bin

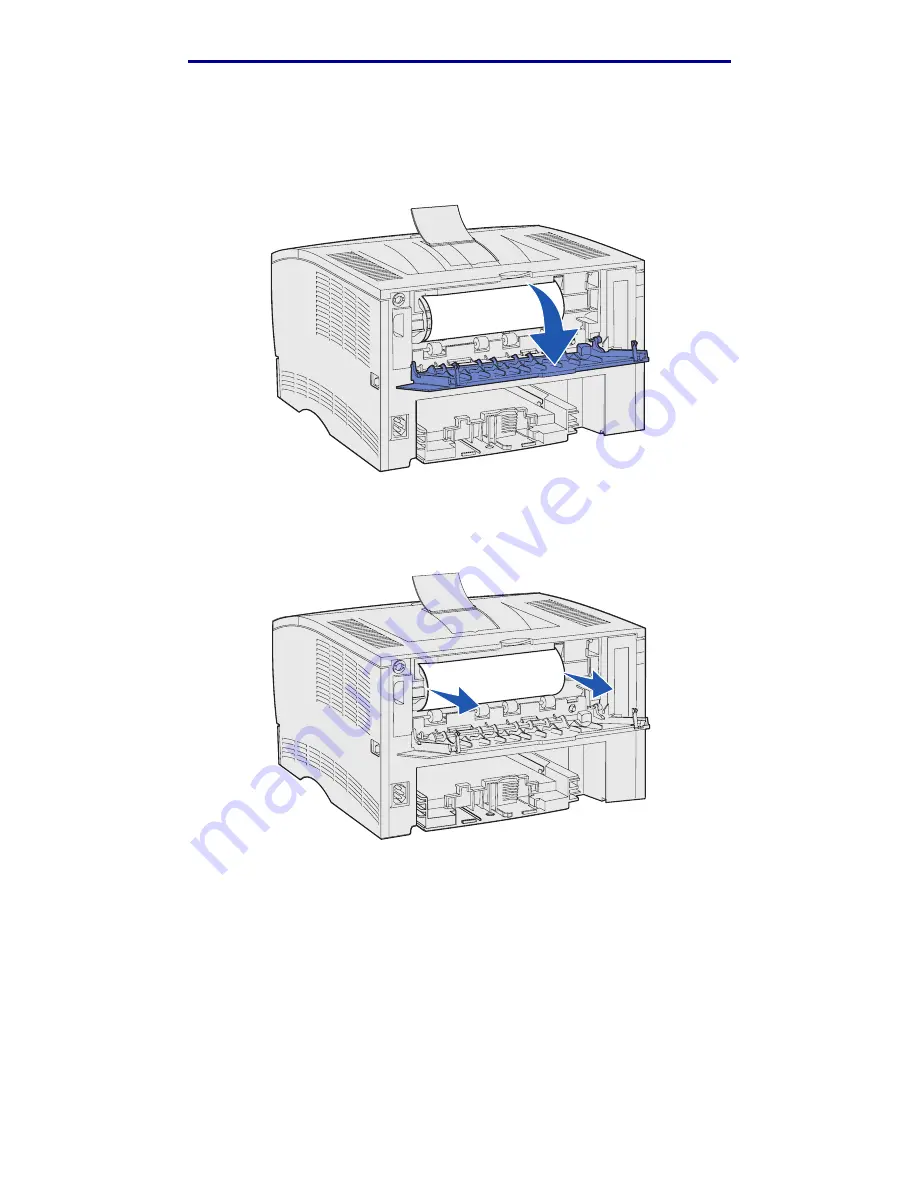
The print media jams before reaching the standard output bin.

1

Open the rear output bin door.

2

Gently remove the jam based on how much is visible. 

If the middle of the sheet of print media is visible, but not the ends, grasp the print media on 
both sides and gently pull it straight out.

Содержание Laser Printer

Страница 1: ...de March 2004 Lexmark and Lexmark with diamond design are trademarks of Lexmark International Inc registered in the United States and or other countries 2004 Lexmark International Inc 740 West New Circle Road Lexington Kentucky 40550 ...

Страница 2: ... or service that does not infringe any existing intellectual property right may be used instead Evaluation and verification of operation in conjunction with other products programs or services except those expressly designated by the manufacturer are the user s responsibility 2004 Lexmark International Inc All rights reserved UNITED STATES GOVERNMENT RIGHTS This software and any accompanying docum...

Страница 3: ...ay 20 Loading the optional 500 sheet tray 26 Loading and using the multipurpose feeder 31 Opening the multipurpose feeder 32 Loading the multipurpose feeder 34 Using the standard output bin 39 Raising the paper rest 39 Using the rear output bin 40 Clearing jams 43 200 201 Paper Jam Remove Cartridge 44 202 Paper Jam Open Rear Door 46 23x Paper Jam duplex jams 49 24x Paper Jam Check Tray x 53 250 Pa...

Страница 4: ... 61 Printing a font sample list 61 Scalable fonts 62 PCL bitmapped fonts 65 PCL symbol sets 65 Chapter 5 Understanding the operator panel 67 Using the operator panel 68 Indicator light 68 Buttons 68 Using the operator panel to change printer settings 70 Menus Disabled 71 Using the printer menus 72 Paper Menu 73 Finishing Menu 79 Utilities Menu 81 Job Menu 83 Quality Menu 85 Setup Menu 86 PCL Emul ...

Страница 5: ...8 Maintaining the printer 118 Determining the status of supplies 119 Conserving supplies 120 Ordering supplies 121 Ordering a print cartridge 121 Ordering a charge roll 121 Storing the print cartridge 122 Changing the print cartridge 123 Removing the used print cartridge 123 Cleaning the printer 124 Installing the new print cartridge 124 Recycling Lexmark products 127 Replacing the charge roll 128...

Страница 6: ...ntial jobs 147 Chapter 10 Troubleshooting 148 Solving basic printer problems 148 Solving display problems 149 Solving printing problems 150 Turning on Reduced Curl mode 153 Solving print quality problems 154 Solving option problems 158 Solving network printing problems 159 Solving other problems 159 Contacting service 159 Notices 160 Trademarks 160 Licensing notice 161 Laser notice 161 Electronic ...

Страница 7: ...wers The printer supports up to two additional drawers in the following configurations One 250 sheet drawer 2 One 500 sheet drawer 3 Two 250 sheet drawers 4 One 250 sheet drawer and one 500 sheet drawer 5 the 500 sheet drawer must be on the bottom of the stack Note The printer does not support the addition of two 500 sheet drawers 1 2 3 4 5 ...

Страница 8: ...ay LCD five buttons and one indicator light that flashes when the printer is processing a job indicated by the Busy message Standard output bin Handhold Operator panel Tray 1 Front paper support Multipurpose feeder door Upper front door Rear output bin Power button LCD 1 Menu 2 Return 4 Light Go 5 Stop 6 Select 3 ...

Страница 9: ...dia sources and specifications 10 Choosing the right print media 13 Storing print media 18 Preventing jams 19 Loading trays 20 Loading and using the multipurpose feeder 31 Using the standard output bin 39 Using the rear output bin 40 Clearing jams 43 ...

Страница 10: ... A4 A5 JIS B5 folio letter legal executive statement 60 105 g m2 16 28 lb 250 sheets of paper Tray 2 optional 500 sheet tray Paper only A4 JIS B5 folio letter legal executive 60 90 g m2 16 24 lb 500 sheets of paper Multipurpose feeder Paper envelopes labels transparencies card stock Minimum 76 2 x 127 mm 3 x 5 in Maximum 216 x 355 6 mm 8 5 x 14 in Supports all sizes listed in Supported print media...

Страница 11: ...ay 1 250 sheet tray Tray 2 optional 250 sheet drawer Tray 2 optional 500 sheet drawer Multipurpose feeder Standard output bin Rear output bin Duplex Paper Card stock Labels Transparencies Envelopes Labels and transparencies may be sent to the standard output bin however they may print more successfully when sent to the rear output bin ...

Страница 12: ...182 x 257 mm 7 17 x 10 12 in Letter 215 9 x 279 4 mm 8 5 x 11 in Legal 215 9 x 356 mm 8 5 x 14 in Executive 184 2 x 266 7 mm 7 25 x 10 5 in Folio 215 9 x 330 mm 8 5 x 13 in Statement 139 7 x 215 9 mm 5 5 x 8 5 in Universal 216 x 356 mm 8 5 x 14 in 7 3 4 Envelope Monarch 98 4 x 190 5 mm 3 875 x 7 5 in 9 Envelope 98 4 x 225 4 mm 3 875 x 8 875 in 10 Envelope Com 10 104 8 x 241 3 mm 4 125 x 9 5 in DL ...

Страница 13: ...e from your software application Paper For the best print quality use 75 g m2 20 lb xerographic grain long paper The laser printing process heats paper to high temperatures of 170 C 338 F for non MICR applications Use only paper able to withstand these temperatures without discoloring bleeding or releasing hazardous emissions Check with the manufacturer or vendor to determine whether the paper you...

Страница 14: ...d papers with rough or heavily textured surfaces Printing on preprinted forms and letterhead Check with the manufacturer or vendor to determine whether the preprinted letterhead you have chosen is acceptable for laser printers Page orientation is important when printing on letterhead Use the following table for help when loading letterhead in the print media sources Print media source or process T...

Страница 15: ...sing hazardous emissions We recommend Lexmark laser printer transparencies part number 70X7240 for letter size transparencies part number 12A5010 for A4 size transparencies To prevent print quality problems avoid getting fingerprints on the transparencies Before loading transparencies fan the stack to prevent sheets from sticking together You can send transparencies to the standard output bin howe...

Страница 16: ...ous emissions If you have any doubts about the envelopes you are considering using check with the envelope supplier A combination of high humidity over 60 and the high printing temperatures may seal the envelopes Set the Paper Source to MP Feeder or Manual Env set the paper type to Envelope and select the correct envelope size from the printer driver or from MarkVision Load envelopes with the flap...

Страница 17: ...use label sheets with a slick backing material Do not print within 1 mm 0 04 in of the die cut Use full label sheets Partial sheets may cause labels to peel off during printing resulting in a jam Partial sheets also contaminate your printer and your cartridge with adhesive and could void your printer and cartridge warranties Use labels that can withstand temperatures of 205 C 401 F without sealing...

Страница 18: ...hat may release hazardous emissions when heated Do not use preprinted card stock manufactured with chemicals that may contaminate the printer Preprinting introduces semi liquid and volatile components into the printer We recommend the use of grain short card stock Storing print media Use the following guidelines for proper print media storage These help avoid paper feeding problems and uneven prin...

Страница 19: ...ted by the labels in the sources Do not use print media that you have cut or trimmed yourself Do not mix print media sizes weights or types in the same print media source Make sure the recommended print side is face down when loading all trays and the recommended print side is face up when loading the multipurpose feeder Keep print media stored in an acceptable environment See Storing print media ...

Страница 20: ... package Do not remove trays while a job prints Doing so may cause a jam Loading the standard tray and the optional 250 sheet tray The following instructions work for loading the standard tray or the tray for the optional 250 sheet drawer Your printer has one standard 250 sheet tray For the sizes and types of print media these trays support see Print media source specifications To load the tray fo...

Страница 21: ...Loading trays 21 Print media 3 Press down on the metal plate until it locks into place 4 Locate the tabs on both of the guides Tab Tab ...

Страница 22: ...he guide all the way to the right 7 Flex the sheets back and forth to loosen them then fan them Do not fold or crease the print media Straighten the edges on a level surface Hold the print media so the side you want to print on is face down and the front edge of the stack is toward the front of the tray For information on loading letterhead see Printing on preprinted forms and letterhead Length gu...

Страница 23: ...s easily under the metal stop and is not bent or wrinkled Do not raise the metal stop or force print media under it Note Do not exceed the maximum stack height indicated Overfilling the tray may cause jams 9 Squeeze the width guide tab and the width guide together and then slide the guide to the edge of the print media Metal stop Maximum stack height indicator ...

Страница 24: ...t media 10 Squeeze the length guide tab and the length guide together and then slide the guide to the edge of the print media Note Sliding the guides too tightly against the print media may cause misfeeds 11 Insert the tray ...

Страница 25: ...o position 2 1 Remove the tray completely 2 Remove any print media already in the tray 3 Turn the tray over 4 Using a coin push the media dial down and turn it from position 1 to position 2 5 Turn the tray over and load the appropriate print media as described in Loading the standard tray and the optional 250 sheet tray on page 20 If you are using print media that is 60 90 g m2 16 24 lb the media ...

Страница 26: ... optional 500 sheet tray The optional 500 sheet tray only accepts paper It has a special cover at the back of the tray to protect legal size paper from exposure to dust To load paper in the tray 1 Remove the tray completely 2 Raise the cover ...

Страница 27: ...Loading trays 27 Print media 3 Press down on the metal plate until it locks into place 4 Locate the tabs on both of the guides Tab Tab ...

Страница 28: ...lide the guide all the way to the right 7 Flex the sheets back and forth to loosen them then fan them Do not fold or crease the paper Straighten the edges on a level surface Hold the paper so the side you want to print on is face down and the front edge of the stack is toward the front of the tray For information on loading letterhead see Printing on preprinted forms and letterhead Length guide Wi...

Страница 29: ...s easily under the metal stop and is not bent or wrinkled Do not raise the metal stop or force paper under it Note Do not exceed the maximum stack height indicated Overfilling the tray may cause jams 9 Squeeze the width guide tab and the width guide together and then slide the guide to the edge of the paper Metal stop Maximum stack height indicator ...

Страница 30: ...dia 10 Squeeze the length guide tab and the length guide together and then slide the guide to the edge of the paper Note Sliding the guides too tightly against the paper may cause misfeeds 11 Close the cover 12 Insert the tray ...

Страница 31: ...s for a listing of supported types and sizes Note When printing from the multipurpose feeder be sure to set the Paper Size and Paper Type Follow these guidelines when using the multipurpose feeder Load only one size and type of print media at a time To achieve the best possible print quality use only high quality print media that is designed for use in laser printers To prevent jams do not add pri...

Страница 32: ...Loading and using the multipurpose feeder 32 Print media Opening the multipurpose feeder 1 Open the multipurpose feeder door 2 Pull the extension out ...

Страница 33: ...Loading and using the multipurpose feeder 33 Print media 3 Gently press down on the ridge The extension unfolds 4 Guide the extension down gently so the multipurpose feeder is extended fully Ridge ...

Страница 34: ... media you can load in the multipurpose feeder 1 Slide the width guide all the way to the right 2 Prepare print media for loading Note Do not load different sizes or types of print media at the same time Doing so may cause a jam Flex sheets of paper back and forth to loosen them then fan them Do not fold or crease the print media Straighten the edges on a level surface ...

Страница 35: ...side of the transparencies Be careful not to scratch them Fan envelopes back and forth to loosen them Do not fold or crease the envelopes Straighten the edges on a level surface 3 Do not exceed the maximum stack height by forcing print media under the stack height limiter The maximum stack height is 10 mm 0 4 in Overfilling could cause jams Stack height limiter ...

Страница 36: ...paper card stock and labels with the recommended print side face up and the top edge going in first Load letterhead with the logo face up and the top edge entering first Note If you load letterhead for duplex printing load the sheets with the logo face down and entering the printer last ...

Страница 37: ...ndows coated linings or self stick adhesives These envelopes may severely damage the printer Load envelopes with the flap side down and the stamp area going in last Note For best results peel and stick envelopes should exit to the rear output bin Open the rear output bin when printing on these envelopes Do not feed stamped envelopes The stamp and addresses are shown for envelope orientation only ...

Страница 38: ...8 Print media 5 Slide the print media in as far as it will go without damaging the print media 6 Slide the width guide to the left until it lightly touches the edge of the stack Make sure the print media fits loosely and is not bent or wrinkled ...

Страница 39: ...holds 250 sheets of print media The printer automatically sends print jobs to the standard output bin Print jobs collate face down in this bin Raising the paper rest The paper rest holds printed jobs to keep them from sliding out of the bin Pull the paper rest forward to raise it Standard output bin ...

Страница 40: ...ent sizes and types of print media such as paper transparencies postcards note cards and envelopes Labels and transparencies may print more successfully when sent to the rear output bin Envelopes may curl less if sent to the rear output bin Card stock must always exit to the rear output bin Print media that is 165 1 mm 6 5 in or less in length must exit to the rear output bin Note Legal size print...

Страница 41: ...Using the rear output bin 41 Print media To use the rear output bin 1 Grasp the tab as shown 2 Pull the door down ...

Страница 42: ...he rear output bin 42 Print media 3 Pull the extension straight out using the tab 4 Close the rear output bin door when you finish using it Note Make sure the door closes properly on both sides to prevent jams ...

Страница 43: ...hat print media travels through the printer The path varies depending on the input source trays and multipurpose feeder and output bin you are using Use the following table to locate instructions for a particular jam Note To avoid tearing print media pull all jams out gently and slowly Jam message Go to page 200 201 Paper Jam Remove Cartridge 44 202 Paper Jam Open Rear Door 46 23x Paper Jam duplex...

Страница 44: ...you may need to reach in farther to remove the jam 1 Open the upper front door 2 Remove the print cartridge See Removing the used print cartridge for instructions CAUTION The rear portion of the inside of the printer may be hot 3 Locate the jam inside the printer If most of the paper is visible gently pull the print media to the right and then out ...

Страница 45: ...ull the jam straight out and then up Note If the print media resists stop pulling and access it from the rear output bin door See 202 Paper Jam Open Rear Door to continue 4 Reinstall the print cartridge See Installing the new print cartridge for instructions 5 Close the upper front door ...

Страница 46: ...tely exiting into the standard output bin see Exiting to the standard output bin If the print media jams before reaching the standard output bin see Before reaching the standard output bin Exiting to the standard output bin 1 Gently pull the jam straight out 2 If the print media does not pull easily from here continue with Before reaching the standard output bin ...

Страница 47: ...int media jams before reaching the standard output bin 1 Open the rear output bin door 2 Gently remove the jam based on how much is visible If the middle of the sheet of print media is visible but not the ends grasp the print media on both sides and gently pull it straight out ...

Страница 48: ...Clearing jams 48 Print media If an end of the jam is visible pull it straight out 3 Close the rear output bin door by pushing it in the middle under the tab Note Make sure the door closes on both sides ...

Страница 49: ...n a duplex jam occurs one of three jam messages appears on the display depending on if the location of the jam is known or not 23x Paper Jam Remove Tray1 Pull Down Lever At Printer Front 1 Pull Tray 1 completely out 2 Look under the printer on the left side to locate a green lever 3 Push down on the green lever 4 Gently pull the jam toward you 5 Insert the tray Note Make sure the metal plate at th...

Страница 50: ...ou are unable to clear the jam from here continue with step 2 2 Pull Tray 1 completely out 3 Look under the back of the printer on the right side to locate a green lever 4 Push down on the lever 5 Gently pull the jam toward you 6 Insert the tray Note Make sure the metal plate at the bottom of the tray is locked down Lever Rear door ...

Страница 51: ...n the left side to locate a green lever 3 Push down on the green lever 4 Look for the jam If it is not visible from the front continue with step 6 5 Gently pull the jam toward you Note If the jam does not come out easily continue with step 6 6 Open the rear door and clear any jams If you are unable to clear the jam from here continue with step 7 7 Look under the back of the printer on the right si...

Страница 52: ...Clearing jams 52 Print media 8 Push down on the lever 9 Gently pull the jam toward you 10 Insert the tray Note Make sure the metal plate at the bottom of the tray is locked down Lever Rear door ...

Страница 53: ...heck Tray x Print media is jammed in the area under the print cartridge but the jam is not visible 1 Pull the specified tray out 2 Pull the jam straight out 3 Insert the tray Note Make sure the metal plate at the bottom of the tray is locked down ...

Страница 54: ...t has not completely exited the tray This can occur in any of the trays You need to check each tray 1 Pull the tray completely out 2 Reposition the print media under the metal stop Note If the sheet of print media is damaged remove it Do not reposition it 3 Press down on the print media until the metal plate below it locks into place 4 Insert the tray ...

Страница 55: ...Clearing jams 55 Print media 250 Paper Jam Check MP Feeder Pull the jam straight out ...

Страница 56: ...s Options or Setup depending on the application select the print media type and size and then select OK 6 Select OK or Print Printing from a Macintosh computer 1 Load print media See Loading trays 2 From your software application open the file you want to print 3 From the File menu choose Page Setup 4 Verify the correct printer is selected in the dialog box 5 From the Paper menu choose the print m...

Страница 57: ...lect File Æ Print 2 Click Properties or Options Printer or Setup depending on the application to view the printer driver settings 3 From the Setup tab select either Long Edge or Short Edge 4 Click OK 5 Click OK on the Print window to send the job to print Warning As the printer processes a duplex print job it partially ejects a sheet to the standard output bin and then pulls the sheet back inside ...

Страница 58: ...umbered pages The two values for Duplex Bind are Long Edge Assumes binding along the long end of the page left edge for portrait orientation and top edge for landscape orientation The following illustration shows long edge binding for portrait and landscape pages Short Edge Assumes binding along the short edge of the page top edge for portrait orientation and left edge for landscape orientation Th...

Страница 59: ...uter 1 Minimize all programs to display the desktop 2 Double click the My Computer icon 3 Double click the Printer icon A list of available printers appears 4 Double click the printer you are using to print the job A list of print jobs appears 5 Select the job you want to cancel 6 Press the Delete key From a Macintosh computer 1 Double click the printer icon on your desktop A list of print jobs ap...

Страница 60: ...and Paper Type settings print a menu settings page see Printing the menu settings and network setup pages Change the Paper Size and Paper Type settings on the operator panel so the settings match If you load the same size print media in each tray make sure the print media is all the same type also Disabling tray linking If you use different print media in the sources each source with a different p...

Страница 61: ... release Menu until either PCL Fonts or PS Fonts appears on the second line of the display Select PCL Fonts to print a listing of the fonts available to the PCL emulator Select PS Fonts to print a listing of the fonts available to the PostScript emulator Select PPDS Fonts to print a listing of the fonts available to the PPDS emulator This choice only appears when the PPDS emulation is enabled in t...

Страница 62: ... Italic Arial BoldMT Arial Bold Arial BoldItalicMT Arial Bold Italic AvantGarde Book ITC Avant Garde Book AvantGarde BookOblique ITC Avant Garde Book Oblique AvantGarde Demi ITC Avant Garde Demi AvantGarde DemiOblique ITC Avant Garde Demi Oblique Bookman Light ITC Bookman Light Bookman LightItalic ITC Bookman Light Italic Bookman Demi ITC Bookman Demi Bookman DemiItalic ITC Bookman Demi Italic Cla...

Страница 63: ...rrow Helvetica Narrow Helvetica Narrow Oblique Helvetica Narrow Italic Helvetica Narrow Bold Helvetica Narrow Bold Helvetica Narrow BoldOblique Helvetica Narrow Bold Italic Intl CG Times CG Times Intl CG Times Italic CG Times Italic Intl CG Times Bold CG Times Bold Intl CG Times BoldItalic CG Times Bold Italic Intl Univers Medium Univers Medium Intl Univers MediumItalic Univers Medium Italic Intl ...

Страница 64: ...o BoldItalic Palatino Bold Italic Symbol SymbolPS Symbol Times Roman Times Roman Times Italic Times Italic Times Bold Times Bold Times BoldItalic Times Bold Italic TimesNewRomanPSMT Times New Roman TimesNewRomanPS ItalicMT Times New Roman Italic TimesNewRomanPS BoldMT Times New Roman Bold TimesNewRomanPS BoldItalicMT Times New Roman Bold Italic Univers Univers Oblique Univers Bold Univers BoldObli...

Страница 65: ...ternational POSTNET Bar Code ISO 57 Chinese DeskTop ISO German ISO 60 Norwegian version 1 Legal ISO Spanish ISO 61 Norwegian version 2 MC Text ISO 2 IRV Int l Ref Version ISO 69 French Microsoft Publishing ISO 4 United Kingdom ISO 84 Portuguese Russian GOST ISO 6 ASCII ISO 85 Spanish Ukrainian ISO 10 Swedish ISO 8859 1 Latin 1 ECMA 94 PCL ITC Zapf Dingbats ISO 11 Swedish for Names ISO 8859 2 Latin...

Страница 66: ... 437T PC 860 Portugal Ventura International PC 8 Latin Greek PC 861 Iceland Ventura Math PC 8 PC Nova PC 863 Canadian French Ventura US PC 8 Polish Mazovia PC 865 Nordic Windows 3 0 Latin 1 PC 8 Code Page 437 PC 866 Cyrillic Windows Cyrillic PC 1004 OS 2 PC 869 Greece Windows Greek PC 775 Baltic PC 8 Latin 6 PC 911 Katakana Windows Latin 1 PC 850 Multilingual Math 8 Windows Latin 2 PC 851 Greece G...

Страница 67: ...o printer settings from a software application override changes made from the printer operator panel If you cannot change a setting from your application use the printer operator panel or the remote operator panel available from MarkVision Changing a printer setting from the printer operator panel or from MarkVision makes that setting the user default Section Page Using the operator panel 68 Using...

Страница 68: ...e status of your printer Buttons Use the five operator panel buttons to open a menu scroll through a list of values change printer settings and respond to printer messages The numbers 1 through 6 appear beside the operator panel buttons in this illustration You use these numbers to enter your personal identification number PIN after you send a confidential print job from the printer driver see Usi...

Страница 69: ...hen Ready is displayed to take the printer offline out of the Ready state and enter the menus When Busy is displayed to take the printer to the Job Menu When the printer is offline to scroll through the menus Press Menu to go to the previous item in the menus For menu items with numeric values such as Copies press and hold Menu to scroll through the values Release the button when the number you wa...

Страница 70: ...ibe a setting A numerical value that can be changed An On or Off setting 4 Press Menu to move to the value you need 5 Press Select to select the value on the second line of the operator panel An asterisk appears beside the value to indicate that it is now the user default setting The new setting appears for one second clears displays the word Saved and then displays the previous list of menu items...

Страница 71: ...u select from the operator panel Menus Disabled If your printer is configured as a network printer available to a number of users Menus Disabled may appear when you press Menu from the Ready state Disabling the menus prevents users from using the operator panel to inadvertently change a printer default that has been set by the person managing the printer You can still use Print and Hold features c...

Страница 72: ...rint Fonts Print Directory Factory Defaults Remove Held Jobs Format Flash Defragment Flash Hex Trace Quality Menu Print Resolution Toner Darkness PictureGrade Setup Menu Printer Language Power Saver Resource Save Download Target Print Timeout Wait Timeout Auto Continue Jam Recovery Page Protect Display Language Alarm Control Toner Alarm PCL Emul Menu Font Source Font Name Point Size Pitch Symbol S...

Страница 73: ...r for the job Manual Printer treats the multipurpose feeder like a manual feed tray and displays Load Manual when you need to insert a single sheet of paper in the feeder First Printer pulls paper from the multipurpose feeder until it is empty regardless of the paper source or paper size requested for the job Custom Types To specify the kind of paper associated with each of the Custom Types availa...

Страница 74: ... Colored Loading Custom x Loading Labels Loading Ltrhead Loading Preprint Loading Bond Loading 2 Select a value Duplex Notifies the printer that the specified paper type is loaded properly for duplex printing If the printer receives a single sided job using that paper type the printer inserts blank pages as necessary to print the job properly on preprinted forms This setting may slow single sided ...

Страница 75: ...or 500 sheet drawer B5 Folio 10 Envelope US 9 Envelope B5 Envelope Other Envelope 7 3 4 Envelope DL Envelope non US C5 Envelope Universal Select Universal when you load paper that does not match any of the other available sizes The printer automatically formats the page for the maximum possible size You can then set the actual page size from your application software Paper Source To identify the d...

Страница 76: ...ms to optimize print quality for your specific paper 1 Select a paper type Plain Texture Card Stock Text Trnsprncy Text Preprint Texture Colored Texture Custom x Texture Labels Texture Bond Texture Envelope Texture Ltrhead Texture 2 Select a value Smooth Note The default for Bond Texture is Rough instead of Normal If a user defined name is available for a custom Type then the name is displayed ins...

Страница 77: ...lues 1 Select a paper source Tray x Type Manual Pap Type MP Feeder Type Manual Env Type 2 Select a value Plain Paper Card Stock Transparency Labels Bond Letterhead Preprinted Custom Type x Envelope Colored Paper The Paper Type default for each envelope source is Envelope The Paper Type default for each paper tray is as follows Note If a user defined name is available it is displayed instead of Cus...

Страница 78: ...oaded Off Printer prompts the user to load the requested paper size Statement A5 Prints A5 size jobs on statement size paper if only statement size paper is loaded and prints statement size jobs on A5 paper if only A5 paper is loaded Letter A4 Prints A4 size jobs on letter size paper if only letter size paper is loaded and prints letter size jobs on A4 size paper if only A4 size paper is loaded Al...

Страница 79: ... by the Copies menu item For example if you set Copies to 2 and send three pages to print the printer prints page 1 page 2 page 3 page 1 page 2 page 3 Copies To set the number of copies you want for the printer default value Set the number of copies required for a specific job from the printer driver Values selected from the printer driver always override values selected from the operator panel 1 ...

Страница 80: ...e Order value you select Multipage Print To print multiple page images on one side of a sheet of paper Also called n up or Paper Saver Off Prints 1 page image per side 2 Up Prints 2 page images per side 3 Up Prints 3 page images per side 4 Up Prints 4 page images per side 6 Up Prints 6 page images per side 9 Up Prints 9 page images per side 12 Up Prints 12 page images per side 16 Up Prints 16 page...

Страница 81: ...Inserts a blank sheet between jobs Between Pages Inserts a blank sheet between each page of a job This is useful if you are printing transparencies or want to insert blank pages in a document for notes Separator Source To specify the paper source that holds separator sheets Tray x Tray 1 Selects separator sheets from the specified tray MP Feeder Selects separator sheets from the multipurpose feede...

Страница 82: ... Cancels the request to format the flash memory and leaves current resources stored in flash memory Hex Trace To help isolate the source of a print job problem With Hex Trace selected all data sent to the printer is printed in hexadecimal and character representation Control codes are not executed To exit Hex Trace turn the printer off or reset the printer from the Job Menu Print Directory To prin...

Страница 83: ...l job Enter PIN Use the operator panel buttons to enter the PIN associated with your confidential job 2 Then select a value Print All Jobs Prints all jobs associated with your PIN Print A Job Prints the specified confidential job Press Menu to scroll through the list of confidential jobs associated with your PIN Press Select to print a specific job Delete All Jobs Deletes all jobs associated with ...

Страница 84: ...ll through the list of held jobs Press Select to specify the job you want to print Press Menu to increase or decrease the number of copies and then press Select Print Buffer To print any data stored in the print buffer Note Print Buffer is only available when you enter the Job Menu while Waiting is displayed The Waiting state occurs if an incomplete job is sent to the printer or an ASCII job such ...

Страница 85: ...ue the sharper the clarity of printed characters and graphics 600 dpi Produces high quality output for print jobs that are mostly text 1200 Image Q Uses line screening for print jobs that contain bitmapped images such as scanned photos 2400 Image Q 1200 dpi Produces highest quality output for jobs where print speed is not important and memory is abundant Toner Darkness To lighten or darken text im...

Страница 86: ...nds the printer waits after displaying an operator intervention error message before it resumes printing Disabled Printer does not resume printing until someone clears the error message 5 255 Printer waits the specified amount of time and then automatically resumes printing This timeout value also applies if the menus are displayed and the printer is offline for the specified period of time Displa...

Страница 87: ...her the printer reprints jammed pages On Printer reprints jammed pages Off Printer does not reprint jammed pages Auto Printer reprints a jammed page unless the memory required to hold the page is needed for other printer tasks Page Protect To successfully print a page that may otherwise generate Complex Page errors If after selecting On you still cannot print the page you may also have to reduce t...

Страница 88: ...e printer Select 1 if your printer shares an electrical circuit with room lighting and you notice lights flickering Select a high value if your printer is in constant use Under most circumstances this keeps the printer ready to print with minimum warm up time Select a value between 1 and 240 minutes if you want a balance between energy consumption and a shorter warm up period Print Timeout To spec...

Страница 89: ...rinter languages during language changes and printer resets If the printer runs out of memory 38 Memory Full is displayed Toner Alarm To specify how the printer responds when it is low on toner Off An error message is displayed until someone replaces the toner cartridge If an Auto Continue value is selected from the Setup Menu the printer resumes printing after the specified timeout value Single P...

Страница 90: ...erforms a carriage return after a line feed control command Auto LF after CR To specify whether the printer automatically performs a line feed after a carriage return control command Off Printer does not perform a line feed after a carriage return control command On Printer performs a line feed after a carriage return control command Font Name To choose a specific font from the specified font sour...

Страница 91: ...h from 0 08 to 100 characters per inch cpi in increments of 0 01 cpi For nonscalable monospaced fonts the pitch is displayed but cannot be changed Note Pitch is only displayed for fixed or monospaced fonts 10 Point Size To change the point size for scalable typographic fonts 1 1008 in increments of 0 25 points Point size refers to the height of the characters in the font One point equals approxima...

Страница 92: ...r source Assign Tray x Assign MP Feeder Assign Man Env Assign Man Paper 2 Select a value Off Printer uses factory default paper source assignments 0 199 Select a numeric value to assign a custom value to a paper source None Paper source ignores the Select Paper Feed command Other Tray Renumber selections View Factory Def Press Menu to display the factory default value assigned to each paper source...

Страница 93: ... flash memory for the requested font before searching printer memory PDF Menu Use the PDF Menu within the PostScript Menu to change printer settings that only affect jobs using Portable Document Format PDF files See PDF Menu for more information Print PS Error To print a page defining the PostScript emulation error when an error occurs Off Discards the print job without printing an error message O...

Страница 94: ...CR after LF To specify whether the printer automatically performs a carriage return after a line feed control command Off Printer does not perform a carriage return after a line feed control command On Printer performs a carriage return after a line feed control command Auto LF after CR To specify whether the printer automatically performs a line feed after a carriage return control command Off Pr...

Страница 95: ... how text and graphics are oriented on the page Portrait Prints text and graphics parallel to the short edge of the paper Landscape Prints text and graphics parallel to the long edge of the paper Page Format Affects how the printer interprets the margins set from software applications Print Printer measures the margin settings from the inside edge of the left unprintable area and the bottom of the...

Страница 96: ...hardware initialization requests from the computer On Printer honors hardware initialization requests from the computer MAC Binary PS To configure the printer to process Macintosh binary PostScript print jobs On Printer processes raw binary PostScript print jobs from computers using the Macintosh operating system Note This setting often causes Windows print jobs to fail Off Printer filters PostScr...

Страница 97: ... edge of strobe PCL SmartSwitch To configure the printer so it automatically switches to PCL emulation when a print job received through the parallel port requires it regardless of the default printer language On Printer examines data on the parallel interface and selects PCL emulation if the data indicates that is the required printer language Off Printer does not examine the incoming data The pr...

Страница 98: ...int jobs from computers using the Macintosh operating system Note This setting often causes Windows print jobs to fail Off Printer filters PostScript print jobs using standard protocol Auto Printer processes print jobs from computers using either Windows or Macintosh operating systems Network Buffer To configure the size of the network input buffer Note Changing the Network Buffer menu item automa...

Страница 99: ...ncoming data The printer uses PostScript emulation to process the job if PS SmartSwitch is On or uses the default printer language specified in the Setup Menu if PS SmartSwitch is Off PS SmartSwitch To configure the printer so it automatically switches to PostScript emulation when a print job received through the network port requires it regardless of the default printer language On Printer examin...

Страница 100: ...g required for bidirectional communication following the conventions defined in the Network Printing Alliance NPA Protocol Note Changing this menu item automatically resets the printer Off Printer performs NPA processing If data is not in NPA format it is rejected as bad data On Printer does not perform NPA processing Auto Printer examines the data to determine the format and then processes it app...

Страница 101: ... before normal processing of incoming jobs resumes Auto Printer automatically calculates the USB Buffer size recommended setting 3K to maximum size allowed User specifies the USB Buffer size The maximum size depends on the amount of memory in your printer the size of the other link buffers and whether Resource Save is set to On or Off To maximize the range for the USB Buffer size disable or reduce...

Страница 102: ...clear Busy The printer is busy receiving processing or printing data Wait for the message to clear Press Menu to open the Job Menu and cancel the current job Canceling Job The printer is processing a request to cancel the current print job Wait for the message to clear See also Canceling a print job Change Tray x The printer is requesting different paper than what is loaded in the specified tray o...

Страница 103: ...equest to disable the menus Wait for the message to clear Note While the menus are disabled you cannot change the printer settings from the operator panel See also Disabling the operator panel menus Enabling Menus The printer is responding to a request to make the menus available to all users Wait for the message to clear then press Menu to view the menus from the operator panel See also Enabling ...

Страница 104: ... specified tray is either missing or not fully inserted into the printer Insert the specified tray completely into the printer Press Menu to open the Job Menu and cancel the current job Invalid Engine Code The printer engine code is not valid The printer cannot receive and process jobs until valid code is programmed into the engine Download valid code to the printer engine Note You can download en...

Страница 105: ...dential job Not Ready The printer is not ready to receive or process data Someone pressed Stop to take the printer offline Press Go to make the printer ready to receive jobs Performing Self Test The printer is running the series of start up tests it performs after it is turned on Wait for the message to clear Power Saver The printer is ready to receive and process data It is reducing its electrici...

Страница 106: ...nter is deleting one or more held jobs and sending one or more jobs to print Wait for the message to clear See also Using the Print and Hold function Queuing Jobs The printer is sending one or more held jobs to print Wait for the message to clear See also Using the Print and Hold function Ready The printer is ready to receive and process print jobs Send a job to print Ready Hex The printer is in H...

Страница 107: ...ontinue printing Note If you do not replace the cartridge you may experience print quality problems Tray x Missing The specified tray is either missing or not fully inserted into the printer Insert the tray completely into the printer See also Loading trays Waiting The printer has received a page of data to print but is waiting for an End of Job command a Form Feed command or additional data Press...

Страница 108: ...pecifications 35 Res Save Off Deficient Memory The printer lacks the memory needed to enable Resource Save This message usually indicates too much memory is allocated for one or more of the printer link buffers Press Go to disable Resource Save and continue printing To enable Resource Save after you get this message Make sure the link buffers are set to Auto and exit the menus to activate the link...

Страница 109: ...t 38 Memory Full The printer is processing data but the memory used to store pages is full Press Go to clear the message and continue printing the job The job may not print correctly Press Menu to open the Job Menu and cancel the current job To avoid this error in the future Simplify the print job by reducing the amount of text or graphics on a page and deleting unnecessary downloaded fonts or mac...

Страница 110: ...inter detects unformatted flash memory Press Go to clear the message and continue printing You must format the flash memory before you can store any resources on it If the error message remains the flash memory may be defective and require replacing 54 Std Network Software Error The printer cannot establish communications with an installed network port Press Go to clear the message and continue pr...

Страница 111: ...uled Maintenance The printer requires replacement of routine maintenance items to maintain top performance and avoid print quality and paper feed problems Replace the maintenance items and press Go to clear the message 88 Toner Low The printer has detected that the toner supply in the print cartridge is low If you do not have a print cartridge on hand order one now Shake the print cartridge to uti...

Страница 112: ...ction Page Printing the menu settings and network setup pages 113 Printing the Print Quality Test Pages 114 Printing PDF documents 114 Printing a directory list 115 Printing a confidential job 115 Using MarkVision to manage the printer 117 Using Hex Trace mode 117 ...

Страница 113: ...ntil you see Print Menus and then press Select The message Printing Menu Settings appears while the page prints The printer returns to the Ready message after the menu settings page prints If any other message appears when you print this page see Understanding the printer messages for more information If your printer has a network port an additional page prints to indicate more about network setti...

Страница 114: ...ormation current margin settings and a graphic to use to evaluate the print quality Two pages with graphics to use to evaluate how well the printer is capable of printing various types of graphics 4 Examine the pages to determine the quality of printing If there are problems see Solving print quality problems To exit these menus turn the printer off and then back on Printing PDF documents The Lexm...

Страница 115: ...l and choose to print or delete the job This ensures that the job does not print until you are there to retrieve it and no one else using the printer can print the job This will only work with the Lexmark custom drivers that came on the drivers CD which shipped with your printer 1 In your word processor spreadsheet browser or other application select File Æ Print 2 Click Properties If there is no ...

Страница 116: ...ial job The numbers next to the button names identify which button to press for each digit 1 6 As you enter the PIN asterisks appear on the display to ensure confidentiality If you enter an invalid PIN the message No Jobs Found Retry appears 2 Press Go to reenter the PIN or press Stop to exit the Confidential Job menu 3 Press Select to print your confidential jobs Your jobs print and are deleted f...

Страница 117: ...ace to help you determine if the language interpreter or the cable has a problem Hex Trace isolates printing problems by telling you what information your printer is receiving 1 Make sure the printer is on and the Ready message appears 2 Press and release Menu until you see Utilities Menu and then press Select 3 Press and release Menu until Hex Trace appears and then press Select To exit Hex Trace...

Страница 118: ...tup and maintenance of your printer Refer printing problems and maintenance tasks to this key operator In the U S contact Lexmark at 1 800 539 6275 for information about Lexmark Authorized Supplies Dealers in your area In other countries or regions visit the Lexmark Web site at www lexmark com or contact the place where you bought your printer Section Page Maintaining the printer 118 Determining t...

Страница 119: ...the status of consumables installed in your printer you can print the menu settings page from the Utilities Menu Press Menu until you see Utilities Menu and then press Select Press Menu until you see Print Menus and then press Select to print the menu settings page One or two pages print depending on the number of menu settings you have Look for Cartridge Information on the page the percentage of ...

Страница 120: ... on one side of a sheet Values for Multipage Print are 2 Up 3 Up 4 Up 6 Up 9 Up 12 Up and 16 Up Combined with the duplex setting Multipage Print lets you print up to 32 pages on one sheet of paper 16 images on the front and 16 on the back Multipage Print Duplex in the Finishing Menu Duplex printing is available when you attach the optional duplex unit It lets you print on both sides of a sheet of ...

Страница 121: ...8 Toner Low message comes on To use the remaining toner remove the print cartridge and then shake it gently back and forth You need to have a new print cartridge available when the current one no longer prints satisfactorily The recommended print cartridges specifically designed for your printer are Ordering a charge roll We recommend ordering a new charge roll when toner fog or background shading...

Страница 122: ...e original packaging until you are ready to install it Do not store the print cartridge in Temperatures greater than 40 C 104 F An environment with extreme changes in humidity or temperature Direct sunlight Dusty places A car for a long period of time An environment where corrosive gases are present An environment with salty air ...

Страница 123: ...mmend that you use print cartridges from a third party refiller Print quality and printer reliability cannot be guaranteed if you do For best results use genuine supplies Removing the used print cartridge 1 Turn the printer off 2 Open the upper front door 3 Grasp the print cartridge by the handle and lift it out 4 Set it aside Handle ...

Страница 124: ...transfer roller or the plastic sensors Installing the new print cartridge 1 Remove the cartridge packaging Remove the red plastic piece and foam Save the packaging and foam to return the used print cartridge For more information see Recycling Lexmark products Warning Do not touch the photoconductor drum on the bottom of the print cartridge Transfer roller Plastic sensor Plastic sensor Packaging Re...

Страница 125: ...Changing the print cartridge 125 Supplies and maintenance information 2 Hold the print cartridge by the handle and gently shake it side to side to distribute the toner Handle ...

Страница 126: ...t into the printer a Align the tabs on each side of the cartridge with the slots on each side of the print cartridge cradle b Slide the cartridge in until it snaps into place 4 Close the upper front door Make sure the door snaps closed on both sides or the printer will not function properly 5 Turn the printer on Cradle Tab ...

Страница 127: ...products 127 Supplies and maintenance information Recycling Lexmark products To return your Lexmark products to Lexmark for recycling 1 Visit our Web site www lexmark com recycle 2 Follow the instructions on your screen ...

Страница 128: ... ordering a charge roll 1 Turn the printer off and unplug the printer power cord 2 Open the upper front door 3 Remove the print cartridge 4 Locate the used charge roll above the area for the print cartridge 5 Locate the label with an arrow on the right side of the housing It is attached to the arm like tab 6 Push the right end of the charge roll down and towards the back of the printer to release ...

Страница 129: ...e charge roll 129 Supplies and maintenance information 7 Gently rotate the charge roll between your fingers and pull it to the right to remove it from the left tab 8 Pull the charge roll straight out of the printer ...

Страница 130: ...ove the new charge roll from its packaging Warning Do not remove the wrapper from the charge roll until you have installed it Touching the cylinder part without the wrapper contaminates the charge roll and affects printing 10 Insert the left side of the charge roll as shown ...

Страница 131: ...s and maintenance information 11 Push the right side of the charge roll up into the tab with the arrow label until it snaps into place Note You may need to hold the upper front door still while inserting the charge roll into the right side ...

Страница 132: ...d maintenance information 12 Remove the charge roll wrapper by pulling it off the roller and out of the printer 13 Reinstall the print cartridge and close the front door 14 Plug the printer power cord into a properly grounded electrical outlet ...

Страница 133: ...0 sheet drawer and or the 500 sheet drawer using the same method 1 Turn the printer power off 2 Unplug the printer power cord 3 Disconnect all cables from the back of the printer 4 Use the handholds to lift the printer off of the optional drawer and set the printer aside CAUTION Make sure your fingers are not under the printer when you set it down Handhold ...

Страница 134: ...er memory or firmware cards Note You will need a 2 Phillips screwdriver for this procedure Accessing the system board 1 Turn the printer off and unplug the printer power cord 2 Disconnect all cables from the back of the printer 3 Open the upper front door and multipurpose feeder door 4 Press the tabs on the front and top of the printer to release the side cover ...

Страница 135: ...away from the printer and then slide the cover toward the back of the printer to remove it 6 Loosen the five screws on the shield but do not remove them completely 7 Slide the shield to the left until the screws fit into the keyholes on the cover 8 Remove the shield and set it aside ...

Страница 136: ...hing metal on the printer before you touch an optional memory card 1 Remove the shield See Accessing the system board 2 Locate the optional memory card 3 Push the connector latches on both ends of the memory connector away from the memory card 4 Pull the memory card straight out of the memory connector 5 Place the memory card in its original packaging or wrap it in paper and store it in a box 6 Re...

Страница 137: ...inter before you touch an optional firmware card 1 Remove the shield See Accessing the system board 2 Locate the firmware card you want to remove 3 Grasp the firmware card gently and pull it straight out in one motion Do not pull one side and then the other 4 Place the card in its original packaging or wrap the card in paper and store it in a box 5 Reinstall the shield See Reinstalling the shield ...

Страница 138: ...emoving options 138 Supplies and maintenance information Reinstalling the shield 1 Align the five keyholes with five screws on the system board 2 Slide the shield to the right and then tighten the screws ...

Страница 139: ...es and maintenance information Reattaching the side cover 1 Align the three tabs on the back of the side cover with the slots on the printer 2 Align the tabs on the bottom of the side cover with the slots at bottom of the printer ...

Страница 140: ... making sure that the two tabs are in place and that the ridge on top of the side cover aligns with the ridge on the printer 4 Close the upper front door and multipurpose feeder door 5 Reconnect all cables on the back of the printer 6 Plug in the printer power cord and turn the printer on Tabs Ridge ...

Страница 141: ...Administration The following sections are for a network administrator in charge of the printer Section Page Disabling the operator panel menus 142 Restoring factory default settings 143 Using the Print and Hold function 144 ...

Страница 142: ...old functionality 2 Press and hold Select and Return and turn the printer on 3 Release the buttons when you see Performing Self Test Config Menu appears on the first line of the display 4 Press Menu until you see Panel Menus and then press Select Disable appears on the second line of the display 5 Press Select Locking Menus appears briefly 6 Press Menu until you see Exit Config Menus and then pres...

Страница 143: ... the Ready message appears 2 Press Menu until you see Utilities Menu and then press Select 3 Press Menu until you see Factory Defaults and then press Select Restore appears on the second line of the display 4 Press Select The message Restoring Factory Defaults appears followed by the Ready message When you select Restore No other button actions are available on the operator panel while Restoring F...

Страница 144: ...Selecting a user name All confidential and held jobs have a user name associated with them To access all held jobs or confidential jobs you must first select your user name from a list of user names for print jobs When the list is presented press Menu to scroll through the list Press Select once you find your user name for your job Printing and deleting held jobs Once held jobs are stored in print...

Страница 145: ...ll through the list of available jobs and press Select when the correct job is displayed An asterisk appears next to the job name indicating you have chosen to print or delete that job If you are prompted to enter the number of copies you want to print press Menu to increase or decrease the number on the display and then press Select 8 Press Go to print or delete specific jobs you have marked The ...

Страница 146: ...ut stores the job in memory so you can print the job later The job is held in memory until you delete it from the Held Jobs menu Reserve Print jobs may be deleted if the printer requires extra memory to process additional held jobs See Printing and deleting held jobs for information Verify Print If you send a Verify Print job the printer prints one copy and holds the remaining copies you requested...

Страница 147: ...nel to enter the four digit PIN associated with your confidential job The numbers next to the button names identify which button to press for each digit 1 6 As you enter the PIN asterisks are displayed to ensure confidentiality If you enter an invalid PIN the message No Jobs Found Retry appears Press Go to reenter the PIN or press Stop to exit the Confidential Job menu When you enter a valid PIN y...

Страница 148: ...breaker Other electrical equipment plugged into the outlet is working All options are properly installed If you have checked all of the above and still have a problem turn the printer power off wait for about 10 seconds and then turn the printer power on This often fixes the problem Note If any of these do not solve your problem see the other topics listed in Troubleshooting Section Page Solving b...

Страница 149: ...tact the Lexmark Customer Support Center at 1 859 232 3000 or http support lexmark com Menu settings changed from the operator panel have no effect Settings in the software application the printer driver or the printer utilities are overriding the settings made from the operator panel Change the menu settings from the printer driver the printer utilities or the software application instead of the ...

Страница 150: ...t down the right side of a page Job did not print or incorrect characters printed Make sure Ready appears on the operator panel before you send a job to print Press Go to return to Ready Make sure print media is loaded in the printer See Loading trays and Loading and using the multipurpose feeder Press Continue Verify that the printer is using the correct printer language Verify that the correct p...

Страница 151: ...he print media Load a print media source only when it is empty Job prints from the wrong source or on the wrong print media Check the Paper Type setting in the printer driver or on the operator panel Print media does not stack neatly in an output bin Turn the print media stack over in the tray or multipurpose feeder Lift the paper rest in the standard output bin The print media stacks more neatly ...

Страница 152: ...ck height indicator Make sure the paper is under the paper stop See Loading trays Make sure the width and length guides on the print media sources are adjusted correctly and are not too tight Remove the paper from the optional tray 2 and fan it 250 sheet tray only Make sure the tray s media dial is in the correct position for the weight of paper you are using See Loading print media over 90 g m2 2...

Страница 153: ...y 6 Press Select SAVED appears briefly 7 Press Menu until you see Exit Config Menus and then press Select Performing Self Test will reappear The printer returns to Ready state The paper is curled once it exits the printer Use paper that is sealed in its original packaging Turn the paper over Rotate the paper 180 degrees If you are printing a multi page job try duplexing it When printing on heavy m...

Страница 154: ...o the Card Stock Label Guide available on the Lexmark Web site at www lexmark com for detailed specifications The printer detects a print cartridge error Replace it Make sure print media you load in the sources is not damp Toner smudges appear on the front or back of the page Make sure the print media is straight and unwrinkled Replace the used print cartridge with a new one Toner is on the transf...

Страница 155: ... the print cartridge for instructions The Toner Low message is displayed Remove the print cartridge and shake it from side to side to redistribute the toner to extend the life of the cartridge and then reinstall it See Changing the print cartridge for an illustration of how to shake the cartridge Replace the used cartridge with a new one See Changing the print cartridge for instructions Solid blac...

Страница 156: ...i If you are using downloaded fonts verify that the fonts are supported by the printer the host computer and the software application Resolution was automatically reduced Reduce the complexity of the print job or add printer memory The job prints but the left and top margins are incorrect Make sure the Paper Size setting in the Paper Menu is correct Make sure the margins are set correctly in your ...

Страница 157: ...d verify that it is installed correctly Toner fog or background shading appears on the page Check the print cartridge to make sure it is installed correctly See Changing the print cartridge for more information Change the print cartridge See Changing the print cartridge for more information If the problem continues change the charge roll See Replacing the charge roll for more details Unexpected ch...

Страница 158: ...ter power on If this does not fix the problem unplug the printer and check the connection between the option and printer Make sure the option is installed and selected in the printer driver you are using For Macintosh users Make sure the printer is set up in Chooser Optional drawer Make sure the connection between the optional drawer and the printer is secure Refer to the Setup Guide Make sure the...

Страница 159: ... and report a description of the problem Problem Solution Job did not print or incorrect characters printed If you are using a Lexmark print server verify that it is set up properly and the network cable is connected Note Refer to the documentation that came with your print server for more information For Novell users Make sure the netware drv file is dated October 24 1994 or later Make sure the N...

Страница 160: ...of their respective owners Section Page Trademarks 160 Licensing notice 161 Laser notice 161 Electronic emission notices 161 Printer energy consumption 162 Albertus The Monotype Corporation plc Antique Olive Monsieur Marcel OLIVE Apple Chancery Apple Computer Inc Arial The Monotype Corporation plc Candid Agfa Corporation CG Omega Product of Agfa Corporation CG Times Based on Times New Roman under ...

Страница 161: ...t to the following two conditions 1 this device may not cause harmful interference and 2 this device must accept any interference received including interference that may cause undesired operation The FCC Class B limits are designed to provide reasonable protection against harmful interference in a residential installation This equipment generates uses and can radiate radio frequency energy and if...

Страница 162: ...rs to promote the introduction of energy efficient products and to reduce air pollution caused by power generation Companies participating in this program introduce products that power down when they are not being used This feature will cut the energy used by up to 50 percent Lexmark is proud to be a participant in this program As an ENERGY STAR Partner Lexmark International Inc has determined tha...

Страница 163: ...tal energy usage It is sometimes helpful to calculate the total printer energy usage Since power consumption claims are provided in power units of Watts the power consumption should be multiplied by the time the printer spends in each mode in order to calculate energy usage The total printer energy usage is the sum of each mode s energy usage ...

Страница 164: ...8 capacity 10 guidelines 18 loading 36 supported source 10 card stock exiting to rear output bin 40 characteristics print media letterhead 14 characters jagged 156 charge roll replacing 128 cleaning the printer 124 clearing jams 43 possible jam areas 43 Collation Finishing Menu 79 collation enabling 79 complex page errors 87 Confidential Job Job Menu 83 confidential jobs 115 entering a PIN 115 ent...

Страница 165: ...w 80 Separator Sheets 81 Separator Source 81 flash memory defragmenting 81 formatting 82 printing downloaded resources 82 setting as download target 87 Font Name PCL Emul Menu 90 Font Priority PostScript Menu 93 font samples printing 61 Font Source PCL Emul Menu 90 font support PCL emulation 61 PostScript emulation 61 fonts choosing in PCL emulation 90 printing font samples 61 printing sample list...

Страница 166: ...der 36 standard tray 20 transparencies 37 loading print media multipurpose feeder 34 optional 250 sheet tray 20 optional 500 sheet tray 26 standard tray 20 logo 36 M MAC Binary PS Network Menu 98 MAC Binary PS Parallel Menu 96 MAC Binary PS USB Menu 100 maintaining the printer 118 cleaning the printer 124 ordering a print cartridge 121 print cartridge installing a new one 124 storing 122 maintenan...

Страница 167: ...ecified bin 106 Res Reduced 106 Resetting Maint Cnt Value 106 Resetting the Printer 107 Restoring Factory Defaults 107 Std Bin Full 107 Toner Low 107 Tray x Missing 107 Waiting 107 Multipage Border Finishing Menu 80 Multipage Order Finishing Menu 80 multipage print border settings 80 configuring 80 order settings 80 view settings 80 Multipage Print Finishing Menu 80 Multipage View Finishing Menu 8...

Страница 168: ...0 sheet tray 20 optional 500 sheet tray 26 optional label tray 20 standard tray 20 paper exits 39 rear output bin 40 standard output bin 39 paper jams clearing 43 paper path 43 preventing 19 reprinting jammed pages 87 paper loading optional 250 sheet tray 20 Paper Loading Paper Menu 74 Paper Menu 73 Configure MP 73 Custom Types 73 Paper Loading 74 Paper Size 75 Paper Source 75 Paper Texture 76 Pap...

Страница 169: ...ize 91 symbol set 91 tray renumber 92 95 PCL emulation font support 61 PCL SmartSwitch Network Menu 99 PCL SmartSwitch Parallel Menu 97 PCL SmartSwitch USB Menu 100 PCL SmartSwitch setting See also printer language network port 99 parallel port 97 USB port 100 PDF Menu PostScript Menu 93 personal identification number See PIN photoconductor kit recycling 127 PictureGrade Quality Menu 85 PIN enteri...

Страница 170: ...lope 12 A4 12 A5 12 B5 12 C5 12 DL 12 executive 12 folio 12 JIS B5 12 legal 12 letter 12 paper 12 statement 12 universal 12 sources 10 storing 18 transparencies guidelines 15 loading in multipurpose feeder 37 loading in standard tray 20 type incorrect 151 print media jams avoiding 19 clearing 43 print media types card stock 11 envelopes 11 labels 11 paper 10 11 transparencies 11 print media specif...

Страница 171: ...dware statistics 82 printing duplex from multipurpose feeder 57 from trays 57 font samples 61 on two sides from multipurpose feeder 57 from trays 57 printing problems solving missing or damaged parts 151 multiple sheets feed 151 optional 250 sheet tray paper feed failure 152 optional 500 sheet tray paper feed failure 152 Paper Jam message displayed jam is cleared 152 print media buckles 151 print ...

Страница 172: ...allel Menu 97 PS SmartSwitch USB Menu 101 PS SmartSwitch setting See also printer language 89 network port 99 parallel port 97 USB port 101 Q Quality Menu 85 PictureGrade 85 Print Resolution 85 Toner Darkness 85 Quick Reference Help Menu 101 R rear output bin card stock exiting to 40 using 40 recycling supplies 127 reinstalling shield on system board 138 Remove Held Jobs Utilities Menu 82 removing...

Страница 173: ...ut print 88 wait 89 toner alarm 89 Toner Alarm Setup Menu 89 toner cartridge recycling 127 Toner Darkness Quality Menu 85 toner fog 157 transparencies 15 loading 37 tray linking 60 tray dial 25 Tray Renumber PCL Emul Menu 92 95 troubleshooting clearing operator panel error messages 69 display problems 149 network problems incorrect characters printing 159 job not printing 159 option problems does ...

Страница 174: ...print media buckles 151 print media skews 151 print media skews or buckles 151 print media stacking is messy 151 print media sticks 151 printer on nothing prints 151 standard tray paper feed failure 152 upper front door will not close 151 USB port 151 wrong source 151 stopping printer 69 U uneven edges 156 Universal Setup Paper Menu 78 USB Buffer USB Menu 101 USB cable part number 150 USB Menu 100...

Отзывы: