background image

EXT

LINE

To connect:

Connect the cable from the wall jack to the   port of the printer.

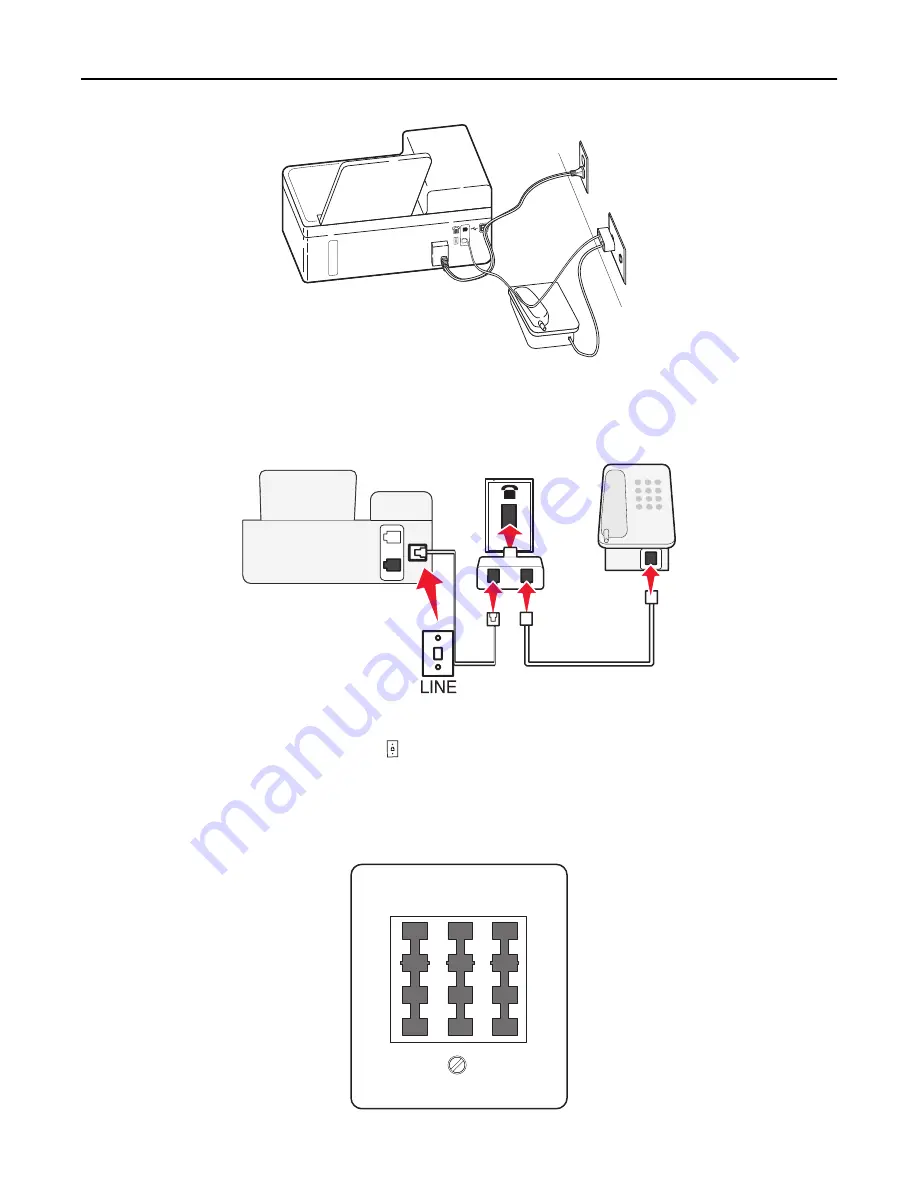
Connecting the printer to a wall jack in Germany

The German wall jack has two kinds of ports. The N ports are for fax machines, modems, and answering machines. The
F port is for telephones.

N F N

Faxing

72

Содержание Interpret S415

Страница 1: ...S410 Series User s Guide October 2011 www lexmark com Machine type s 4448 Model s S410 Series 401 40E ...

Страница 2: ...ntrol panel buttons and menus 17 Replacing the language sheet 17 Using the printer control panel 18 Changing the Sleep timeout 20 Saving paper and energy 20 Restoring factory default settings 21 Using the printer software 22 Minimum system requirements 22 Using the Windows printer software 22 Using the Macintosh printer software 24 Finding and installing optional software 25 Updating the printer s...

Страница 3: ...darker 50 Collating copies using the printer control panel 50 Placing separator sheets between copies 50 Copying multiple pages on one sheet 51 Placing an overlay message on each page 51 Removing the background of a copy 51 Making a two sided duplex copy 52 Canceling copy jobs 53 Scanning 54 Tips for scanning 54 Scanning to a local computer 54 Scanning to a network computer 55 Scanning to a flash ...

Страница 4: ...ng FAQ 104 Maintaining the printer 117 Maintaining ink cartridges 117 Cleaning the exterior of the printer 118 Cleaning the scanner glass 119 Moving the printer to another location 119 Troubleshooting 121 Before you troubleshoot 121 If Troubleshooting does not solve your problem 121 Setup troubleshooting 121 Understanding printer messages 126 Jams and misfeeds troubleshooting 133 Print troubleshoo...

Страница 5: ...Edition notice 162 Power consumption 166 Index 176 Contents 5 ...

Страница 6: ...gned tested and approved to meet strict global safety standards with the use of specific manufacturer s components The safety features of some parts may not always be obvious The manufacturer is not responsible for the use of other replacement parts CAUTION POTENTIAL INJURY Do not cut twist bind crush or place heavy objects on the power cord Do not subject the power cord to abrasion or stress Do n...

Страница 7: ...act even further Conserving energy Activate Eco Mode This feature sets the screen brightness to low and sets the printer to change to Sleep mode after the printer is left idle for 10 minutes Select the lowest Sleep timeout The Sleep feature puts the printer in a minimum power standby mode after the printer has been idle for a set amount of time the Sleep timeout Share your printer Wireless network...

Страница 8: ...tructions to request a postage paid bag Recycle the product packaging Recycle your old printer instead of throwing it away Recycle paper from discarded print jobs Use recycled paper To read the Lexmark Environmental Sustainability Report see www lexmark com environment Note Your printer may not come with some of these programs or some of the functions of these programs depending on the features of...

Страница 9: ...ons information Help using the printer software Windows or Mac Help Open a printer software program or application and then click Help Click to view context sensitive information Notes The Help installs automatically with the printer software The printer software is located in the printer program folder or on the desktop depending on your operating system The latest supplemental information update...

Страница 10: ... Statement of Limited Warranty included with this printer or at http support lexmark com In other countries or regions See the printed warranty that came with your printer Note Your printer may not come with some of these programs or some of the functions of these programs depending on the features of the printer that you purchased Understanding the parts of the printer 5 6 7 8 9 11 12 1 2 10 4 3 ...

Страница 11: ...exit tray Hold paper as it exits 11 Tray extension Keep paper in place as it exits 12 PictBridge and USB port Connect a PictBridge enabled digital camera or a flash drive to the printer 13 ADF paper guide Keep paper straight when feeding it into the ADF Note Adjust the paper guide on the ADF tray to the width of the original document 14 15 16 17 18 19 20 21 22 23 24 Use the To 14 Scanner cover Acc...

Страница 12: ... you to access the phone line to send and receive faxes 19 Power supply with port Connect the printer to the power cord 20 Duplex unit Print on both sides of a sheet of paper Clear paper jams 21 Printhead access area Install the printhead Note The carrier moves to the printhead access area when no printhead is installed in the printer 22 Jam clearance cover Access and clear paper jams 23 Ink cartr...

Страница 13: ...lack cartridge 160 Not available High yield black cartridge 160XL 160XLA Yellow color cartridge 160 Not available High yield yellow color cartridge 160XL 160XLA Cyan color cartridge 160 Not available High yield cyan color cartridge 160XL 160XLA Magenta color cartridge 160 Not available High yield magenta color cartridge 160XL 160XLA 1 Licensed for a single use only After use return this cartridge ...

Страница 14: ...es Lexmark s warranty does not cover damage caused by non Lexmark ink or ink cartridges Replacing ink cartridges Make sure you have a new ink cartridge or cartridges before you begin You must install new cartridges immediately after removing the old ones or the ink remaining in the printhead nozzles may dry out Removing ink cartridges 1 Turn on your printer 2 Open the printer Note The printhead mo...

Страница 15: ...l the cartridge clicks into place 1 2 3 Notes Insert the color cartridges first and then the black cartridge Insert the new ink cartridges immediately after removing the protective cap to avoid exposing the ink to air 3 Close the printer Ordering paper and other supplies To order supplies or to locate a dealer near you visit our Web site at www lexmark com Item Part Number USB cable 1021294 For mo...

Страница 16: ... to www lexmark com Recycling Lexmark products To return Lexmark products for recycling 1 Visit our Web site at www lexmark com recycle 2 Find the product type you want to recycle and then select your country or region from the list 3 Follow the instructions on the computer screen Note Printer supplies and hardware not listed in a Lexmark collection program may be recycled through your local recyc...

Страница 17: ... that came with the printer 2 If necessary insert the paper exit tray into the printer 3 Press the latch under the printer control panel to release it and then push the panel back to its shipping position 2 1 4 Open the printer 5 Remove the language sheet holder from the printer control panel xxxx xx xxxxxxxx xxxx xx xxxxx xxxxxxxx xxxx xx xxxxx xxxxxxxx xxxx xx xxxxxxxx 1 2 6 Insert the preferred...

Страница 18: ...nter on and off Switch to Sleep mode Note When the printer is on press to switch to Sleep mode Press and hold for three seconds to turn off the printer 2 Display Note The display is turned off in Sleep mode View Printer status Messages Menus 3 Arrow buttons Navigate through menu items that appear on the display 4 Home Return to the home screen Using the printer control panel buttons and menus 18 ...

Страница 19: ... to a higher one 7 Select OK Select menu options Save settings 12 13 15 8 9 10 11 14 16 17 Use To 8 Redial Display the last number dialed Press the left or right arrow button to view the last five numbers dialed 9 Pause Insert a three second pause in a fax number to wait for an outside line or get through an automated answering system Enter a pause only when you have already begun entering the num...

Страница 20: ...e it takes for the printer to switch to Sleep mode when the printer is left idle The Sleep feature optimizes energy efficiency by reducing the printer power consumption To save the most energy select the lowest Sleep timeout 1 From the printer control panel navigate to Setup OK Device Setup OK Sleep OK 2 Press the up or down arrow button to select or use the keypad to enter the value of the Sleep ...

Страница 21: ... for printing in Windows and Macintosh depending on your printer model Restoring factory default settings Resetting to factory default settings will delete all the printer settings you have previously selected 1 From the printer control panel navigate to Setup OK Restore Factory Defaults OK 2 Press the up or down arrow button to scroll to Restore All Printer Settings and then press OK 3 Press the ...

Страница 22: ...or later Ubuntu Linux 11 04 10 10 10 04 and 9 04 LTS Red Hat Enterprise Linux WS 6 WS 5 and WS 4 Red Flag Linux Desktop 6 0 SUSE Linux Enterprise Server 11 and 10 SUSE Linux Enterprise Desktop 11 and 10 Linux openSUSE 11 4 11 3 and 11 2 Linpus Linux Desktop 9 6 Fedora 14 Debian GNU Linux 6 0 and 5 0 Mint 10 and 9 PCLinux OS 2010 The printer driver for this operating system is available only at htt...

Страница 23: ... a document and produce text that you can edit with a word processing program Lexmark Wireless Setup Utility referred to as Wireless Setup Utility Set up the wireless printer on a wireless network Change the wireless settings of the printer Note This program is installed automatically with the printer software if the printer has wireless capability Lexmark Tools for Office referred to as Tools for...

Страница 24: ...print jobs With a document or photo open choose File Print Launching an application 1 From the Finder navigate to Applications select your printer folder 2 Double click the application that you want to use Use the To Printer Settings Customize settings for fax jobs Create and edit the Contacts list Configure e mail connectivity settings Configure the language country date and time Shortcuts Speed ...

Страница 25: ...rinter Visit Lexmark SmartSolutions Visit the SmartSolutions Web site Choose your custom solutions Note Your printer may not come with these Web links depending on the features of the printer that you purchased Finding and installing optional software For Windows users 1 Click or Start 2 Click All Programs or Programs and then select the printer program folder from the list 3 Navigate to Printer H...

Страница 26: ...rinter model to view compatible drivers Reinstalling the printer software When you set up the printer using the installation software CD all the necessary software was installed If you encountered problems while installing or if your printer does not appear in the printers folder or as a printer option when you send a print job then try uninstalling and reinstalling the printer software Uninstalli...

Страница 27: ...D drive c Press Enter or click OK 3 Click Install and then follow the instructions on the computer screen For Macintosh users Note To take advantage of the full features of your printer select the custom install option and then select all packages listed 1 Close all open applications 2 Insert the installation software CD If the installation dialog does not appear after a minute then click the CD i...

Страница 28: ...sen them Do not fold or crease the paper Straighten the edges of the stack on a level surface 2 Open the paper feed guard 3 Place the paper at the center of the paper support Note Use the indicators on the paper support when loading smaller size paper Loading paper and original documents 28 ...

Страница 29: ...per guides 5 Close the paper feed guard 6 From the printer control panel select or confirm your paper settings Paper and specialty media guidelines Load up to Make sure that 100 sheets of plain paper The paper guides rest against the edges of the paper You load letterhead paper with the printable side faceup and the top of the letterhead going into the printer first Loading paper and original docu...

Страница 30: ... metal clasps string ties or metal folding bars Notes Do not load envelopes with holes perforations cutouts or deep embossing Do not use envelopes that have exposed flap adhesive 25 sheets of labels The printable side of the label is faceup The paper guides rest against the edges of the paper Note Draft mode is available but is not recommended for use with expensive paper such as heavyweight matte...

Страница 31: ...transfer Note For best results load transfers one at a time 50 transparencies The rough side of the transparencies is faceup The paper guides rest against the edges of the transparencies You remove any paper backing sheets from the transparencies before loading You load A4 or letter size transparencies If the transparencies have a removable strip then each strip faces up Note Transparencies requir...

Страница 32: ...he ADF You can load up to 35 sheets of an original document into the ADF for scanning copying and faxing You can load A4 letter or legal size paper into the ADF 1 Adjust the paper guide on the ADF tray to the width of the original document 2 Load the original document faceup and top edge first into the ADF until you hear a sound from the ADF Loading paper and original documents 32 ...

Страница 33: ...2 Click Properties Preferences Options or Setup 3 Select the print quality the number of copies to print the type of paper to use and how the pages should print 4 Click OK to close any printer software dialogs 5 Click OK or Print For Macintosh users 1 With a document open choose File Page Setup 2 From the Page Setup dialog set the printer paper size and orientation 3 Click OK 4 From the menu bar c...

Страница 34: ...te to Layout tab Copies area 4 Enter the number of copies that you want to print and then select Collate 5 Click OK to close any printer software dialogs 6 Click OK or Print For Macintosh users 1 With a document open choose File Page Setup 2 From the Page Setup dialog set the printer paper size and orientation 3 Click OK 4 From the menu bar choose File Print 5 From the Printer pop up menu choose y...

Страница 35: ...lick Print Printing multiple pages on one sheet For Windows users 1 With a document open click File Print 2 Click Properties Preferences Options or Setup 3 Navigate to Layout tab Page Layouts area select Multiple pages per side N Up 4 Select the number of page images to print on each side 5 Adjust other settings as needed 6 Click OK to close any printer software dialogs 7 Click OK or Print For Mac...

Страница 36: ...out tab Page Orientation area select an orientation 6 Click OK to close any printer software dialogs 7 Click OK or Print For Macintosh users 1 With a document open choose File Page Setup 2 From the Format for pop up menu choose your printer 3 From the Paper Size pop up menu choose your envelope size If no size matches the envelope size then set a custom size 4 Select an orientation and then click ...

Страница 37: ...nd adjust the settings as needed to create a custom size and then click OK 5 Navigate to Paper type list select the created custom type 6 Click OK to close any printer software dialogs 7 Click OK or Print For Macintosh users 1 With a document open choose File Page Setup 2 From the Format for pop up menu choose your printer 3 From the Paper Size pop up menu choose your paper size If no paper size m...

Страница 38: ...software dialogs 6 Click OK or Print For Macintosh users 1 With a document open choose File Page Setup 2 From the Format for pop up menu choose your printer 3 From the Paper Size pop up menu choose Manage Custom Sizes 4 Adjust the settings as needed to create a custom size and then click OK 5 Click OK 6 From the menu bar choose File Print 7 From the printer pop up menu choose your printer 8 Click ...

Страница 39: ...printer does not recognize the memory device then remove and reinsert it Printing photos from a flash drive 1 Load photo paper 2 Insert a flash drive or digital camera set to mass storage mode 3 Use the up or down arrow button to select a photo printing option and then press OK Select and Print allows you to choose a layout the number of photos per page paper settings photo size photo quality and ...

Страница 40: ...the memory device or the printer in the areas shown while actively printing reading or writing from the memory device A loss of data can occur 3 If the PictBridge connection is successful then the following message appears on the display Use PictBridge Device to choose and print photos Press OK to select printer default settings 4 If you want to change the default print settings a Press OK to acce...

Страница 41: ...at are bound along the long edge of the page Click Short edge for print jobs with pages that are bound along the short edge of the page 4 Click the Paper Finishing tab and then select a supported paper type 5 Click OK to close any printer software dialogs 6 Click OK or Print To return to single sided printing repeat steps 1 and 2 and then navigate to Layout tab Print on Both Sides Duplex area Prin...

Страница 42: ...ter control panel navigate to Setup OK Print Mode Setup OK Page Dry Time OK 2 Press the up or down arrow button to scroll to the dry time setting you want and then press OK Note The dry time varies depending on the print quality selected for the print job Select Extended to extend the dry time for your prints Using the printer software For Windows users 1 Click File Print 2 Click Properties Prefer...

Страница 43: ...rinter model or the printer nickname assigned when installing or adding the printer Note Several print queues may appear in the list depending on how the printer is connected USB Ethernet wireless Make sure you know how your printer is connected to the computer to be able to select the correct print queue For Windows users 1 Open the printers folder a Click or click Start and then click Run b In t...

Страница 44: ...to rename the printer 4 Click Add Setting your printer as the default printer Your printer should be selected automatically from the Print dialog when you send a print job If you have to manually select your printer then it is not the default printer To set the default printer For Windows users 1 Click or click Start and then click Run 2 In the Start Search or Run box type control printers 3 Press...

Страница 45: ...pop up menu choose Quality Media 4 From the Print Quality pop up menu choose a print quality 5 Click OK Pausing print jobs For Windows users 1 Click or click Start and then click Run 2 In the Start Search or Run box type control printers 3 Press Enter or click OK The printers folder opens 4 Right click the printer and then select Open or See what s printing 5 Pause the print job If you want to pau...

Страница 46: ...Printers The print queue dialog appears 3 Resume the print job If you want to resume a particular print job then choose the document name and then click Resume If you want to resume all print jobs in the queue then click Resume Printer or Start Jobs Canceling print jobs To cancel a print job from the printer control panel press To cancel a print job from the computer do the following For Windows u...

Страница 47: ...inter model you may need to download the LexPrint Listener application from our Web site at www lexmark com lexprint Supported printers LexPrint enables your mobile device to communicate with Lexmark printers found on the same network For selectprinter modelsthatsupport DirectImageandZeroconforBonjour you canprint directly from your mobile device to the printer without using LexPrint Listener To c...

Страница 48: ... the scanned image Do not load postcards photos small items transparencies photo paper or thin media such as magazine clippings into the ADF Place these items on the scanner glass Make sure the paper exit tray is fully extended When the document to be copied is in place with the settings you want press to start copying Making copies 1 Load paper 2 Load an original document faceup into the ADF or f...

Страница 49: ...oad paper 2 Load the original document facedown on the scanner glass 3 From the printer control panel navigate to Copy OK Scale 4 Press the left or right arrow button to scroll to the Scale setting you want Notes If you select Custom then press OK and then press the left or right arrow button to select a custom percent value Press OK to save the setting If you select Borderless then the printer wi...

Страница 50: ...o print each copy as a set collated or to print the copies as groups of pages not collated Collated Not collated 1 Load paper 2 Load the original document faceup into the ADF or facedown on the scanner glass 3 From the printer control panel navigate to Copy OK Copies 4 Press the left or right arrow button to select the number of copies 5 Press the up or down arrow button until Collate appears 6 Pr...

Страница 51: ...navigate to Copy OK Pages per Side 4 Press the left or right arrow button to select the paper orientation and the number of pages that you want to copy on a sheet of paper You may print up to four page images on one sheet 5 Press Placing an overlay message on each page 1 Load paper 2 Load the original document faceup into the ADF or facedown on the scanner glass 3 From the printer control panel na...

Страница 52: ...ded If you want to specify the page orientation and layout of the original document and the copy then press the arrow buttons to scroll to Advanced Press OK every time you make a selection and then press until you reach the Copy menu screen Notes For long edged binding pages are bound along the long edge of the page left edge for portrait orientation and top edge for landscape orientation For shor...

Страница 53: ...ge faceup into the ADF or facedown on the scanner glass If you are copying a two sided document then flip the original document and then reload it faceup into the ADF or facedown on the scanner glass 9 Remove the paper from the paper exit tray and then reload the paper with the top edge first to print the other side of the document Make sure the printable side of the paper is faceup 10 Press Cance...

Страница 54: ...k edges on the scanned image Do not load postcards photos small items transparencies photo paper or thin media such as magazine clippings into the ADF Place these items on the scanner glass When the document to be scanned is in place with the settings you want press to start scanning Scanning to a local computer 1 Load the original document faceup into the ADF or facedown on the scanner glass 2 Fr...

Страница 55: ...lection 5 Press Note For Macintosh users you may need to enable scanning to your computer through Image Capture to scan documents using a network printer and save the scan output Scanning to a flash drive or memory card Notes Some features are available only in select printer models Make sure your flash drive or memory card is not write protected 1 Load the original document faceup into the ADF or...

Страница 56: ... application that supports your printer and lets you work with photos such as Image Capture 3 From the list of devices select your printer Note For information on finding the list of devices check the documentation that came with the application or search for Scanning an image in the Search field of the Help menu 4 Adjust the scan settings as needed If applicable click on the preview dialog for mo...

Страница 57: ...From the list of devices select your printer Note For information on finding the list of devices check the documentation that came with the application or search for Scanning an image in the Search field of the Help menu 4 Adjust the scan settings as needed If applicable click on the preview dialog for more information 5 Set the OCR software as the scan destination and then start the scan job 6 If...

Страница 58: ...r printer Note For information on finding the list of devices check the documentation that came with the application or search for Scanning an image in the Search field of the Help menu 4 Adjust the scan settings as needed If applicable click on the preview dialog for more information 5 Set the e mail application as the scan destination and then start the scan job 6 Compose your e mail message Sca...

Страница 59: ...ning a photo to edit it then make sure you choose a photo editing application to receive the scan If you are scanning a document to edit the text then make sure you choose an OCR application Use a high resolution How do I scan in black and white Color is the default for all scans To scan in black and white press on the printer control panel Why am I being asked for a PIN PINs are a security measur...

Страница 60: ...printer folder Printer Settings Email 2 Follow the instructions on the computer screen and then click Save Settings Creating an e mail contact list using the computer For Windows users 1 Click or Start 2 Click All Programs or Programs and then select the printer program folder from the list 3 Navigate to Printer Home select your printer Fax Edit contact list Select from Phone Book 4 From the Phone...

Страница 61: ... e mail account information and set up the SMTP server before sending an e mail Make sure the printer is connected to an Ethernet or wireless network before sending an e mail If necessary make sure the network is connected to the Internet for the printer to communicate with the SMTP server If the printer cannot connect to the Internet then contact your system support person The printer supports on...

Страница 62: ...ies photo paper or thin media such as magazine clippings into the ADF Place these items on the scanner glass To send an e mail see Scanning directly to e mail using the printer software on page 57 Canceling an e mail To cancel an e mail press E mailing 62 ...

Страница 63: ...ctrical or cabling connections such as the power supply cord or telephone during a lightning storm Setting up the printer to fax Scenario 1 Standard telephone line Setup 1 Printer is connected to a dedicated fax line EXT LINE To connect Connect the cable from the wall jack to the port of the printer Tips for this setup You can set the printer to receive faxes automatically Auto Answer On or manual...

Страница 64: ...lephone wall jack PHONE LINE EXT LINE To connect 1 Connect the cable from the wall jack to the port of the printer 2 Remove the protective plug from the port of the printer and then connect the answering machine to the port Connected to different wall jacks PHONE LINE EXT LINE Faxing 64 ...

Страница 65: ...and your voice calls are received If the call is a fax then the printer detects the fax signal on the line and takes over the call If you subscribe to a distinctive ring service provided by your telephone company then make sure that you set the correct ring pattern for the printer Otherwise the printer will not receive faxes even if you have set it to receive faxes automatically Setup 3 Printer is...

Страница 66: ...voice mail more often than fax Scenario 2 Digital Subscriber Line DSL EXT LINE A Digital Subscriber Line splits your regular telephone line into two channels voice and Internet Telephone and fax signals travel through the voice channel and Internet signals pass through the other channel This way you can use the same line for analog voice calls including faxes and digital Internet access To minimiz...

Страница 67: ...vate the second phone port 3 Remove the protective plug from the port of the printer and then connect the telephone to the port Tips for this setup To make sure that the phone port on the VoIP adapter is active plug an analog telephone into the phone port and then listen for a dial tone If you hear a dial tone then the port is active If you need two phone ports for your devices but do not want to ...

Страница 68: ...tive plug from the port of the printer and then connect the telephone to the port Tips for this setup To make sure that the phone port on the cable modem is active plug an analog telephone into the phone port and then listen for a dial tone If you hear a dial tone then the port is active If you need two phone ports for your devices but do not want to pay extra then do not plug the printer into the...

Страница 69: ...e printer and then connect the telephone to the port Scenario 5 Country or region specific setup Different countries or regions have different types of telephone wall jacks The standard wall jack adopted by most countries or regions is the Registered Jack 11 RJ 11 You need to have an RJ 11 plug or a telephone cable that has an RJ 11 connector so you can connect a device to an RJ 11 wall jack The f...

Страница 70: ... 11 adapter and then connect the adapter to the wall jack 3 If you want to connect another device telephone or answering machine to the same wall jack and if the device has a non RJ 11 connector then connect it directly to the wall jack Notes Do not remove the wrap plug from the port of the printer The printer may not come with an RJ 11 adapter in your country or region Faxing 70 ...

Страница 71: ...ug all devices into the wall jack You cannot plug a telephone or answering machine into the port of the printer This is called serial connection Austria Germany Portugal Belgium Ireland Spain Denmark Italy Sweden France Netherlands Switzerland Finland Norway United Kingdom Warning Potential Damage If your country or region is on the list then do not remove the wrap plug from the port of the printe...

Страница 72: ...m the wall jack to the port of the printer Connecting the printer to a wall jack in Germany The German wall jack has two kinds of ports The N ports are for fax machines modems and answering machines The F port is for telephones N F N Faxing 72 ...

Страница 73: ...is your telephone number unless you have a dedicated fax telephone line and the time and date on your fax machine when a transmission is made This information appears in the header and footer of the faxes that you send In some countries you cannot send a fax without this information Some fax machines block faxes without sender information so make sure that you enter this information in your printe...

Страница 74: ...ure the fax settings in the printer control panel then the fax software imports those settings The changes appear the next time you launch the fax software The printer also saves the settings that you choose in the fax software unless you set the printer to block changes made from the computer Configuring fax settings using the printer control panel 1 From the printer control panel navigate to Set...

Страница 75: ...ttempts dialing prefix and fax sending speed Convert sent faxes into modes that receiving fax machines recognize Otherwise such faxes are aborted Enable error correction during transmission Fax Blocking Block unwanted incoming faxes Configuring fax settings using the fax software Before you begin make sure that The printer is properly connected to the telephone line The printer is turned on and co...

Страница 76: ...ddress Book a Press the arrow buttons to scroll to Add Entry and then press OK b Use the keypad to enter the contact name in the Name field To change a character press the left arrow button To add a space press the number 0 c Press the up or down arrow button to move the cursor to the Number field d Use the keypad to enter the fax number in the Number field and then press OK to save the entry e If...

Страница 77: ...ware Address Book you may also have phone books of the mail clients installed on your computer such as Microsoft Outlook 7 Click OK For Macintosh users 1 From the Applications folder in the Finder or from the Finder desktop double click the printer folder 2 Double click Printer Settings 3 Click the Contacts tab To add contacts click the Individuals tab To add fax groups click the Groups tab 4 Clic...

Страница 78: ... the original document When using the scanner glass close the scanner cover if possible to avoid dark edges on the scanned image Do not load postcards photos small items transparencies photo paper or thin media such as magazine clippings into the ADF Place these items on the scanner glass When the document to be faxed is in place with the settings you want press to send the fax Sending faxes using...

Страница 79: ... page with the fax 8 Click OK For Macintosh users 1 With a document open choose File Print 2 From the Printer pop up menu select the fax version of your printer Note In order to see the fax options on the Print dialog you must use the fax driver for your printer If the fax version of the printer is not on the list then choose Add a printer and then choose the fax version of the printer 3 Enter the...

Страница 80: ...signal on the line and takes over the call If the printer is on a dedicated fax line then you may set the printer to pick up on any number of rings If you have multiple numbers on a single line or if you subscribe to a distinctive ring service provided by your telephone company then make sure that you set the correct ring pattern for the printer Otherwise the printer will not receive faxes even if...

Страница 81: ...printer folder b Double click Printer Settings and then configure the fax settings What is a splitter and what type of splitter should I use If there are limited wall jacks in your home or limited ports on your adapter then you can use a phone splitter A splitter splits the telephone signal and allows you to connect multiple devices to the wall jack It has two or more ports where you can plug the ...

Страница 82: ...irst If an incoming call is a fax the printer can detect fax signals on the line and takes the call How many rings should I set If the printer is sharing a line with an answering machine then set the printer to pick up after a greater number of rings than the answering machine For example if the answering machine picks up calls after four rings then set the printer to pick up after six rings This ...

Страница 83: ...plug an analog telephone into the port of the printer 2 Listen for a dial tone If you hear a dial tone then the telephone line is working and properly connected to the printer If you do not hear a dial tone through both the wall jack and the printer then see the Fax troubleshooting checklist on page 146 How do I adjust the speaker volume on the printer Listen to the dial tone to check if the telep...

Страница 84: ...have distinctive ring service then set the printer to receive faxes manually Auto Answer Off This setting lets you receive both voice calls and fax calls but works best if you use voice mail more often You need to turn off voice mail whenever you are expecting a fax How do I change the resolution of the documents that I fax The resolution or fax quality of the documents that you send may affect fa...

Страница 85: ...trol panel navigate to Setup OK Fax Setup OK Reports OK Transmission Log Printing OK 2 Press the arrow buttons to select a report printing option If you want to print a report every time you send a fax then select Print Log If you do not want to print the report then select Do not print log If you want to save on ink and print a report only when a fax job is unsuccessful then select Print only for...

Страница 86: ...s to scroll to Add and then press OK b Use the keypad to enter the name of the person you want to block c Press the down arrow button to move the cursor to the Number field d Use the keypad to enter the fax number and then press OK e Repeat steps 2b through 2d until you have added all the numbers that you want to block You can block up to 50 numbers 3 Block unidentified faxes faxes without a Calle...

Страница 87: ...CIIcharacters are letters numbers punctuation and symbols found on a keyboard ASCII characters in a WPA passphrase are case sensitive Every device on the wireless network must use the same WPA passphrase WPA security is an option only on infrastructurenetworks withaccesspoints wireless routers and network cardsthatsupportWPA Mostnewerwireless network equipment also offer WPA2 security as an option...

Страница 88: ...y key either a WEP key or WPA WPA2 passphrase To find the WPA WPA2 passphrase for the wireless network see the documentation that came with the access point see the Web page associated with the access point or consult your system support person If your access point is using WEP security then the WEP key should be Exactly 10 or 26 hexadecimal characters or Exactly 5 or 13 ASCII characters If your a...

Страница 89: ...d by default and cannot be changed if the network is configured in infrastructure mode Notes Ad hoc mode may be available in select models or operating systems only If the network is set up in ad hoc mode then select the channel that other devices in the network are using All devices in an ad hoc network must use the same channel to communicate with each other The printer can communicate on only o...

Страница 90: ...software CD If the installation dialog does not appear after a minute then launch the CD manually a Click or click Start and then click Run b In the Start Search or Run box type D setup exe where D is the letter of your CD or DVD drive c Press Enter or click OK 3 Follow the instructions on the computer screen Note Select Wireless connection when prompted to select a connection type For Macintosh u...

Страница 91: ... the software installer package 4 Select My printer is already set up I am installing it on a new computer 5 Click Continue and then follow the instructions on the computer screen for installing a configured printer on a new computer Determining the printer status using the network indicator light The Wi Fi or Ethernet indicator light shows the network status of the printer Notes The network indic...

Страница 92: ...wireless broadband box Some examples of these boxes include LiveBox AliceBox N9UF Box FreeBox and Club Internet Before you begin Make sure your box is wireless enabled and activated to work on a wireless network For more information about configuring the box to work wirelessly see the documentation that came with your box Make sure your box is turned on and that your computer is on and connected t...

Страница 93: ...hen temporarily disable it to load the printer Web page correctly 4 Click Configuration TCP IP Set static IP address 5 In the Address field type the IP address you want to assign to the printer and then click Submit To verify type the static IP address in the Web browser address field and then press Enter For more information contact your system support person Changing wireless settings after inst...

Страница 94: ...ireless network either ad hoc or infrastructure In Windows Vista or later 1 Click Control Panel Network and Internet Network and Sharing Center 2 Click Set up a connection or network Set up a wireless ad hoc computer to computer network Next 3 Follow the instructions for setting up a wireless ad hoc network As part of the setup a Create a network name or SSID for the network between the computer a...

Страница 95: ...es Wireless Networks tab Note If the Wireless Networks tab does not appear then your computer has third party software that controls your wireless settings You must use that software to set up the ad hoc wireless network For more information see the documentation for the third party software 6 Select the Use Windows to configure my wireless network settings check box 7 Under Preferred Networks del...

Страница 96: ...h users 1 Access the Airport settings In Mac OS X version 10 5 or later From the Apple menu navigate to System Preferences Network AirPort In Mac OS X version 10 4 or earlier From the Finder navigate to Applications Internet Connect AirPort 2 From the Network Name or Network menu click Create Network 3 Create a name for the ad hoc network and then click OK Note Store the network name and password ...

Страница 97: ...D and security information when prompted Configuring Wi Fi Protected Setup manually Note Make sure your access point wireless router is Wi Fi Protected Setup WPS certified For more information see the User s Guide If your printer or device has not yet been configured for wireless connection and you want to configure it using WPS then push the WPS button on the wireless router Wait for the printer ...

Страница 98: ...ings tab Wireless setup utility 4 Follow the instructions on the computer screen Note There is no need to remove the USB cable connecting the printer to the computer during wireless configuration If the printer is currently set up for Ethernet 1 Unplug the Ethernet cable from the printer 2 Place the printer close to the computer you want to use to configure the printer for wireless access Note You...

Страница 99: ...tallation software CD into the computer you want to use to configure the printer 3 Follow the instructions on the computer screen for configuring a printer on an Ethernet network 4 Select the Network printer See Selecting the printer on page 99 Note You will need a USB cable to complete the configuration Selecting the printer 1 Open the printers folder a Click or Start b In the Start Search or Run...

Страница 100: ... 3 Close all open applications 4 Insert the installation software CD If the installation dialog does not appear after a minute then click the CD icon on the desktop 5 Double click Lexmark Extras Lexmark Setup Assistant 6 Follow the instructions on the computer screen 7 A second print queue will be created Remove the Ethernet queue if you do not want to switch back to accessing the printer over an ...

Страница 101: ...ack 2 Insert the installation software CD into the computer you want to use to configure the printer 3 Follow the instructions on the computer screen Note You will need a USB cable to complete the configuration Adding the printer In Mac OS X version 10 5 or later 1 From the Apple menu navigate to System Preferences Print Fax 2 Click 3 Click the Default or Default Browser tab and then select your p...

Страница 102: ... Convention UNC Port Name which consists of the server name and the distinctive printer name that was specified in step 2 on page 102 The name should be in the form server printer f Click OK g Click Close on the Printer Ports dialog h Make sure the new port is selected on the Ports tab and then click Apply i Click OK Sharing a printer in a Macintosh environment 1 From the Finder choose Help Mac He...

Страница 103: ...tificate for network access Following is the list of supported types of wireless network security and their requirements WEP WEP key up to four keys may be required Default WEP Transmit Key if more than one WEP key is configured this specifies which one to use WPA Personal WPA2 Personal or WPA2 Enterprise Pre shared key Encryption AES or TKIP EAP MD5 MSCHAPv2 or LEAP RADIUS user name RADIUS passwo...

Страница 104: ...file 3 Click OK and then follow the instructions on the computer screen Networking FAQ What is Wi Fi Protected Setup Wi Fi Protected Setup WPS is a simple and secure configuration that allows you to establish a wireless home network and enable network security without requiring prior knowledge of Wi Fi technology It is no longer necessary to configure the network name SSID and WEP key or WPA passp...

Страница 105: ...s to join your wireless network 3 Look for the WEP key or WPA WPA2 passphrase What is an SSID A Service Set Identifier SSID is the name that identifies a wireless network All devices on the network must know the SSID of the wireless network or they will not be able to communicate with each other Usually the wireless network broadcasts the SSID to allow wireless devices in the area to connect to it...

Страница 106: ...d 0 9 ASCII characters are letters numbers and symbols found on a keyboard ASCII characters in a WPA WPA2 passphrase are case sensitive View the security settings on the access point 1 Open a Web browser Type the IP address of the access point in the address field and then press Enter Notes To obtain the IP address of the access point see the documentation that came with it or contact your system ...

Страница 107: ...All computers and printers connect to the network through a router with Ethernet and wireless capabilities Some computers and printers connect wirelessly to the router others connect over a wired connection The network is connected to the Internet through a DSL or cable modem Internet Scenario 2 Wireless network with Internet access All computers and printers connect to the network using a wireles...

Страница 108: ...al Bus USB cable is primarily used to connect a USB device to a host Common hosts include computers and video game consoles Through the USB port and cable itis possible to connect computerperipherals such as mouse devices keyboards digital cameras printers personal media players flash drives and external hard drives For many of those devices USB has become the standard connection method Why do I n...

Страница 109: ...quare end of the USB cable into the back of the printer 3 Firmly plug the rectangular end of the USB cable into the USB port of the computer 4 Follow the instructions on the computer screen How are infrastructure and ad hoc networks different Wireless networks can operate in one of two modes infrastructure or ad hoc Ininfrastructuremode alldevicesonawirelessnetworkcommunicatewitheachotherthroughan...

Страница 110: ...ucture mode provides Increased network security Increased reliability Faster performance Easier setup Finding the signal strength The signal strength tells you how strongly the computer or printer is receiving the wireless signal from the wireless network Poor signal quality could affect connectivity during configuration Checking computer connectivity 1 From your computer system tray click the wir...

Страница 111: ...pon the layout of the network and the limitations of the access point REMOVE OBSTACLES BETWEEN THE ACCESS POINT AND THE PRINTER The wireless signal from your access point will pass through most objects Most walls floors furniture and other objects will not block the wireless signal However there are materials that are too dense for the signal to pass through such as objects containing metal and co...

Страница 112: ...address appears as four sets of numbers separated by periods such as 192 168 2 134 b Type the user name and password of the router when prompted c Click OK d In the Wireless settings section look for the SSID e Write down the SSID Note Make sure you copy it exactly including any capital letters 2 Obtain the SSID of the network that the printer is connected to a From the printer print a network set...

Страница 113: ...ime Yes the printer supports a simultaneous USB and network connection The printer can be configured in the following ways Locally attached connected to a computer using a USB cable Wireless network Wireless network and locally attached simultaneously What is a MAC address A Media Access Control MAC address is a 48 bit identifier associated with the hardware of network equipment The MAC address ma...

Страница 114: ...alled MAC filtering If MAC filtering is enabled in your access point and you want to add a printer to your network then the MAC address of the printer must be included in the MAC filter list If you are using an AirPort base station then the MAC address may be referred to as AirPort ID and MAC address filtering may be accessed through MAC Address Access Control What is an IP address An IP address i...

Страница 115: ...nd then click Run 2 In the Start Search or Run box type cmd 3 Press Enter or click OK 4 Type ipconfig and then press Enter The IP address appears as four sets of numbers separated by periods such as 192 168 0 100 For Macintosh users 1 From the Apple menu navigate to About This Mac More Info 2 From the Contents pane choose Network 3 If you are connected over a wireless network then choose AirPort f...

Страница 116: ... on the same wireless network You want the Wireless Setup Utility to automatically detect the network for you You want to connect your printer to the wireless network using Wi Fi Protected Setup WPS Use Advanced setup if The printer and the installing computer are not on the same wireless network or if the computer does not have wireless access The wireless network requires certificates Enterprise...

Страница 117: ...er program folder from the list 3 Navigate to Printer Home select your printer Maintenance tab Supplies Status For Macintosh users 1 From the Apple menu navigate to System Preferences Print Fax select your printer 2 Click Options Supplies or Print Queue 3 Click Supply Levels Aligning the printhead If the characters or lines on your printed image appear jagged or wavy then you may need to align the...

Страница 118: ... Clean Printhead or Deep Clean Printhead and then press OK A cleaning page prints Cleaning the exterior of the printer 1 Make sure that the printer is turned off and unplugged from the wall outlet CAUTION SHOCK HAZARD To avoid the risk of electric shock when cleaning the exterior of the printer unplug the power cord from the wall outlet and disconnect all cables to the printer before proceeding 2 ...

Страница 119: ...dry before placing the document on the scanner glass Moving the printer to another location When moving the printer to another location follow these precautions Make sure the printer is off and all cables have been disconnected from the printer Any cart used to move the printer must have a surface able to support the full footprint of the printer Make sure the paper exit tray is inserted back into...

Страница 120: ... Keep the printer in an upright position to prevent the ink from leaking Avoid severe jarring movements Maintaining the printer 120 ...

Страница 121: ...t http support lexmark com to find the following Knowledgebase articles with the latest information and troubleshooting for your printer Live online technical support Contact numbers for telephone technical support Setup troubleshooting Incorrect language appears on the display on page 121 Software did not install on page 122 Print job does not print or is missing pages on page 122 Printer is prin...

Страница 122: ...t of the computer The USB port is marked with Note If you continue to have problems then try another USB port on the computer You may have connected to a defective port RECONNECT THE PRINTER POWER SUPPLY 1 Turn off the printer Note Make sure the printer is not in Sleep mode Press and hold for three seconds to turn off the printer 2 Unplug the power cord from the wall outlet and then pull out the p...

Страница 123: ...RINTER POWER SUPPLY 1 Turn off the printer Note Make sure the printer is not in Sleep mode Press and hold for three seconds to turn off the printer 2 Unplug the power cord from the wall outlet and then pull out the power cord from the power supply 3 After one minute reconnect the power cord into the power supply and then plug the power cord into the wall outlet 4 Turn on the printer REMOVE AND REC...

Страница 124: ...Printer is busy or does not respond If the Before you troubleshoot checklist does not solve the problem then try one or more of the following MAKE SURE THE PRINTER IS NOT IN SLEEP MODE If the power light is blinking on and off slowly then the printer is in Sleep mode Press to wake up the printer If the printer will not come out of Sleep mode then reset the power 1 Unplug the power cord from the wa...

Страница 125: ...lug the square end of the USB cable into the back of the printer 3 Firmly plug the rectangular end of the USB cable into the USB port of the computer The USB port is marked with Note If you continue to have problems then try another USB port on the computer You may have connected to a defective port MAKE SURE THE USB PORT IS ENABLED IN WINDOWS 1 Click or click Start and then click Run 2 In the Sta...

Страница 126: ...clear the message Cannot Collate Job Try one or more of the following Press OK to continue printing the pages that were saved in the printer memory and then collate the remainder of the print job Press to cancel the current print job Change to Size Paper Try one or more of the following Load the correct paper size in the paper support and then press OK to continue printing Press to cancel the curr...

Страница 127: ...nstall the specified ink cartridges properly Turn the printer off then wait about 10 seconds and then turn the printer back on Note Make sure the printer is not in Sleep mode Press and hold for three seconds to turn off the printer See the User s Guide or visit the Lexmark Support Web site at http support lexmark com for more information Ink Cartridge Missing Try one or more of the following Insta...

Страница 128: ...r visit the Lexmark Support Web site at http support lexmark com for a list of supported ink cartridges Load Size Paper Try one or more of the following Load the correct paper size in the paper support and then press OK to continue printing Press to cancel the current job Load Size Type Paper Try one or more of the following Load the correct paper size and paper type in the paper support and then ...

Страница 129: ...try printing again Printhead Cannot Move Try one or more of the following Open the printer to remove any obstructions to the printhead and then close the printer Press OK to clear the message Printhead Error Remove and reinsert the printhead Warning Potential Damage Do not touch the cartridge contacts with bare hands to avoid damage and print quality problems 1 Open the printer and then lift the l...

Страница 130: ... clicks into place 1 2 5 Close the printer Note If removing and reinserting the printhead does not resolve the error then turn off the printer and then turn it back on If the problem persists then contact customer support Printhead Missing Try one or more of the following Install the printhead 1 Open the printer and then lift the carrier latch Troubleshooting 130 ...

Страница 131: ...nthead then visit the Lexmark support Web site at http support lexmark com or contact customer support for more information If the message appears even if the printhead is already installed then see Printhead Error in the User s Guide Printhead Unsupported Try one or more of the following Turn the printer off and then turn it back on Install a supported printhead 1 Open the printer 2 Press the rel...

Страница 132: ...Clean the printhead to restore print quality A cleaning page prints Notes Cleaning the printhead nozzles uses ink so clean them only when necessary Deep cleaning uses more ink so try the Clean Printhead option first to save ink If the ink levels are too low then you must replace the ink cartridges before you can clean the printhead nozzles See the User s Guide for more information on how to clean ...

Страница 133: ...rect size in the tray or on the paper support Check the paper guides and then make sure the paper is properly loaded in the tray or on the paper support Cancel the current print job Standard Network Software Error Try one or more of the following Press OK to clear the message Turn the printer off and then back on to reset the printer Unrecoverable Scan Error Try one or more of the following Restar...

Страница 134: ...nter Note The parts inside the printer are sensitive Avoid unnecessarily touching these parts while clearing jams Check the jam clearance area 1 Lift the scanner unit 2 Remove the jam clearance cover 1 2 3 Notes Squeeze the snap to lift the jam clearance cover Make sure that the printhead is moved to the side and away from the jammed paper Troubleshooting 134 ...

Страница 135: ...e jam clearance cover until it clicks into place 1 2 5 Close the printer 6 Touch OK or press OK depending on your printer model Paper jam in the exit tray 1 Firmly grasp the paper and then gently pull it out Note Make sure all paper fragments are removed 2 Touch OK or press OK depending on your printer model Troubleshooting 135 ...

Страница 136: ...rts inside the printer are sensitive Avoid unnecessarily touching these parts while clearing jams 1 Remove the paper support 2 Firmly grasp the paper and then gently pull it out Note Make sure all paper fragments are removed Troubleshooting 136 ...

Страница 137: ...am in the duplex unit Note The parts inside the printer are sensitive Avoid unnecessarily touching these parts while clearing jams 1 Push down the duplex latch and then remove the duplex unit 2 Firmly grasp the paper and then gently pull it out Note Be careful not to tear the paper while removing it Troubleshooting 137 ...

Страница 138: ...press OK depending on your printer model Paper jam in the ADF select models only Note The parts inside the printer are sensitive Avoid unnecessarily touching these parts while clearing jams Check the ADF 1 Press the ADF button and then open the ADF cover Scenario 1 Scenario 2 2 1 2 1 Troubleshooting 138 ...

Страница 139: ...the paper on both sides and then gently pull it out Scenario 1 Scenario 2 Note Make sure all paper fragments are removed 3 Close the ADF cover 4 Touch OK or press OK depending on your printer model Troubleshooting 139 ...

Страница 140: ...d 3 Reattach the ADF tray until it snaps into place 4 Touch OK or press OK depending on your printer model Paper or specialty media misfeeds These are possible solutions if paper or specialty media misfeeds or skews or if multiple sheets feed or stick together Try one or more of the following CHECK PAPER CONDITION Use only new unwrinkled paper Troubleshooting 140 ...

Страница 141: ... the edges of the page If the Before you troubleshoot checklist does not solve the problem then try one or more of the following CHECK MINIMUM PRINT SETTINGS Unless you are using the borderless feature use these minimum print margin settings Left and right margins 6 35 mm 0 25 in for letter size paper 3 37 mm 0 133 in for all paper sizes except letter Top margin 1 7 mm 0 067 in Bottom margin 12 7 ...

Страница 142: ... CHECK THE INK LEVELS Replace low or empty ink cartridges SELECT A HIGHER PRINT QUALITY FROM THE PRINTER SOFTWARE MAKE SURE THE INK CARTRIDGES ARE PROPERLY INSTALLED ALIGN THE PRINTHEAD CLEAN OR DEEP CLEAN THE PRINTHEAD NOZZLES Note If these solutions do not remove the streaks or lines on the printed image then contact technical support Print speed is slow If the Before you troubleshoot checklist ...

Страница 143: ...s that are taking too much memory from your computer CHECK YOUR COMPUTER PERFORMANCE You may need to change how your computer manages resources and processes For more information on improving computer performance see the documentation that came with your operating system Copy and scan troubleshooting Copier or scanner does not respond on page 143 Scanner unit does not close on page 144 Poor copy o...

Страница 144: ...N THE CORRECT CORNER Partial copies or scans of documents or photos If the Before you troubleshoot checklist does not solve the problem then try one or more of the following MAKE SURE THE DOCUMENT OR PHOTO IS LOADED FACEDOWN ON THE SCANNER GLASS AND IN THE PLACEMENT CORNER SELECT A PAPER SIZE THAT MATCHES THE LOADED PAPER MAKE SURE THE ORIGINAL SIZE SETTING MATCHES THE SIZE OF THE DOCUMENT YOU ARE...

Страница 145: ...ER Cannot scan to a computer over a network If the Before you troubleshoot checklist does not solve the problem then try one or more of the following MAKE SURE THE PRINTER AND THE DESTINATION COMPUTER ARE CONNECTED TO THE SAME NETWORK MAKE SURE THE PRINTER SOFTWARE IS INSTALLED ON THE DESTINATION COMPUTER Fax troubleshooting Fax troubleshooting checklist on page 146 Cannot send faxes on page 146 C...

Страница 146: ...he printer is connected to a Digital Subscriber Line then make sure you are using a DSL filter for the printer If the printer is connected to a VoIP adapter or cable modem then make sure that the printer is plugged into the first phone port If you are using a splitter then make sure that you are using a phone splitter Do not use a line splitter Cannot send faxes If the Fax troubleshooting checklis...

Страница 147: ...REFIX SETTING IS CORRECT The dialing prefix is the number or series of numbers that you press before you can dial the actual fax number or telephone number If the printer is in an office setting or in a private branch exchange this can be a specific number that you need to press so you can make a call outside the office Make sure that the dial prefix entered in the printer is correct for your netw...

Страница 148: ... DISABLED 1 From the printer control panel navigate to Setup OK Fax Setup OK Ringing and Answering OK Fax Forward OK 2 Press the arrow buttons to scroll to Off and then press OK INCREASE THE RINGER VOLUME If you set the printer to receive faxes manually Auto Answer Off then increase the ringer volume MAKE SURE THAT YOU HAVE THE CORRECT MANUAL ANSWER CODE If you set the printer to receive faxes man...

Страница 149: ...allyconvertscolor faxes to black and lowers the scan resolution of the document Lower the fax quality Reformat the document on Letter size paper Unsupported Compression The fax modem of the receiving fax machine does not support data compression Fax modems compress data to speed up transmission but the receivingfax modem needs to have the same compression code Lowerthetransmissionspeedofthe fax mo...

Страница 150: ...y If the telephone line is being used by another device then wait until the other device is finished before sending the fax Schedule to resend the fax at a later time Set the printer to scan before dialing The scanned document is saved in the printer memory The printer can then retrieve it and automatically redial the number No Answer Auto Answer may have been turnedoff on the receiving fax machin...

Страница 151: ...ces to it If you can successfully use other devices from the port then the port is working Notes Your port may be working fine but certain conflicts can occur with multiple USB devices Try disconnecting one of your other USB devices If the USB port on the computer is not working then try using the other USB ports on the computer MAKE SURE THE USB CABLE IS WORKING Try using a different USB cable If...

Страница 152: ...the USB connection If there is activity on the Device Manager but none of the previous solutions worked then call customer support If there is no activity on the Device Manager then there may be a problem with your computer and its USB support The computer must recognize the USB connection in order for installation to work Cannot print and there is a firewall on the computer Third party non Micros...

Страница 153: ...rnet access then try connecting to the Internet over a wireless connection Your SSID is correct Print a network setup page to verify the SSID the printer is using If you are not sure if your SSID is correct then run the wireless setup again Your WEP key or WPA passphrase is correct if your network is secure Log on to the access point and check the security settings A security key is like a passwor...

Страница 154: ...P security then the WEP key should be Exactly 10 or 26 hexadecimal characters Hexadecimal characters are A F a f and 0 9 or Exactly 5 or 13 ASCII characters ASCII characters are letters numbers and symbols found on a keyboard ASCII characters in a WEP key are case sensitive If your access point is using WPA or WPA2 security then the WPA passphrase should be Exactly 64 hexadecimal characters Hexade...

Страница 155: ...o make these changes then see the documentation that came with the access point or contact the person who set up your wireless network MAKE SURE YOUR COMPUTER IS CONNECTED TO YOUR ACCESS POINT See if you have access to the Internet by opening your Web browser and accessing any site If there are other computers or resources on your wireless network then check to see if you can access them from your...

Страница 156: ...nu 2 Write down the SSID In Mac OS X version 10 4 or earlier 1 From the Finder navigate to Applications Internet Connect AirPort The SSID of the network that the computer is connected to is displayed in the Network menu 2 Write down the SSID For Macintosh users with an access point 1 Type the IP address of the access point in the address field of your Web browser and then continue to step 2 If you...

Страница 157: ...ccur if the laptop hard drive has powered down If you see this message then wait a few seconds and then try to print again The laptop and printer require a few seconds to power up again and reattach to the wireless network If you see this message again after you have waited long enough for the printer and the laptop to attach to the network then there may be a problem with your wireless network Ma...

Страница 158: ... is possible that the printer is not receiving the IP address within the allowed time Make sure your DHCP server which may also be your wireless router is working and is configured to assign IP addresses If you are not sure how to do this then refer to the manual that came with your wireless router If the printer and computer have valid IP addresses and the network is operating correctly then cont...

Страница 159: ...er or before running the wireless setup on the computer To check if the computer is currently connected to a VPN open your VPN Client software and check your VPN connections If you do not have a VPN Client software installed then check the connections manually using the Windows VPN Client If you would like to have the ability to connect to your local network and to a VPN at the same time then requ...

Страница 160: ...t sure how to change the SSID then see the documentation that came with your access point Note You must change the SSID on all of the other devices that access your wireless network if you change the SSID on the access point ASSIGN STATIC IP ADDRESSES TO ALL DEVICES IN THE NETWORK Most wireless networks use a DHCP server Dynamic Host Configuration Protocol built in to the wireless router to assign...

Страница 161: ...t computer It is possible that there is an updated driver available that could resolve the issue CHANGE ALL NETWORK DEVICES TO THE SAME TYPE While it is possible to successfully mix 802 11b 802 11g and 802 11n devices on the same wireless network the faster devices will sometimes prevent the slower devices from communicating Try turning on only the network devices of the same type and see if netwo...

Страница 162: ...oducts or the programs described may be made at any time References in this publication to products programs or services do not imply that the manufacturer intends to make these available in all countries in which it operates Any reference to a product program or service is not intended to state or imply that only that product program or service may be used Any functionally equivalent product prog...

Страница 163: ...ct has been tested and found to comply with the limits for a Class B digital device pursuant to Part 15 of the FCC Rules Operation is subject to the following two conditions 1 this device may not cause harmful interference and 2 this device must accept any interference received including interference that may cause undesired operation The FCC Class B limits are designed to provide reasonable prote...

Страница 164: ...e directed to Director of Lexmark Technology Services Lexmark International Inc 740 West New Circle Road Lexington KY 40550 859 232 3000 Modular component notice This product may contain the following modular component s Lexmark regulatory type model LEX M03 002 FCC ID US 2G2CN00BM03002 Industry Canada IC 2376A M03002 Lexmark regulatory type model LEX M01 004 FCC ID IYLM01004 Industry Canada IC 23...

Страница 165: ...cal sales office phone number Product disposal Do not dispose of the printer or supplies in the same manner as normal household waste Consult your local authorities for disposal and recycling options Battery notice This product contains Perchlorate material Special handling may apply For more information go to http www dtsc ca gov hazardouswaste perchlorate Static sensitivity notice This symbol id...

Страница 166: ...om hard copy original documents 14 8 Scan The product is scanning hard copy documents 11 4 Ready The product is waiting for a print job 6 44 Sleep Mode The product is in a high level energy saving mode 3 06 Off The product is plugged into a wall outlet but the power switch is turned off 0 36 The power consumption levels listed in the previous table represent time averaged measurements Instantaneou...

Страница 167: ...n requirements of EC Council directives 2004 108 EC 2006 95 EC and 2005 32 EC on the approximation and harmonization of the laws of the Member States relating to electromagnetic compatibility safety of electrical equipment designed for use within certain voltage limits and the ecodesign of energy using products The manufacturer of this product is Lexmark International Inc 740 West New Circle Road ...

Страница 168: ...on public service commission or corporation commission for information If your home has specially wired alarm equipment connected to the telephone line ensure the installation of this equipment does not disable your alarm equipment If you have questions about what will disable alarm equipment consult your telephone company or a qualified installer Telephone companies report that electrical surges ...

Страница 169: ...writer s Laboratories un autre laboratoire agréé detype NRTL Nationally Recognized TestingLaboratory ou un organisme decertificationagréédansvotrerégion ou pays Ceci prévient tout endommagement de l équipement causé par les orages et autres surtensions électriques Cet équipement utilise des prises de téléphone CA11A Notice to users of the New Zealand telephone network Thefollowingarespecial condit...

Страница 170: ...len analogen Telefonleitungen in der Schweiz Zeitsteuertakte vorhanden sind Uso del prodotto in Svizzera Questo prodotto richiede un filtro toni Billing svizzero codice Lexmark 14B5109 o 80D1877 da installare su tutte le linee che ricevono impulsi remoti in Svizzera È necessario utilizzare il filtro Lexmark poiché gli impulsi remoti sono presenti su tutte le linee analogiche in Svizzera Notice to ...

Страница 171: ...inted such that it does not emit RF fields in excess of Health Canada limits for the general population consult Safety Code 6 obtainable from Health Canada s Web site www hc sc gc ca rpb The term IC before the certification registration number only signifies that the Industry Canada technical specifications were met Industry Canada Canada Cet appareil est conforme à la norme RSS 210 d Industry Can...

Страница 172: ...ss LAN option are in conformity with the protection requirements of EC Council directives 2004 108 EC 2006 95 EC and 1999 5 EC on the approximation and harmonization of the laws of the Member States relating to electromagnetic compatibility safety ofelectrical equipment designed for use within certain voltage limits and on radio equipment and telecommunications terminal equipment Compliance is ind...

Страница 173: ... Italiano Con la presente Lexmark International Inc dichiara che questo questo prodotto è conforme ai requisiti essenziali ed alle altre disposizioni pertinenti stabilite dalla direttiva 1999 5 CE Latviski Ar šo Lexmark International Inc deklarē ka šis izstrādājums atbilst Direktīvas 1999 5 EK būtiskajām prasībām un citiem ar to saistītajiem noteikumiem Lietuvių Šiuo Lexmark International Inc dekl...

Страница 174: ...2 months later provided that the warranty period for any supplies and for any maintenance items included with the printer shall end earlier if it or its original contents are substantially used up depleted or consumed To obtain warranty service you may be required to present proof of original purchase You may be required to deliver your product to the Remarketer or Lexmark or ship it prepaid and s...

Страница 175: ...T TO CHANGE AT ANY TIME WITHOUT NOTICE Limitation of liability Your sole remedy under this limited warranty is set forth in this document For any claim concerning performance or nonperformance of Lexmark or a Remarketer for this product under this limited warranty you may recover actual damages up to the limit set forth in the following paragraph Lexmark s liability for actual damages from any cau...

Страница 176: ... 18 Back 19 Black 20 Cancel 20 Color 20 Dial Tone 19 Eco Mode 20 Home 18 keypad 19 Pause 19 Power 18 Redial 19 Select 19 Start 20 C cable installation 108 USB 108 Caller ID 73 Caller ID pattern fax setting 74 camera connecting 40 canceling copy job 53 e mail 62 print job 46 scan job 59 Cannot Collate Job 126 cannot delete documents from print queue 125 cannot print over wireless network 154 cannot...

Страница 177: ...l tone checking 83 dial tone volume adjusting 83 dialing prefix 82 Digital Subscriber Line DSL fax setup 66 digital telephone service fax setup 68 distinctive ring 82 documents faxing using the computer 79 faxing using the control panel 78 loading into the Automatic Document Feeder ADF 32 loading on scanner glass 32 printing 33 scanning for editing 56 scanning using the printer control panel 55 sc...

Страница 178: ...g tips receiving faxes automatically 80 FCC notices 163 167 171 finding information 8 MAC address 114 print queue 43 publications 8 Web site 8 firewall on computer 152 flash drive inserting 39 scanning to 55 forwarding faxes 86 France special wireless setup instructions 92 FreeBox 92 frequently asked questions USB cable 108 G greeting cards 30 Group Dial setting up 76 77 H heavyweight matte paper ...

Страница 179: ...etwork 94 noise emission levels 164 notices 163 164 165 166 167 168 169 170 171 172 O on hook faxing 85 ordering paper and other supplies 15 P page does not print 122 page order changing 34 Pages per Side copies 51 paper conserving 7 paper and media envelopes 30 heavyweight matte paper 30 index cards 30 iron on transfers 31 photo cards 30 photo glossy paper 31 plain paper 29 postcards 30 transpare...

Страница 180: ...talling 27 uninstalling 26 printer status determining 91 printer setting as default 44 printers supported 47 printhead aligning 117 printhead access area 12 Printhead Cannot Move 129 printhead error 129 Printhead Missing 130 printhead nozzles cleaning 118 Printhead Warning 132 printing collate 34 custom size paper 38 documents 33 envelopes 36 first page first 34 from a PictBridge enabled camera 40...

Страница 181: ...er in Windows 101 Short Paper 133 signal strength finding 110 Sleep timeout changing 20 software did not install 122 software updates checking 26 software optional finding installing 25 speaker volume adjusting 83 Speed Dial setting up 76 splitter choosing 81 SSID ad hoc 94 finding 112 locating 105 wireless network 105 Standard Network Software Error 133 streaks or lines on printed image 142 suppo...

Страница 182: ...ice over Internet Protocol VoIP fax setup 67 VoIP adapter 67 volume adjusting ringer and dial tone 83 speaker 83 VPN lose connection to printer 153 W Web Links accessing 24 Web site finding 8 WEP 87 103 ad hoc 94 transmit key 103 WEP key key index 116 locating 105 Windows installing printer on wireless network 90 Windows software Abbyy Sprint OCR 22 Phone Book 22 Printer Home 22 Printer Setup Util...

Страница 183: ...t networks 112 printer works intermittently on wireless network 159 Wi Fi Protected Setup 97 configuring manually 97 using 104 Wi Fi Protected Setup logo identifying 104 WPA 87 103 WPA passphrase locating 105 WPA2 87 WPS 97 Index 183 ...

Отзывы: