background image

Diagnostic Information

2-13

5055-01x

940 - High Capacity Paper Feed Sensor Error

941 - High Capacity Paper Feed Tray Error

942 - Duplex Error

Step

Questions / 

Actions 

Yes

No

1

Is connector CN40 
on the printer 
controller board 
connected properly?

Go to 

“High 

Capacity Paper 
Feed (HCPF) 
Service Check” on 
page 2-57

.

Plug the connector 
in securely.

Step

Questions / 

Actions 

Yes

No

1

Is connector CN40 
on the printer 
controller board 
connected properly?

Go to 

“High 

Capacity Paper 
Feed (HCPF) 
Service Check” 
on page 2-57

.

Plug the connector 
in securely.

942 Service
Duplex

Step

Questions / 

Actions 

Yes

No

1

Is connector CN37 
on the printer 
controller board 
connected properly?

Replace the printer 
controller board.

Plug the connector 
in securely.

Service.bk  Page 13  Thursday, October 4, 2001  12:20 PM

Содержание C910 5055-01x

Страница 1: ...r Lexmark and Lexmark with diamond design are trademarks of Lexmark International Inc registered in the United States and or other countries Table of Contents Index Safety and Notices Trademarks Start...

Страница 2: ...ngton Kentucky 40550 U S A or electronically mailed e mail to ServiceInfoAndTraining Lexmark com Lexmark may use or distribute any of the information you supply in any way it believes appropriate with...

Страница 3: ...Transfer Unit 1 6 Cleaning Unit 1 7 Paper Feeding Fusing 1 7 Drive System 1 8 Paper Feeding 1 9 Cassette Paper Feeder 1 9 Multi Purpose Feeding 1 10 Registration Unit 1 11 Separation Unit 1 12 Fuser U...

Страница 4: ...anel Service Check 2 58 Paper Carrying Service Check 2 58 Paper Exit FU FD Service Check 2 63 Paper Tray Missing Service Check 2 63 Photodeveloper Missing Service Check 2 64 Power Supply Service Check...

Страница 5: ...rd Removal 4 15 Upper Fan Removal 4 16 Multi Purpose Feeder Tray Removal 4 17 Paper Feed Roller Removal 4 18 Paper Carrying Roller Removal 4 18 Paper Present Sensor Removal 4 19 Paper Feed Frame Remov...

Страница 6: ...4 45 Motor Drive Board Removal 4 45 Power Switch Removal 4 46 Connector Duplex Unit Removal 4 47 Paper Size Sensor Board Assembly Removal 4 48 Main Unit Fan Removal 4 49 Main Drive Unit Removal 4 50 F...

Страница 7: ...Supply Removal 4 83 Locations 5 1 Covers Diagram 5 1 Major Parts Diagram 5 2 Printer Controller Board 5 4 Printhead Controller Board 5 5 RIP Board 5 6 Power Source Unit 1 Board 5 7 Power Source Unit 2...

Страница 8: ...bly 11 I F Controller 7 28 Assembly 11 I F Controller Continued 7 30 Assembly 12 Fuser Unit 7 32 Assembly 13 Cassette 7 34 Assembly 14 Expansion Feeder 1 7 36 Assembly 15 Expansion Feeder 2 7 38 Assem...

Страница 9: ...assembly and servicing of this product Professional service personnel should understand this and take necessary precautions Consignes de S curit Ce produit a t con u test et approuv pour respecter les...

Страница 10: ...le di assistenza autorizzato deve quindi adottare le precauzioni necessarie Sicherheitshinweise Dieses Produkt und die zugeh rigen Komponenten wurden entworfen und getestet um beim Einsatz die weltwei...

Страница 11: ...reparaci n de la m quina El personal cualificado debe ser consciente de este peligro y tomar las precauciones necesarias Informa es de Seguran a Este produto foi concebido testado e aprovado para sati...

Страница 12: ...d algunes peces pot ser que no sempre siguin bvies Lexmark no es responsabilitza de l us d altres peces de recanvi La informaci pel manteniment d aquest producte est orientada exclusivament a professi...

Страница 13: ...Safety Information xiii 5055 01x...

Страница 14: ...xiv Service Manual 5055 01x...

Страница 15: ...hair oil grease or toner Clean the printer interior using a lint free cloth dampened slightly with cold water Do not use solvents or chemical cleaners to clean the printer interior Use only the speci...

Страница 16: ...llowing Be sure printer is on a single flat strong tabletop This is very important for color printers that use belts Check and set registration as necessary Shake all cartridges and be sure they are c...

Страница 17: ...General Information 1 3 5055 01x Serial Number Open the front door the serial number is located as shown The serial number is also on the menu settings page you can print from the Tests Menu...

Страница 18: ...k LASER Light Amplification by Stimulated Emission of Radiation LCD Liquid Crystal Display LED Light Emitting Diode LVPS Low Voltage Power Supply NVRAM Nonvolatile Random Access Memory OEM Original Eq...

Страница 19: ...rded by irradiating light from the LED printhead forming the electrostatic image The LED printhead array along with the Selfoc lens array provide a single dot line of the image in a one to one arrange...

Страница 20: ...elopment roll and doctor blade by the rotating development roll and is negatively charged forming the electrostatic image on the photosensitive drum Toner attaches to the bright portion of the photose...

Страница 21: ...oved by the eraser Paper Feeding Fusing The main unit drive is composed of drives 1 and 2 Drive 1 feeds paper stands by drives the belt unit separates fuses feeds the face up delivery unit and drives...

Страница 22: ...er cartridge fusing unit and face up delivery unit The motor rotates by the ON signal from the printer controller motor drive unit and sends a rotation synchronization detection signal to the motor dr...

Страница 23: ...ers A high capacity paper feeding system 3 000 sheets may be used Combining the multi paper feeder expansion paper feeders and high capacity paper feeding system the printer has a maximum paper supply...

Страница 24: ...rpose Feeding The multi paper feed solenoid turns on by the signal from the printer controller The multi purpose feed roll interconnected with the drive 1 through the spring clutch rotates and picks t...

Страница 25: ...he black image The upper and lower registration rolls are arranged in parallel with the photosensitive drum for black imaging The lower registration roll incorporates a registration clutch which feeds...

Страница 26: ...1 12 Service Manual 5055 01x Separation Unit The transfer belt and paper are separated with the belt drive roll by separation fingers...

Страница 27: ...act with the outside of the tube Separation fingers are attached near the upper roller to separate the paper from the roller Each thermistor sends the surface temperature of the roller to the printer...

Страница 28: ...FU FD deflector switches between the face up and face down paper delivery The paper from the fuser pulls down the sensing lever turning on the delivery sensor photo interrupter If the delivery unit r...

Страница 29: ...m the drum with a cleaning blade and recovered into the waste toner bottle Adjust the registration when the belt unit is replaced The registration is adjusted at the leading edge of the image or by ad...

Страница 30: ...fer belt moves up and down with the switching shaft cam by the electromagnetic clutch in drive 1 The belt position is used to detect the cam position with the photo sensor using the fan shaped light b...

Страница 31: ...ging with the pulse motor in the duplex unit feeding is stopped before the paper is delivered Paper delivery is then reversed and fed to the duplex unit Paper fed with the duplex unit stops once and t...

Страница 32: ...ion is prevented due to the diffused reflection Images projected in color printing appear in monochrome When non offset type color toner is used the process speed in the OHP mode is decreased causing...

Страница 33: ...p mode and registration mode are switched by command from the interface controller By carefully selecting print media and loading them properly you can avoid most paper jams If jams do occur follow th...

Страница 34: ...clothing 2 Remove any paper on the transfer belt 3 If the paper source was the multipurpose feeder check the area between the multipurpose feeder and the transfer belt Do not use any pointed objects t...

Страница 35: ...paper from the paper path Check Area D This message indicates a paper jam in the duplex unit area To clear area D 1 Open the duplex jam access door on the right side of the printer 2 Gently pull out...

Страница 36: ...n the printer 8 Tighten the thumbscrews to secure the duplex unit 9 Close the duplex unit door Check Area E This message indicates a jam in the top middle or bottom optional drawer paper path area If...

Страница 37: ...ght out of the multipurpose feeder If the paper will not come out continue 2 Open the top cover 3 Remove the paper on the transfer belt 4 Close the top cover 5 Press Go 24 x Paper Jam Check Tray x Jam...

Страница 38: ...ce Manual 5055 01x 249 Paper Jam Check Tray x A 249 Paper Jam Check Tray x message indicates a jam has occurred in the high capacity feeder 1 Open the top cover 2 Remove the jam 3 Close the top cover...

Страница 39: ...e paper feed clutch turns on the paper feed roller shaft rotates and the paper feed roller is driven with the one way clutch The call roller rotates with the relay gears to feed the top paper The reve...

Страница 40: ...eration When the paper feed motor rotates the transfer roller is driven with relay gears The reverse roller shaft rotates the gears on the paper feed clutch in the direction of the arrow and stops by...

Страница 41: ...paper loads and the top cover is set the pickup solenoid turns on to lower the call roller When the tray moves up the call roller is raised by the top surface of the paper and the shield plate on the...

Страница 42: ...sed the tray motor reverses to move the tray down During the down motion of the tray as the top surface of paper passes the paper level sensor the tray motor stops The tray moves down by about 500 she...

Страница 43: ...p sensor is OFF not shielded Power cord is connected and the joint SW is ON Up sensor is ON shielded during printing Top cover is closed or when up sensor is ON Tray Down Condition Tray down motion st...

Страница 44: ...itched between A4 and letter 11 inches by changing the side fence position The paper size sensor 2 detects the fixing screw 2 at the A4 position The paper size sensor 1 detects the fixing screw 1 at t...

Страница 45: ...Mechanism The residual paper quantity in the tray is detected with four photo interrupters The quantity of pages remaining in the sheet feeder displays in the following increments Near end about 80 sh...

Страница 46: ...1 32 Service Manual 5055 01x Paper End Detection A reflection type sensor is provided on the top stay to detect the paper top surface and the paper end...

Страница 47: ...ction is valid without connecting to the printer controller board DIP Switch Function Switch Maintenance Switch Description 4 3 2 1 OFF 1 Standard machine initial setting ON X X OFF X 2 Optional machi...

Страница 48: ...itch activated press and hold the tray down button for more than 1 2 second In steps 1 and 2 paper feeding starts and is continuously fed until the cover is opened The test ends when the tray motor st...

Страница 49: ...l or actuate the micro switch being tested while observing the associated LED on the high capacity paper feed board LED Sensor Name 1 Paper size sensor 1 switch letter size 11 inches 2 Paper size sens...

Страница 50: ...1 36 Service Manual 5055 01x...

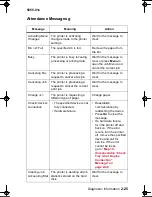
Страница 51: ...4 the Attendance Messages g on page 2 25 or the Symptom Table on page 2 52 and take the appropriate action If an error message appears while you are working on the printer go to the error message tab...

Страница 52: ...and Theta Counters Configuration ID RIP Controller Board If you replace the RIP controller board be sure to move the solid state drive memory and option cards from the old card to the new one Transfer...

Страница 53: ...ted place The room temperature is between 10 and 32 C 50 and 90 F and the relative humidity between 20 and 80 Avoid sites generating ammonia gas high temperature high humidity near water faucets kettl...

Страница 54: ...r Operator Manual 910 Drive Motor Error 910 Service Motor Error Step Questions Actions Yes No 1 Are connectors CN1 and CN5 on the motor drive board connected properly Go to step 2 Connect CN1 and CN5...

Страница 55: ...connected Replace the paper exit motor and go to step 2 Plug the connector in securely 2 Did replacement of the paper exit motor solve the problem Problem solved Replace the printer controller board S...

Страница 56: ...of connector J5 on the RIP board Replace the RIP fan Replace the RIP board Step Questions Actions Yes No 1 Is 24 V present between pins 1 and 3 on connectors CN17 upper left fan and CN5 upper right fa...

Страница 57: ...e problem Problem solved Return power supply 2 and replace the printer controller board Step Questions Actions Yes No 1 Is connector CN44 on the printer controller board connected properly Disconnect...

Страница 58: ...ff and reconnect CN44 Go to step 3 Replace the printer controller board 3 Power the printer off and short pins 8 and 11 of CN44 and turn the printer on Is error 924 displayed Replace the fuser Replace...

Страница 59: ...Is the toner cartridge encoder wheel dirty Clean the encoder wheel and toner sensor Go to step 3 3 Replace the toner cartridge for the color with the error Did this fix the problem Problem solved Go...

Страница 60: ...d control board cables and LED printhead Replace the printhead controller board Step Questions Actions Yes No 1 Is fuse 6 on the printhead control board open Replace the printhead control board cables...

Страница 61: ...d LED printhead Replace the printhead controller board 934 Service Drum Sensor Step Questions Actions Yes No 1 Is connector CN28 connected properly Go to step 2 Plug the connector in securely 2 Clean...

Страница 62: ...drum sensor LED Did this fix the problem Problem solved Replace the black drum sensor Go to step 3 3 Did replacing the black drum sensor fix the problem Problem solved Replace the printer controller...

Страница 63: ...Paper Feed HCPF Service Check on page 2 57 Plug the connector in securely Step Questions Actions Yes No 1 Is connector CN40 on the printer controller board connected properly Go to High Capacity Paper...

Страница 64: ...ine code 946 Printer Printhead Controller Board Communication Error 945 Service Engine Flash 946 Service Communication Step Questions Actions Yes No 1 Replace the printhead controller board Did this f...

Страница 65: ...t 30 seconds Turn the printer on Did this fix the problem Problem solved Verify proper installation of the EPROMs on both the printer controller board and the printhead controller board Go to step 2 2...

Страница 66: ...M Slot 1 Bad Replace RAM Card or the RIP board 961 RAM Slot 2 Bad Replace RAM Card or the RIP board 962 RAM Slot 3 Bad Replace RAM Card or the RIP board 964 Emulation Error Replace the DLE board If th...

Страница 67: ...Software Error in Network Port Software error To to the Options Service Check on page 2 77 and refer to the network card option section 978 Bad Checksum While Programming Network Card Software error 9...

Страница 68: ...ep 2 Replace the face up exit assembly 2 Is there continuity on the FU deflector solenoid between pins 1 and 2 of CN14 on the printer controller board Go to step 3 Replace the FU deflector solenoid 3...

Страница 69: ...ecurely 2 Are connectors CN26 and CN29 on the printer controller board connected properly Go to step 3 Plug the connector in securely 3 Verify the belt up down sensor actuator is properly blocking the...

Страница 70: ...oard Replace the belt up down clutch Go to step 6 Replace the belt up down sensor 6 Did replacing the belt up down clutch fix the problem Problem solved Replace the printer controller board 982 Servic...

Страница 71: ...lean the gear sensor Does this fix the problem Problem solved Replace the K drive unit gear sensor If the problem remains replace the printer controller board Step Questions Actions Yes No 1 Is connec...

Страница 72: ...ep 2 Plug the connector in securely 2 Is connector CN29 on the printer controller board connected properly Replace the transfer belt unit If the problem remains replace the printer controller board Pl...

Страница 73: ...3 of connector CN7 of the printer controller board Replace the printer controller board Replace the upper and lower transparency sensor Step Questions Actions Yes No 1 Is connector CN3 on the printer...

Страница 74: ...e sensor board connected properly Go to step 2 Plug the connector in securely 2 Is connector CN29 on the printer controller board connected properly Replace the density sensor Go to step 3 Plug the co...

Страница 75: ...ng Job The printer is processing a request to cancel the current print job Wait for the message to clear Change x The printer is requesting a different type of paper Change paper Check device connecti...

Страница 76: ...copy job originating from the OptraImageTM scanner Wait for the message to clear Defragmenting The printer is defragmenting the flash memory to reclaim storage space occupied by deleted resources Wai...

Страница 77: ...e Warming The printer is warming the fuser assembly Wait for the message to clear Enter PIN ______ The printer is waiting for you to enter your four digit PIN number Use the operator panel buttons to...

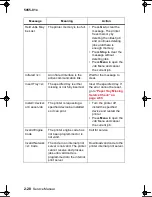
Страница 78: ...Insert the specified tray If the error cannot be reset go to Paper Tray Missing Service Check on page 2 63 Install device or Cancel Job The printer is requesting a specified device be installed so it...

Страница 79: ...lot Load a sheet of paper specified in the second line of the display in the manual feed tray or multipurpose feeder Press Select or Go to ignore the manual feed request and print on paper already in...

Страница 80: ...to clear Power Saver The printer is ready to receive data It is reducing electricity consumption while idle Send a job to the printer Press Go to quickly warm the printer to normal operating temperatu...

Страница 81: ...programming new system code Wait for the message to clear Program Flash The printer is storing resources such as fonts or macros in flash memory Wait for the message to clear Programming Disk The pri...

Страница 82: ...age to clear Restore Held Jobs Go Stop The printer has been reset or has been turned on and the printer detects print and hold jobs stored on the hard disk Press Go All jobs on hard disk are restored...

Страница 83: ...ck on page 2 63 Unsupported Disk The printer detects an unsupported disk Press Go to clear the message Format the disk USB x The printer is processing data through the specified USB port Wait for the...

Страница 84: ...nfig Error The optional heavy media tray is inserted into any tray location except tray 1 Remove the heavy media tray from the invalid location 34 Short Paper The paper is too short Press Go to clear...

Страница 85: ...the current job 38 Memory Full The printer is processing data but the memory is full Press Go to clear the message and continue printing Press Menu to open the Job Menu and cancel the current job 39...

Страница 86: ...n 1 output tray but the tray is closed Open bin 1 to clear the message Press Go to clear the message and continue If the message cannot be reset go to Map 9 False 41 Open Bin 1 Exit Tray Message on pa...

Страница 87: ...r The printer cannot establish communications with an installed network port Press Go to clear the message and continue printing Program new firmware for the network interface by way of the parallel p...

Страница 88: ...off and unplug the printer Remove or reconfigure the output bins Plug the printer in and turn it on 58 Too Many Disks Installed Too many disks are installed Turn off and unplug the printer Remove the...

Страница 89: ...Belt Fuser Exhausted The transfer belt and fuser have reached end of life Replace the transfer belt and fuser 80 Belt Fuser Life Warning The transfer belt and fuser are nearing end of life Press Go to...

Страница 90: ...o clear the message and continue printing 84 Black Photo Dev Exhausted The black photodeveloper has reached end of life Replace the black photodeveloper Make sure you also install the new fuser coatin...

Страница 91: ...color photodevelopers are nearing end of life Press Go to clear the message and continue printing The supplies message is displayed until you replace the photodevelopers 88 Black Toner Empty 85 Toner...

Страница 92: ...oner Low Toner Empty Message on page 2 47 88 color Toner Low The printer has detected that the specified toner cartridge is low Replace the specified toner cartridge Press Go to clear the message and...

Страница 93: ...ile activating the door switch is there continuity at pins 1 and 2 of the connector Replace the printer controller board Replace the side door turn guide sensor assembly Step Questions Actions Yes No...

Страница 94: ...estions Actions Yes No 1 Remove the rear cover on the high capacity paper feeder and observe LED 9 on the HCPF card while actuating the cover open micro switch Does the LED go on and off while opening...

Страница 95: ...tray properly connected Go to step 4 Properly connect the connectors 4 Replace the paper remaining sensor board for the problem tray Does this fix the problem Problem solved Replace the expansion feed...

Страница 96: ...s CN44 on the printer controller board properly connected Replace the printer controller board Properly connect CN44 Step Questions Actions Yes No 1 Insure that all connectors that the print unit phot...

Страница 97: ...and free of dirt or paper dust Go to step 2 Clean the encoder wheel or replace the toner set 2 Is the toner remaining photo interrupter sensor clean and free of obstructions Go to step 3 Clean or rep...

Страница 98: ...the LEDs 1 and 2 on the HCPF control board while unscrewing the paper size adjusting thumbscrews Do the LEDs light when the screws are loosened all the way Replace the HCPF control board Replace the...

Страница 99: ...onnectors 4 Are connectors CN3 and CN1 on the expansion paper feed control card for tray 1 properly connected Go to step 5 Properly connect the connectors 5 Replace the tray 1 expansion feeder control...

Страница 100: ...r replace the connector 9 Are connectors CN101 and CN102 on the duplex interface card properly connected Go to step 10 Properly connect the connectors 10 Replace the duplex interface card Does this fi...

Страница 101: ...Do the size sensor levers operate correctly Go to step 3 Replace the size sensor levers 3 Are the following connectors properly connected CN2 tray 1 on the printer controller board CN4 on the expansi...

Страница 102: ...n Paper or Letterhead If Printer Usage is set to Maximum Yield the printer must adjust the photodevelopers as it prepares to print a color page after printing a mono page The printer performs this sam...

Страница 103: ...vice Check on page 2 58 Operator panel does not operate properly Go to the Diagnostic Aids chapter and run the LCD and Button tests If the tests fail replace the operator panel If you still have a pro...

Страница 104: ...heck the following Excessive toner buildup on the transfer belt Clean off the toner and run a test print Transfer belt assembly Transfer belt toner waste bottle Transfer belt separation fingers Fuser...

Страница 105: ...ts are not causing an overload on the dc motor If the motor turns but the paper carrying section of the machine does not rotate check the drive 1 unit gear train for damage Be sure the clutch on the g...

Страница 106: ...er Solenoid Assembly Paper Re feedSolenoid Assembly Check for proper operation of the solenoid and linkage Replace as necessary 4 Photo interrupter Assembly Ensure that the photo interrupter actuators...

Страница 107: ...aper Level Sensor Lower Limit Switch Docking Switch Upper Limit Paper Sensor Switch Paper Sensor Switch Paper Feed Sensor Go to the High Capacity Paper Feed Sensor Switch Test on page 1 35 and perform...

Страница 108: ...rator panel FRU Action 1 Paper Feed Roller Transfer Roller Be sure the paper feed roller and transfer roller reverse roller and call roller are free of dirt and are not damaged Clean or replace parts...

Страница 109: ...s Be sure the paper feed gears are not damaged 4 Paper Feed Solenoid Paper Feed Clutch MPF Clutch Be sure the paper feed solenoid activates the paper feed clutch and the clutch engages properly Check...

Страница 110: ...connector CN13 on the printer controller board is connected properly 2 Registration Sensor Printer Controller Board Check for a fluctuation of between 0V and 5 V between pins 1 and 2 of connector CN11...

Страница 111: ...place any damaged or worn parts Do a continuity check of the solenoid Be sure connector CN122 is properly connected to the printer controller board 3 Paper Exit Motor Drive 2 Stepper Motor Face Down F...

Страница 112: ...plex unit is properly installed and that all connections are correct 3 Duplex Stopper Motor Side Fence Stepper Motor Be sure the stepper motor turns freely with no binding Check for wear or damage to...

Страница 113: ...FU FD solenoid for continuity Also be sure the connector is properly connected to the printer controller board 4 Face Up Exit Assembly Check the gears and the actuating mechanism for wear or damage Re...

Страница 114: ...for dirt or damage to the sensing contacts on rear Clean or replace the photodeveloper drum unit if necessary 2 Sub frame Unit Check the sensing contacts on the sub frame assembly Clean or replace th...

Страница 115: ...Unplug the machine and check fuse F2 on the power supply 1 for continuity If the fuse is good check the power switch connector for continuity 4 Power Supply 2 The power supply 2 may be defective Check...

Страница 116: ...prescribed intervals If you remove the transfer belt do not turn it upside down Toner will fall from the waste toner box onto the transfer sheets and roller s inside the belt This causes lower transf...

Страница 117: ...ations mm From Paper Center Thermistor Hot Roll 6 Thermistor BUR 0 TCO Hot Roll 66 TCO BUR 101 Detact Fingers Hot Roll 113 5 75 37 5 0 37 5 75 113 5 Detact Fingers BUR 134 90 45 0 45 90 134 Exit Rolle...

Страница 118: ...e sensor or the actuator if necessary Check for a fluctuation between 0V and 5 V between pins 8 and 10 while actuating the sensor 2 Belt Up Down Clutch Be sure connector CN26 is firmly connected to th...

Страница 119: ...ly installed in the printer Set print darkness to 4 from the Color Menu Clean the printhead LEDs If you suspect a toner cartridge is low on toner remove the appropriate toner cartridge and gently shak...

Страница 120: ...oblem remains go to Black Line on page 2 74 Toner specks appear on the page Replace the oil coating roll Toner colors the background of the page Be sure the affected photodevelopers are completely ins...

Страница 121: ...black photoconductor If the problem occurs when printing one of the colors replace all three of the color photodevelopers and the transfer belt If there still is a go to Uneven Printing on page 2 76 T...

Страница 122: ...ansparency Avoid getting fingerprints on transparencies before printing Print on the page is skewed Be sure the width guides in the paper tray or the multipurpose feeder fit snugly against the media y...

Страница 123: ...he printhead controller board and LED printhead assembly If the problem remains replace the LED printhead High Voltage Unit HVU Be sure all the connectors to the high voltage unit are securely connect...

Страница 124: ...printhead Print a blank document Replace the LED printhead if a black line appears on the paper Possible Cause Action High Voltage Unit HVU The printed paper has black print Be sure the high voltage u...

Страница 125: ...her color and run a test print If the new color prints replace the failing toner cartridge High Voltage Unit If the problem remains check the connector on the high voltage unit Replace the high voltag...

Страница 126: ...ry Top Cover Be sure the top cover is fully locked Possible Cause Action Fuser Heat Roll Fuser Press Roll Fuser Oil Roll Check for dirt or damage to the fuser heat the fuser press roll or the fuser oi...

Страница 127: ...replace the RIP board Flash Memory Option s Run a copy of the test page and check to see if the option you are checking is listed The printer does not recognize the option being installed if the opti...

Страница 128: ...ection WARNING This can be a very lengthy test depending on the disk size This test leaves the hard disk unformatted The servicer or user must reformat the disk using the Format Disk Menu operation Th...

Страница 129: ...erent surface phase counts Radar Page is always used when adjusting print registration Power On Self Test Sequence 1 Power on 2 Printer and RIP controller check ROM and RAM Fuser thermistor 3 Printer...

Страница 130: ...r light The light indicates whether the printer power is on and whether the printer is idle or busy processing a job Indicator Light Use the five operator panel buttons to open a menu scroll through a...

Страница 131: ...splay and view the available menu items Select the menu item shown on the second line of the display and view the available values and the current user default setting for that menu item Save the valu...

Страница 132: ...machine on Menu Overview SUPPLIES MENU Belt Block Photo Dev Coating Roll Color Photo Dev color Toner Fuser Replace Supplies Supplies Life UTILITIES MENU Color Samples Print Alignment Print Menus Print...

Страница 133: ...Switch PS SmartSwitch MAC Binary PS NPA Mode Parallel Buffer Job Buffering Advanced Status Protocol Honor Init Parallel Mode 1 Parallel Mode 2 SERIAL MENU PCL SmartSwitch PS SmartSwitch NPA Mode Seria...

Страница 134: ...s the margin value An asterisk is displayed next to the default value Upon first entering the Alignment menu the X alignment sign value pair will flash This indicates it is the alignment value being c...

Страница 135: ...ssage displays No buttons are active while the Alignment Test page is printing Once it is complete the Alignment screen will be displayed again The previously active margin value flashes The printer a...

Страница 136: ...pattern prints This pattern contains text of each character in the selected symbol set If Continuous is selected all sources printing with paper sizes will print the same page continuously until the t...

Страница 137: ...m the Configuration Menu Group When printing using this method the toner cartridge lockout functionality is enabled These pages cannot print unless a cartridge with a Machine Class ID matching the Mac...

Страница 138: ...or Stop Button Test The Button Test is used to verify the operation of each button on the operator panel When Button Test is selected the following screen displays When a button is depressed CL Closed...

Страница 139: ...mum pass count is 999 999 F represents the number of times the memory test finishes with errors Initially 00000 displays for The maximum fail count is 99 999 The power indicator blinks indicating the...

Страница 140: ...nt is 99 999 The power indicator blinks indicating the memory test is in process The printer runs this test continually The test can be terminated by powering off the printer Each time the test finish...

Страница 141: ...g the parallel hardware and the following screen displays Terminology P represents the number of times the memory test finishes successfully Initially 000000 displays for The maximum pass count is 999...

Страница 142: ...ata FF Error RAM Data AA Error RAM Data 00 Error RAM Data 55 Error DMA Count Error DMA Address Error DMA Interrupt Error DMA Memory Error DMA Background Error Clear Init Rise Error False Init Rise Err...

Страница 143: ...standard serial 1 optional serial port 1 P represents the number of times the memory test finishes successfully Initially 000000 displays for The maximum pass count is 999 999 F represents the number...

Страница 144: ...errupt Error Transmit Empty Error Threshold Error Receive Data Ready Error Break Interrupt Error Framing Error Parity Error Overrun Error Data Error Data 232 Error Data 422 Error FIFO Error DSR Error...

Страница 145: ...The Power indicator blinks while the test is in progress If the test is successful the following message displays Press Go Return or Stop to return to the DEVICE TESTS screen If the test fails then th...

Страница 146: ...all disk contents will be lost To continue on with the test press Go To exit the test immediately and return to the DEVICE TESTS screen press Return or Stop The Power indicator blinks while the test...

Страница 147: ...tinue the test press Go To exit the test immediately and return to the DEVICE TESTS screen press Return or Stop The following message displays while the test is running The Power indicator blinks whil...

Страница 148: ...U S Non U S Light Quantity Cyan Magenta Yellow Black Range 0 to 45 If you replace one or more of the printheads or the EEPROM for the engine controller the Light Quantity value must be set to the val...

Страница 149: ...This message displays only if the printer is confused with the standard parallel port Par 1 Strobe Adj Note This message displays only if a parallel port is available through the PCL slot 1 Auto Color...

Страница 150: ...not viewable from the Ready menu The following screen illustrates the operator panel when the cyan drum counter displays The leftmost digit 1 in this example blinks indicating it is the first digit to...

Страница 151: ...value displays Press Select to move to the next digit The next digit 2 in this example blinks Continue modifying each digit using this method To skip a digit i e and keep it s current value press Sel...

Страница 152: ...to be changed To change the value press Menu until the desired value displays Press Select to move to the next digit The next digit 2 in this example blinks Continue modifying each digit using this m...

Страница 153: ...in the log when a 925 service error occurs If an error occurs after the log is full the oldest error in the log is discarded to make room for the new error The printer stores identical errors in conse...

Страница 154: ...lear the log as the empty log message displays as follows Select No Return or Stop to exit the Clear Log menu Maintenance Menu Exiting Diagnostics Mode To exit diagnostics mode and POR the printer int...

Страница 155: ...with its covers removed use care not to allow your clothing to be caught in revolving parts such as the gears rollers and fan motor Never touch the terminals of electrical parts or high voltage parts...

Страница 156: ...lectricity Do not touch pins of the integrated circuits with your bare hands Replacement Before you unplug connectors from the circuit boards be sure the power cord has been unplugged from the power o...

Страница 157: ...Paper Feed Timing Belt Adjustment 1 Secure the bracket with the screw as shown 2 Attach the spring and washer to the bracket with the screw 3 Adjust the screw to 6mm 1mm 4 Tighten the screw completel...

Страница 158: ...m the four screws from the back side and the screw from the left side Operator Panel Removal 1 Open the top unit and remove the toner cartridges and photoconductor drum units 2 Remove the operator pan...

Страница 159: ...Repair Information 4 5 5055 01x Cover Front Removal 1 Remove the four hinge screws from the front cover 2 Remove the front cover...

Страница 160: ...Cover Front Left 1 Open the front cover and remove the cassette 2 Remove the left front cover by removing the three screws Cover Rear Removal 1 Open the top unit 2 Remove the three screws from the rea...

Страница 161: ...Removal 1 Remove the screw from the solenoid cover 2 Remove the solenoid cover Cover Left Side Removal 1 Remove the upper cassette front cover paper exit tray and duplex unit 2 Remove the five screws...

Страница 162: ...1 Open the top unit and remove the front cover and upper cassette 2 Remove the seven screws from the right side cover together with the turn guide and remove the cover 3 When installing the right sid...

Страница 163: ...cover by sliding upward 2 Remove the three harnesses and one flat cable of the RIP board connector 3 Remove the two screws from the parallel port connector and the screw from the USB connector 4 Remo...

Страница 164: ...4 10 Service Manual 5055 01x Tray Paper Exit Removal 1 Unlatch the hinge at the back side then unlatch the hinge on the front side 2 Remove the paper exit tray...

Страница 165: ...2 Slightly lift and remove the RIP box Electronic Box Removal 1 Open the top unit and remove the back cover front cover cassette turn guides and right side cover 2 Remove the screws from the electron...

Страница 166: ...ductor drum units Note Remove the transfer belt or spread a cloth or paper over the transfer belt to protect it from damage 2 Remove the screw from the printhead holder and remove the holder 3 Remove...

Страница 167: ...thead controller board Place the printer in Diagnostic Mode input the printhead light quantity value plus eight refer to note below from the printhead label Be sure to remove any fingerprints or stain...

Страница 168: ...emove the appropriate printheads Spread a cloth or paper over the transfer belt to protect it from damage 2 Remove the two screws from HSP holder and remove the holder 3 Remove the top cover 4 Disconn...

Страница 169: ...ve the top cover 2 Remove the 20 printhead controller board connectors 3 Remove the 10 screws from the printhead controller board and remove the board Note When replacing the board be sure to return t...

Страница 170: ...tridges and photoconductor drum units top cover and face down guide assembly 2 Remove the four screws and the five screws from the upper bracket and remove the bracket 3 Remove the two screws from the...

Страница 171: ...pose Feeder Tray Removal 1 Open the top unit and remove the front cover cassette feeder turn guides and right side cover 2 Open the multi purpose feeder and slide it toward the magnet in the direction...

Страница 172: ...until the paper feed roller screw is visible Turn the paper feed roller and remove the screw from the roller 6 Remove the paper feed roller from the shaft Note If the paper feed roller surface is stai...

Страница 173: ...tion 4 19 5055 01x Paper Present Sensor Removal 1 Open the paper feed cover and pull out the duplex unit halfway 2 Unclip the paper present sensor from the mounting 3 Disconnect the connector and remo...

Страница 174: ...nic box Open the turn guide and paper feed cover and pull out the duplex unit halfway 2 Remove the belt unit 3 Disconnect the connector and remove the three screws and the screw from the paper feed fr...

Страница 175: ...n 4 21 5055 01x Cassette Guide Removal 1 Remove the paper feed frame 2 Remove the front cover cassette turn guide right side cover and paper feed frame 3 Remove the screws from the cassette guide and...

Страница 176: ...midity sensor and remove the sensor 3 Remove the two screws from the paper feed solenoid bracket and remove the solenoid 4 Remove the spring from the solenoid plunger arm Note Be sure to use the speci...

Страница 177: ...it and remove the upper cassette front cover multi purpose feeder right side cover and turn guide 2 Remove the two screws from the gear cover and remove the cover 3 Remove the four screws from the mul...

Страница 178: ...rn and remove upward 8 Remove the C clip and remove the multi purpose feeder clutch Note After reassembling the components coat the contact areas of the multi purpose feeder roll shaft and multi purpo...

Страница 179: ...55 01x Fanning Pad Removal 1 Open the top unit and remove the upper cassette front cover turn guide multi purpose feeder right side cover and multi purpose feeder roll 2 Release clips at 4 positions a...

Страница 180: ...tion Sensor Removal 1 Open the top unit and remove the upper cassette front cover turn guide multi purpose feeder right side cover and multi purpose feeder frame 2 Disconnect the connector of the regi...

Страница 181: ...Present Sensor Removal 1 Open the top unit and remove the upper cassette front cover turn guide multi purpose feeder right side cover turn guide and multi purpose feeder frame 2 Disconnect the connect...

Страница 182: ...OHP detection sensor upper multi purpose feeder frame back cover RIP cover RIP board RIP box and electronic box 2 Remove the four screws from the paper carrying frame 3 Remove the screw from the OHP s...

Страница 183: ...Removal 1 Open the top unit open the turn guide open the paper feed cover and pull out the duplex unit halfway 2 Remove the two screws from the registration frame 3 Remove the registration clutch Note...

Страница 184: ...ms If the operator panel is inoperable or if you have an unrecoverable error code perform steps 1 through 4 and then Remove the transfer belt cover Override the front cover interlock switch Turn the p...

Страница 185: ...Repair Information 4 31 5055 01x 3 Loosen the thumbscrews as shown...

Страница 186: ...4 32 Service Manual 5055 01x 4 Lift and remove the transfer belt cover 5 Loosen the thumbscrews as shown...

Страница 187: ...9 Turn the printer on Note If the message Did you Replace Belt appears wait for the message Select yes Stop no and press Select If you replaced the belt before the Life Warning or Exhausted message a...

Страница 188: ...t Up Down Detection Sensor Removal 1 Open the top unit and remove the waste toner bottle and belt unit 2 Remove the belt up down detection sensor from the mounting board 3 Remove the connector from th...

Страница 189: ...Repair Information 4 35 5055 01x Sensor Board Removal 1 Remove the transfer belt unit 2 Remove the four connectors 3 Remove the three screws from the waste toner full sensor board...

Страница 190: ...move the belt unit 2 Remove the three screws from the sensor bracket 3 Remove the harness band and remove the two screws from the density sensor from the sensor bracket 4 Remove the three set screws f...

Страница 191: ...ard RIP box and electronic box 2 Remove the connectors and the eight screws from the printer controller Note When replacing the board install the EPROM U5 of the former board to the new board Also whe...

Страница 192: ...al 1 Open the top unit and remove the RIP cover RIP board RIP box electronic box and printer controller board 2 Remove the five screws from the printer controller board bracket 3 Remove the connectors...

Страница 193: ...nd high voltage power supply board 2 Remove the two screws from the sub frame R from inside of the main unit 3 Remove the screw and C clip from the sub frame cover 4 Remove the screw from the toner re...

Страница 194: ...a paper or cloth over the belt to protect the belt Set the sub frame F to the position of the following colors depending on presence of upper detection button Magenta Sub frame F1 Detection button ava...

Страница 195: ...p unit and remove the gear cover RIP cover RIP board RIP box electronic box printer controller and high voltage power supply board 2 Remove the screw from the drive gear unit sensor assembly 3 Remove...

Страница 196: ...Open the top unit and remove the RIP cover RIP board RIP box and electronic box Remove the printer controller Remove the printer controller bracket and the high voltage power supply board 2 Remove the...

Страница 197: ...RIP box and electronic box Remove the cassette left front cover and back cover Remove the left side cover 2 Remove the insulation sheet connector two ground wires five screws two screws with washers t...

Страница 198: ...l 5055 01x Power Supply 2 Removal 1 Open the top unit and remove the RIP cover RIP board RIP box and electronic box 2 Disconnect the connector and remove the seven screws from Power Supply 2 and remov...

Страница 199: ...move the side left cover Remove the connector two ground wires and power supply 1 6 Remove the connector CN2 CN4 and CN5 from the motor drive board 7 Remove the four screws with spring washers from th...

Страница 200: ...ront cover paper feed cover and left side cover 2 Unlock the power switch and pull out the power switch 3 Remove each terminal connected to the power switch Note When connecting be careful to connect...

Страница 201: ...side cover RIP cover RIP board RIP box and the electronic box Remove the turn guide and open the paper feed cover and remove the duplex unit Remove the left side cover and power supply A 2 Disconnect...

Страница 202: ...box Remove the upper cassette front cover B and back cover Open the turn guide and paper feed cover and remove the duplex unit Remove the left side cover and power supply A 2 Disconnect the connector...

Страница 203: ...Repair Information 4 49 5055 01x Main Unit Fan Removal 1 Remove the left side cover the solenoid cover and the rear cover 2 Remove the two screws from the main unit fan bracket 3 Remove the fan...

Страница 204: ...1 and power unit 2 4 Remove the printer controller board 5 Remove the bracket high voltage power supply board and sub frame R 6 Remove the fuser unit face up paper delivery unit belt up down clutch a...

Страница 205: ...connector cable assembly from the fuser connector plate Note Note the direction when installing 13 After removing the two screws on the bracket that attaches the rear side and paper exit side of the m...

Страница 206: ...55 01x 14 Remove the bearing from the belt up down switching shaft and remove the belt up down switching shaft 15 Remove the screw from the clutch stopper The clutch stopper is attached to the ground...

Страница 207: ...he right side 17 Remove the screw and the screw from the drive unit and remove the unit 18 Remove the two screws and the screw from the belt up down clutch box and remove the belt up down clutch 19 Re...

Страница 208: ...ve the left front cover left side cover and rear cover 3 Remove the three screws from the face up delivery assembly and remove the assembly 4 Remove the paper delivery sensor from the face up paper de...

Страница 209: ...remove the toner cartridges photoconductor drum units and upper cover 2 Remove the top cover 3 Disconnect the connector and remove the five screws and two snap bands from the face down guide assembly...

Страница 210: ...he motor from the face down guide assembly Remove the assembly Note When the motor is installed press the motor 45 degrees in an upward direction when viewing from the rear 6 Remove the face down pape...

Страница 211: ...rn Guide Cover Sensor Removal 1 Open the top unit and remove the upper cassette front cover multi purpose feeder right side cover and turn guide 2 Remove the two screws from turn guide sensor and remo...

Страница 212: ...Slide Rail Removal 1 Remove the upper cassette 2 Remove the screw from both left and right slide rails Front Cover Open Switch Actuator Removal 1 Open the front cover 2 Remove the two screws from the...

Страница 213: ...Repair Information 4 59 5055 01x Lock Handle Assembly Removal 1 Open the top unit 2 Turn the plastic latch on the front and rear sides by 90 degrees 3 Remove the lock handle assembly...

Страница 214: ...4 60 Service Manual 5055 01x Top Unit Removal 1 Open the top unit and remove the top cover and face down guide assembly 2 Remove the screws and remove the top unit...

Страница 215: ...er guide assembly 2 Remove the yellow and black sub frame 3 Remove the screw and the screw from the right stopper and remove the stopper 4 Remove the screw from the left stopper and remove the stopper...

Страница 216: ...4 62 Service Manual 5055 01x Fuser Removal 1 Open the top unit 2 Pushing the front and back lock hold the handle raise and remove the fuser...

Страница 217: ...e the two screws from left side cover and remove the cover 4 Remove the two screws from right side cover A and remove the cover 5 Remove the two screws from right side cover B and remove the cover 6 R...

Страница 218: ...paper the detection cover and remove the cover 10 Remove the paper detection sensor 11 Remove the high capacity feeder guide The cover is hinged in place 12 Remove the screw from the paper feed rolle...

Страница 219: ...13 Remove the screw from the gear cover and remove the cover 14 Remove the two screws from the paper carrying roller and remove the roller 15 Remove the connector and remove the two screws from the d...

Страница 220: ...emove the six screws from the drive assembly and remove the assembly 17 Remove the two screws from the paper remaining detection board and remove the board 18 Remove the four screws from the solenoid...

Страница 221: ...Repair Information 4 67 5055 01x 19 Remove the two bearings from the turn guide The cover is hinged in place 20 Remove the screw from the paper feed frame fuser plate and remove the plate...

Страница 222: ...4 68 Service Manual 5055 01x 21 Remove the two screws from the fuser frame assembly and remove the assembly 22 Remove the three screws from the cassette guide assembly and remove the assembly...

Страница 223: ...24 Remove the two screws from the paper size detection board and remove the board 25 Remove the screw from the size detection lever spring and remove the spring 26 Remove the two screws from the conne...

Страница 224: ...4 70 Service Manual 5055 01x 28 Remove the two screws from the lower drawer connector female and remove the connector...

Страница 225: ...ir Information 4 71 5055 01x Duplex Unit Separation Removal 1 Remove the thumbscrews C clips and screws as shown from both sides 2 Remove the connectors and separate the duplex frame from the duplex u...

Страница 226: ...the interface board and remove the board 2 Remove the two screws from the duplex connector and remove the connector Duplex Timing Belt Removal 1 Remove the three C clips from the three timing gears a...

Страница 227: ...noid Removal 1 Remove the two screws securing the pressure roll solenoid assembly Duplex Feed Roller And Solenoid Removal 1 Remove the two screws securing the feed roll solenoid assembly 2 Remove the...

Страница 228: ...Side Fence Motor Assembly Side Fence Removal 1 Remove the three screws and remove the side fence motor assembly 2 Remove the front and rear side fences Note When installing spread the front and rear s...

Страница 229: ...Repair Information 4 75 5055 01x Duplex Paper Carrying Motor Removal 1 Remove the gear cover 2 Remove the screws from the duplex paper carrying motor and remove the motor...

Страница 230: ...two screws from the drive cover and remove the cover 2 Remove the front cover 3 Remove the two screws from the right cover and remove the cover 4 Remove the top cover 5 Remove the rear cover 6 Remove...

Страница 231: ...1x HCPF Call Roller Paper Feed Roller Reverse Roller Removal 1 Open the top cover on the tray 2 Remove the two screws from the transfer cover and remove the cover 3 Remove the retaining rings on the r...

Страница 232: ...ur screws from the transfer cover and remove the cover 2 Remove the two screws from the drive cover and remove the cover 3 Remove the screw from the clamp plate and remove the plate 4 Remove the conne...

Страница 233: ...n sensor turns on 2 Remove the front cover and transfer cover 3 Remove the two screws on the front and rear sides of the side fence 4 Mark the locking position of the side fence locking stay 5 Remove...

Страница 234: ...tay hold the stay when removing the sensors Be sure the side registration is not shifted which may occur with the dismounting and mounting of the locking stay If it is shifted relocate the stay toward...

Страница 235: ...Repair Information 4 81 5055 01x HCPF Tray Motor Removal 1 Remove the rear cover and the drive cover 2 Remove the two screws of the tray motor and remove the motor...

Страница 236: ...aper Level Sensor Removal 1 Remove the four screws from the transfer cover and remove the cover 2 Remove the two screws from the sensor and remove the cover 3 Remove the connector and screw from paper...

Страница 237: ...upward 2 Disconnect the power cord 3 Remove the front cover 4 Remove the two screws from the power supply cover and remove the cover 5 Remove the four screws from the power supply unit and remove the...

Страница 238: ...4 84 Service Manual 5055 01x...

Страница 239: ...Locations 5 1 5055 01x 5 Locations Covers Diagram...

Страница 240: ...5 2 Service Manual 5055 01x Major Parts Diagram...

Страница 241: ...0 Transfer Belt 6 Registration Upper Roll 21 Belt Drive Roller 7 Registration Lower Roll 22 Paper Delivery Detection Lever 8 Registration Sensor 23 Press Roll 9 Registration Detection Lever 24 Heater...

Страница 242: ...5 4 Service Manual 5055 01x Printer Controller Board...

Страница 243: ...Locations 5 5 5055 01x Printhead Controller Board...

Страница 244: ...5 6 Service Manual 5055 01x RIP Board...

Страница 245: ...Locations 5 7 5055 01x Power Source Unit 1 Board Power Source Unit 2 Board...

Страница 246: ...5 8 Service Manual 5055 01x High Voltage Power Supply Board...

Страница 247: ...Locations 5 9 5055 01x Sensor Board Expansion Paper Feeder Controller Board...

Страница 248: ...5 10 Service Manual 5055 01x Duplex Unit Controller Board Motor Drive Board Size Sensor Board...

Страница 249: ...Locations 5 11 5055 01x High Capacity Paper Feed HCPF...

Страница 250: ...5 12 Service Manual 5055 01x High Capacity Paper Feed Configuration...

Страница 251: ...Locations 5 13 5055 01x Electrical Parts Layout...

Страница 252: ...5 14 Service Manual 5055 01x Driving Parts Layout...

Страница 253: ...Locations 5 15 5055 01x Sensor and Switch Locations...

Страница 254: ...5 16 Service Manual 5055 01x...

Страница 255: ...Locations 5 17 5055 01x Component Locations...

Страница 256: ...Voltage Unit HVU 8 Upper Left Fan 9 Main Drive Motor 10 Upper Right Fan 11 Power Supply Fan 12 Temperature Humidity Sensor 13 Paper Remaining Detection Sensor Main Unit 14 Paper Remaining Detection Se...

Страница 257: ...Belt Life Warning and or 80 Fuser Life Warning Routine replacement of these parts ensures peak printer performance and helps prevent print quality problems and paper feed problems resulting from worn...

Страница 258: ...y cloth If it is still dirty clean with a soft cloth and alcohol Charge Exposure Unit LED Head Remove any dust or dirt and wipe the surface lightly with a dry cloth If it is still dirty clean with a s...

Страница 259: ...ajority of identical parts they are shown on the same list Common parts are shown by one index number Parts peculiar to one or the other of the assemblies are listed separately and identified by descr...

Страница 260: ...7 2 Service Manual 5055 01x Assembly 1 Covers 1...

Страница 261: ...9 56P9545 1 Label Operator Guide 10 56P9549 1 Label Model Name 11 56P9532 1 Cover Assembly Front 12 56P9548 1 Label Jam Removal 13 56P9543 1 Magnet Front Cover Latch 14 56P9542 1 Cover Left Front 15 5...

Страница 262: ...7 4 Service Manual 5055 01x Assembly 2 Covers 2...

Страница 263: ...er 3 11G0243 2 Interrupter Photo 4 56P9564 1 Cable Face Up Sensor 5 56P9559 1 Roller Paper Exit 6 56P9561 1 Deflector Face Up 7 56P9502 1 Switch Paper Exit Tray 8 56P9565 1 Cable Paper Exit Switch 9 5...

Страница 264: ...7 6 Service Manual 5055 01x Assembly 3 Covers 3...

Страница 265: ...n Pinch Roller 8 56P9577 1 Roller Face Down Lower Feed 9 56P9571 4 Arm Face Down Lower Pinch Roller 10 56P9570 4 Spring Face Down Lower Pinch Roller 11 56P9583 1 Cover Face Down 12 56P9567 1 Door Face...

Страница 266: ...7 8 Service Manual 5055 01x Assembly 4 Covers 4...

Страница 267: ...Parts Catalog 7 9 5055 01x Asm Index Part Number Units Description 4 1 56P9584 1 Guide Assembly Turn...

Страница 268: ...7 10 Service Manual 5055 01x Assembly 5 Covers 5...

Страница 269: ...Asm Index Part Number Units Description 5 1 56P9587 1 Feeder Assembly Multi Purpose 2 56P9589 1 Extender MPF 3 56P9588 1 Cover MPF 4 56P9590 1 Spring MPF 5 11G0118 1 Pinion MPF 6 11G0117 1 Rack MPF 7...

Страница 270: ...7 12 Service Manual 5055 01x Assembly 6 Upper Unit...

Страница 271: ...oller Power 12 56P9637 1 Frame Printhead Controller 13 56P9625 1 Hook Right Link 14 56P9626 2 Cover Hook 15 56P9628 4 Pivot Color Link 16 56P9614 1 Spring Return 17 56P9618 1 Hook Right 18 56P9615 1 H...

Страница 272: ...7 14 Service Manual 5055 01x Assembly 6 Upper Unit Continued...

Страница 273: ...6P9593 4 Holder Rear Printhead 38 56P9619 1 Bracket Rear Upper 39 56P9622 1 Fan Upper Right 40 56P9623 1 Fan Upper Left 41 56P9621 1 Bracket Fan Holder NS 56P9629 1 Frame Link NS 56P9639 4 Connector U...

Страница 274: ...7 16 Service Manual 5055 01x Assembly 7 Base 1...

Страница 275: ...uide Upper Cassette 14 56P9503 4 Foot Rubber 15 56P9641 1 Actuator Front Cover Open Switch 16 56P9505 1 Rail Base Left Side 17 56P9504 1 Rail Base Right Side 18 56P9521 1 Lever Size Sensor 19 56P9522...

Страница 276: ...7 18 Service Manual 5055 01x Assembly 7 Base 1 Continued...

Страница 277: ...mbly C Toner Remaining 39 56P9655 1 Sensor Assembly M Toner Remaining 40 56P9661 1 Rod Lock 41 56P9662 1 Shaft Changing NS 56P9524 2 Screw Slide Rail NS 11G0569 1 Parts Packet NS 11G0579 1 Parts Packe...

Страница 278: ...7 20 Service Manual 5055 01x Assembly 8 Base 2...

Страница 279: ...its Description 8 1 56P9666 1 Support Assembly Upper Unit 2 56P9667 4 Pin Upper Unit Support 3 56P9668 1 Handle Assembly Lock 4 56P9669 1 Handle Lock 5 56P9673 1 Cover Electronic 6 56P9670 1 Shroud Ca...

Страница 280: ...7 22 Service Manual 5055 01x Assembly 9 Base 3...

Страница 281: ...3 1 Roller Assembly Upper Carrying 13 56P9682 1 Frame Assembly Carrying 14 56P9694 1 Unit Transfer Belt 15 56P9696 1 Cable Assembly Belt Thermistor 16 56P9502 1 Sensor Turn Guide Door 17 56P9695 1 Cab...

Страница 282: ...7 24 Service Manual 5055 01x Assembly 10 Electrical...

Страница 283: ...Printer Controller 12 56P9742 1 Board Heater Drive 13 56P9741 1 Resistor Conditioning 14 56P9738 1 Cable Assembly Conditioning Joint 15 56P9698 1 Motor Assembly 120 V 15 56P9699 1 Motor Assembly 230 V...

Страница 284: ...7 26 Service Manual 5055 01x Assembly 10 Electrical Continued...

Страница 285: ...1 Power Supply 230 V 2 32 56P9715 1 Cable High Voltage Power Supply Board NS 11D0328 1 Power Cord USA Canada APG LAD NS 11D0329 1 Power Cord Peru NS 11D0330 1 Power Cord Argentina NS 11D0331 1 Power...

Страница 286: ...7 28 Service Manual 5055 01x Assembly 11 I F Controller...

Страница 287: ...ory NS 56P9911 1 Card Assembly 256MB SDRAM memory NS 56P9912 1 Card Assembly 4MB Flash DIMM memory NS 56P9913 1 Card Assembly 8MB Flash DIMM memory NS 56P9914 1 Card Assembly 16MB Flash DIMM memory NS...

Страница 288: ...7 30 Service Manual 5055 01x Assembly 11 I F Controller Continued...

Страница 289: ...escription NS 56P9926 1 Software Optra Forms NS 56P9927 1 Software Optra Forms Director NS 56P9928 1 DIMM Lexmark Forms 4MB Flash NS 56P9929 1 DIMM Lexmark Forms 8MB Flash NS 56P9930 1 DIMM Lexmark Fo...

Страница 290: ...7 32 Service Manual 5055 01x Assembly 12 Fuser Unit...

Страница 291: ...Parts Catalog 7 33 5055 01x Asm Index Part Number Units Description 12 1 56P9751 1 Fuser 120 V 1 56P9752 1 Fuser 230 V...

Страница 292: ...7 34 Service Manual 5055 01x Assembly 13 Cassette...

Страница 293: ...ocation Plate 5 56P9753 1 Plate Left Rear Location 6 56P9763 2 Spring A Push Up 7 56P9764 2 Spring B Push Up 8 56P9757 1 Locator Front Side 9 56P9758 1 Pawl Front 10 56P9759 1 Lock A Side 11 11G0284 1...

Страница 294: ...7 36 Service Manual 5055 01x Assembly 14 Expansion Feeder 1...

Страница 295: ...Cover Front Feeder 11 56P9504 1 Rail Left Side 12 56P9524 2 Screw Slide Rail 13 56P9503 6 Foot Rubber 14 56P9505 1 Rail Right Side 15 11G0399 5 Plate Ground 16 56P9766 1 Cover Left Side 17 56P9522 1 B...

Страница 296: ...7 38 Service Manual 5055 01x Assembly 15 Expansion Feeder 2...

Страница 297: ...ssette 14 56P9515 1 Guide Upper Cassette 15 11G0563 1 Interrupter Photo 16 56P9786 1 Spring Paper Detection Sensor 17 56P9784 1 Actuator Paper Detection 18 56P9787 1 Cable Paper Present Sensor 19 56P9...

Страница 298: ...7 40 Service Manual 5055 01x Assembly 16 Duplex Unit 1...

Страница 299: ...bly 2 56P9804 1 Board Duplex Interface 3 56P9799 1 Frame Duplex 4 56P9800 2 Screw Duplex Mounting 5 56P9803 1 Motor Duplex Stepping 6 56P9525 1 Interrupter Photo 7 56P9806 1 Cable Assembly Paper Detec...

Страница 300: ...7 42 Service Manual 5055 01x Assembly 17 Duplex Unit 2...

Страница 301: ...o 11 56P9526 2 Spring Feed Roller 12 56P9815 6 Spring Feed Roller 13 56P9829 3 Solenoid Assembly Feed Roller 14 56P9831 1 Cable Assembly Duplex Drawer 15 56P9810 1 Roller Follow up Feed 16 56P9527 2 G...

Страница 302: ...7 44 Service Manual 5055 01x Assembly 18 High Capacity Paper Feed 1...

Страница 303: ...56P9835 1 Magnet Latch 3 56P9837 1 Cover Upper 4 56P9834 1 Cover Upper Rear 5 56P9843 1 Cover Lower Rear 6 56P9839 1 Cover Right 7 56P9833 1 Cover Front 8 56P9836 1 Fence End 9 56P9940 1 Ring Snap 10...

Страница 304: ...7 46 Service Manual 5055 01x Assembly 19 High Capacity Paper Feed 2...

Страница 305: ...er Feed 3 56P9844 1 Motor Assembly Transport 4 56P9941 1 Arm Pick up 5 56P9501 1 Spring Pressure 6 56P9528 1 Interrupter Photo 7 56P9849 1 Roller Manual Feed Pickup 8 56P9850 1 Roller Manual Feed 9 56...

Страница 306: ...7 48 Service Manual 5055 01x Assembly 20 High Capacity Paper Feed 3...

Страница 307: ...scription 20 1 56P9854 1 Sensor Assembly Photo 2 56P9855 1 Interrupter Photo 3 56P9529 1 Caster HCPF 4 56P9856 1 Spring Tension 5 56P9857 1 Switch Micro 6 56P9530 1 Switch Push 7 56P9859 1 Connector I...

Страница 308: ...7 50 Service Manual 5055 01x Assembly 21 High Capacity Paper Feed 4...

Страница 309: ...1 Cable Assembly Sensor 9 56P9877 1 Cable Assembly Paper Size Sensor 10 56P9876 1 Cable Assembly Lift Motor 11 56P9868 1 Board High Capacity Paper Feed 12 56P9873 1 Cable Assembly Power Supply Out 13...

Страница 310: ...7 52 Service Manual 5055 01x Assembly 22 High Capacity Paper Feed 5...

Страница 311: ...mber Units Description 22 1 56P9883 2 Spring Pressure 2 56P9528 4 Interrupter Photo 3 56P9888 1 Bracket Rear Idler 4 56P9884 2 Belt Timing 5 56P9886 1 Gear Drive 6 56P9885 2 Pulley Timing 7 56P9882 1...

Страница 312: ...7 54 Service Manual 5055 01x Assembly 23 High Capacity Paper Feed 6...

Страница 313: ...s Description 23 1 56P9892 1 Plate Upper Side Fence 2 56P9893 2 Knob 3 56P9891 2 Knob Tray 4 56P9890 2 Plate Paper Adhesion 5 56P9915 1 Fence Assembly Front Side 6 56P9894 1 Fence Assembly Rear Side 7...

Страница 314: ...7 56 Service Manual 5055 01x...

Страница 315: ...Driving Parts Layout 5 14 E Electrical Parts Layout 5 13 Error Log 3 25 Exiting Diagnostics Mode 3 26 G General Information 1 1 H Handling Printed Circuit Boards 4 2 Hardware Tests 3 10 HCPF Sensor Sw...

Страница 316: ...Preventive Maintenance 6 1 Print Quality Pages 3 9 Print Quality Problems 2 69 Printer Messages 2 4 Printing Menu Settings 3 4 R Removals belt up down clutch 4 42 belt up down detection sensor 4 34 c...

Страница 317: ...r board assembly 4 48 power supply 1 4 43 power supply 2 4 44 power switch 4 46 printer controller 4 37 printhead controller board 4 15 R sub frame 4 39 registration clutch 4 29 registration frame 4 2...

Страница 318: ...duplex unit 1 17 electrophotography process 1 5 envelope postcard mode 1 19 expansion paper feeder 1 16 fuser unit 1 13 high capacity paper feeder HCPF 1 25 maintenance mode 1 33 multi purpose feeding...

Страница 319: ...7 3 13A0296 7 29 13A0297 7 29 56P0161 7 29 56P0162 7 29 56P9500 7 35 56P9501 7 47 56P9502 7 5 7 23 56P9503 7 17 7 37 56P9504 7 17 7 37 56P9505 7 17 7 37 56P9506 7 39 56P9507 7 17 7 39 56P9508 7 39 56...

Страница 320: ...7 13 56P9593 7 15 56P9594 7 13 56P9595 7 13 56P9596 7 13 56P9597 7 13 56P9598 7 13 56P9599 7 15 56P9600 7 13 56P9601 7 13 56P9602 7 13 56P9603 7 13 56P9604 7 15 56P9605 7 15 56P9606 7 15 56P9607 7 15...

Страница 321: ...23 56P9694 7 23 56P9695 7 23 56P9696 7 23 56P9697 7 23 56P9698 7 25 56P9699 7 25 56P9700 7 25 56P9701 7 25 56P9702 7 25 56P9703 7 25 56P9704 7 25 56P9705 7 25 56P9706 7 25 56P9707 7 25 56P9708 7 25 5...

Страница 322: ...9792 7 39 56P9793 7 39 56P9794 7 39 56P9795 7 39 56P9796 7 39 56P9797 7 39 56P9798 7 41 56P9799 7 41 56P9800 7 41 56P9803 7 41 56P9804 7 41 56P9805 7 41 56P9806 7 41 56P9807 7 41 56P9808 7 43 56P9809...

Страница 323: ...7 51 56P9878 7 51 56P9879 7 51 56P9880 7 51 56P9882 7 53 56P9883 7 53 56P9884 7 53 56P9885 7 53 56P9886 7 53 56P9887 7 53 56P9888 7 53 56P9889 7 55 56P9890 7 55 56P9891 7 55 56P9892 7 55 56P9893 7 55...

Страница 324: ...I 10 Service Manual 5055 01x...

Отзывы: