Diagnostic information
2-117
5062
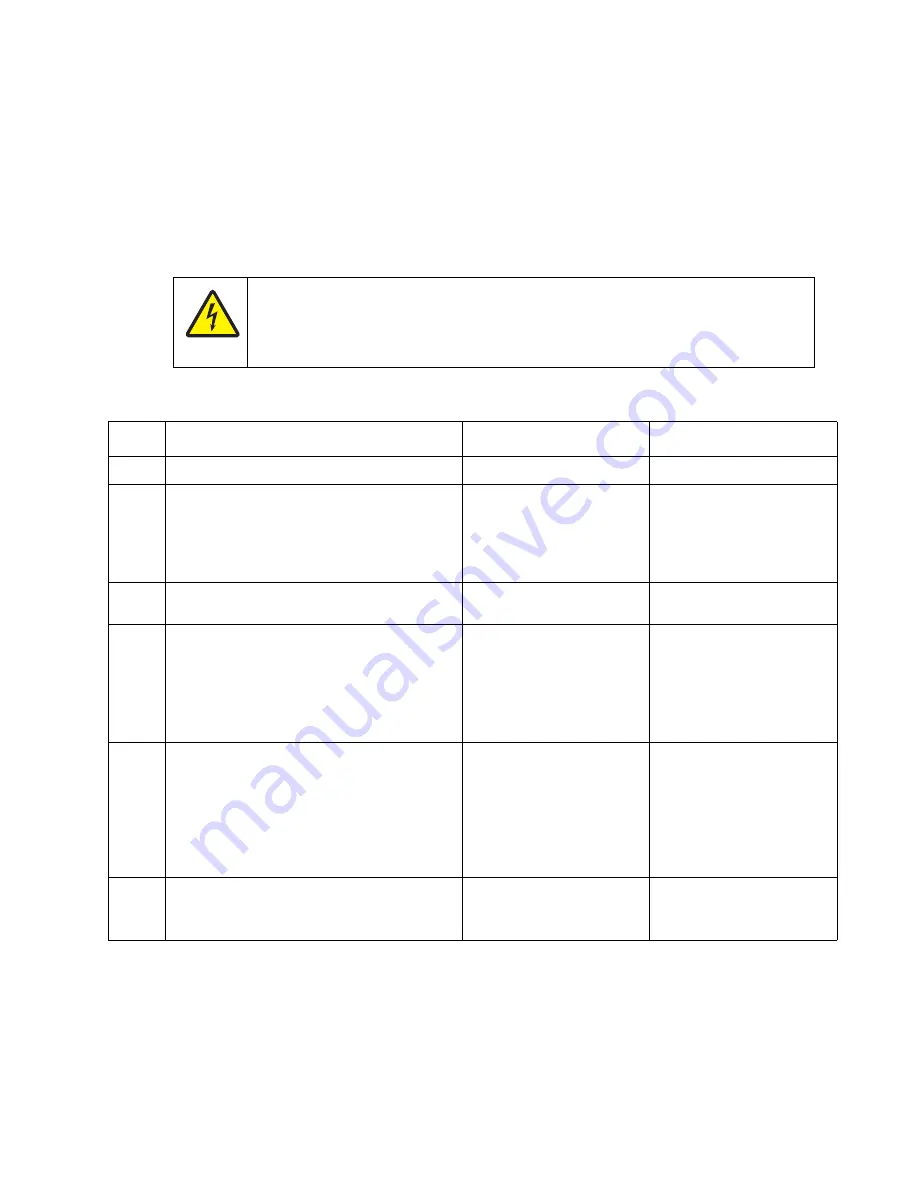
Dead printer service check
A dead printer is a condition where the display is blank, the LED on the operator panel is off, no fans turn, no
motors turn, and the fuser lamp does not come on.
If a 550-sheet option assembly is installed, remove the option and check the base printer for correct operation. If
the base printer operates correctly, replace the 550-sheet option assembly.
Warning:
Observe all necessary ESD precautions when removing and handling the system board or any
installed option cards or assemblies. See
“Handling ESD-sensitive parts” on page 4-1
.
Remove any input and output paper handling options from the printer.
Step
Questions / actions
Yes
No
1
Is the AC line cord damaged?
Replace the line cord.
Go to step 2.
2
Turn the printer off, open the system board
shield, and remove the connector shield.
Check the system board for +5 V dc between
JLVPS1 pin 6 and ground.
Is the voltage correct?
Replace the system board.
See
.
Go to step 3.
3
Is the JLVPS1 cable correctly installed at
JLVPS1 on the system board?
Go to step 4.
Reseat the cable.
4
1. Turn the printer off.
2. Disconnect the JLVPS1 cable from the
system board.
3. Turn the printer on, and then measure the
voltage between the JLVPS1 cable pin 6
and the pin 15 (black wire).
Does this measure approxi5 V dc?
Go to step 5.
Replace the LVPS. See
“Low-voltage power
supply (LVPS) removal”
on page 4-82
5
1. Turn the printer off.
2. Disconnect the cables in J5, JFSR1,
JHVPS, JCM1, JITM1, JKI1, JOOPT1,
and JYF1.
3. Connect the JLVPS1 cable to the system
board.
4. POR the printer.
Is the printer still dead?
Contact your next level of
support.
Go to step 6.
6
Connect one cable at a time, and POR the
printer.
Did you find the failing part?
Replace the failing part.
Contact you next level of
support.
CAUTION
When you see this symbol, there is a danger from hazardous voltage in the area of the product
where you are working. Unplug the product before you begin, or use caution if the product
must receive power in order to perform the task.
Содержание C792de
Страница 17: ...Notices and safety information xvii 5062...
Страница 18: ...xviii Service Manual 5062...
Страница 24: ...xxiv Service Manual 5062...
Страница 38: ...1 14 Service Manual 5062...
Страница 178: ...2 140 Service Manual 5062...
Страница 220: ...3 42 Service Manual 5062...
Страница 234: ...4 14 Service Manual 5062 11 Slide the lower left cover down to remove it from the left cover...
Страница 239: ...Repair information 4 19 5062 3 Remove the three screws A and the two screws B A 88A0323 B 88A0212 A 88A0323...
Страница 242: ...4 22 Service Manual 5062 3 Separate the system board shield door from the rear upper cover...
Страница 244: ...4 24 Service Manual 5062 6 Remove the screw B 7 Remove the four screws C B 88A0212 C 88A0323...
Страница 253: ...Repair information 4 33 5062 4 Remove the eight screws A from the waste toner left cover A 88A0323 88A0323 A...
Страница 258: ...4 38 Service Manual 5062 3 Remove the screw A in the top cover A 88A0323...
Страница 260: ...4 40 Service Manual 5062 6 Press the release tab B to disconnect the cable from the assembly B...
Страница 273: ...Repair information 4 53 5062 3 Align the top edge of the duplex assembly with the post and then replace the screw...
Страница 275: ...Repair information 4 55 5062 4 Push the assembly up and pull to remove it...
Страница 279: ...Repair information 4 59 5062 2 Pull down the two fuser latches A 3 Pull to remove the fuser assembly A...
Страница 326: ...4 106 Service Manual 5062 3 Remove four screws A 4 Rotate the panel up and pull it out A 88A0323...
Страница 334: ...4 114 Service Manual 5062 4 Disconnect the sensor cables A 5 Clip the cable tie and route the cables through the frame A...
Страница 377: ...Repair information 4 157 5062 8 Remove the 550 sheet tray controller card assembly from the shield...
Страница 397: ...Repair information 4 177 5062 8 Release the three drive assembly cables from the cable guides C C...
Страница 400: ...4 180 Service Manual 5062 4 Remove the three screws B securing the controller card housing B 88A0231...
Страница 423: ...Repair information 4 203 5062 7 Remove the motor from the bracket...
Страница 426: ...4 206 Service Manual 5062 4 Release the latch B securing the pass thru sensor 5 Remove the pass thru sensor B A...
Страница 428: ...4 208 Service Manual 5062 6 Disconnect the four pick assembly connectors C from the controller card assembly C...
Страница 429: ...Repair information 4 209 5062 7 Release the pick assembly cables from the cable guide D D...
Страница 431: ...Repair information 4 211 5062 This is the photo of the 2000 sheet high capacity feeder pick assembly...
Страница 436: ...4 216 Service Manual 5062 This is the photo of the 2000 sheet high capacity feeder pick roll assembly...
Страница 442: ...4 222 Service Manual 5062 4 Pull the upper back portion of the right side cover 5 Lift the right side cover to remove it...
Страница 443: ...Repair information 4 223 5062 This is the photo of the 2000 sheet high capacity feeder right side cover...
Страница 464: ...4 244 Service Manual 5062 3 Using a spring hook remove the spring...
Страница 492: ...4 272 Service Manual 5062 3 Use a spring hook to remove the spring A...
Страница 517: ...Repair information 4 297 5062 4 Remove the screw C from the left side...
Страница 521: ...Repair information 4 301 5062 6 Remove the two screws D one screw E and disconnect the cable F...
Страница 522: ...4 302 Service Manual 5062 7 Remove the right lower cover Note Observe the routing of cable through the side frame...
Страница 523: ...Repair information 4 303 5062 8 Remove the two screws H 9 Remove the two screws I and two screws J...
Страница 536: ...4 316 Service Manual 5062 5 Flex the back of the frame to release the rear edge and then remove the guide...
Страница 537: ...Repair information 4 317 5062...
Страница 538: ...4 318 Service Manual 5062...
Страница 540: ...5 2 Service Manual 5062 Connectors System board...
Страница 549: ...Connector locations 5 11 5062 550 sheet tray option system card J35 J34 J32 J30 J10 J3 JPTS1 J4 J17 J2...
Страница 552: ...5 14 Service Manual 5062 2000 sheet high capacity feeder option system card J35 J34 J32 J10 J3 JPTS1 J4 J17 J11 J2 J16...
Страница 555: ...Connector locations 5 17 5062 5 bin mailbox printer circuit board...
Страница 556: ...5 18 Service Manual 5062...
Страница 560: ...6 4 Service Manual 5062...
Страница 562: ...7 2 Service Manual 5062 Assembly 1 Top right and front covers 1 2 3 4 5 6 7 9 10 11 12 13 14 15 8...
Страница 564: ...7 4 Service Manual 5062 Assembly 2 Left and rear covers 1 2 4 5 6 7 8 9 10 11 12 13 14 3...
Страница 566: ...7 6 Service Manual 5062 Assembly 3 Front 1 2 4 5 6 7 8 3 3 3 3...
Страница 568: ...7 8 Service Manual 5062 Assembly 3 1 Front continued 1 2 4 5 1 1 1 3...
Страница 570: ...7 10 Service Manual 5062 Assembly 4 Left 1 2 4 5 6 8 7 3...
Страница 572: ...7 12 Service Manual 5062 Assembly 4 1 Left continued 1 2 3 4...
Страница 574: ...7 14 Service Manual 5062 Assembly 5 Rear 1 2 3 6 10 8 9 11 4 7 5 12...
Страница 576: ...7 16 Service Manual 5062 Assembly 6 Optional 550 sheet tray 1 2...
Страница 578: ...7 18 Service Manual 5062 Assembly 7 Optional 550 sheet drawer assembly 4 5 3 2 2 1...
Страница 580: ...7 20 Service Manual 5062 Assembly 8 Optional 2000 sheet high capacity feeder 2 3 4 5 6 1 7 9 6 10 8...
Страница 582: ...7 22 Service Manual 5062 Assembly 9 Finisher assembly...
Страница 584: ...7 24 Service Manual 5062 Assembly 9 1 Finisher assembly continued...
Страница 586: ...7 26 Service Manual 5062 Assembly 10 Finisher stapler assembly 1 2...
Страница 588: ...7 28 Service Manual 5062 Assembly 11 High capacity output stacker...
Страница 590: ...7 30 Service Manual 5062 Assembly 11 1 High capacity output stacker continued...
Страница 604: ...7 44 Service Manual 5062...
Страница 606: ...A 2 Service Manual 5062 Print Quality Pages Page 1 total of five...
Страница 607: ...Appendix A Print samples A 3 5062 Print Quality Pages Page 2 total of five...
Страница 608: ...A 4 Service Manual 5062 Print Quality Pages Page 3 total of five...
Страница 609: ...Appendix A Print samples A 5 5062 Print Quality Pages Page 4 total of five...
Страница 613: ...Appendix A Print samples A 9 5062 Printhead electronic alignment test page Magenta two of two...
Страница 626: ...I 12 Service Manual 5062...
Страница 630: ...I 16 Service Manual 5062...


