


2-10
Service Manual
5062
Go Back
Previous
Next
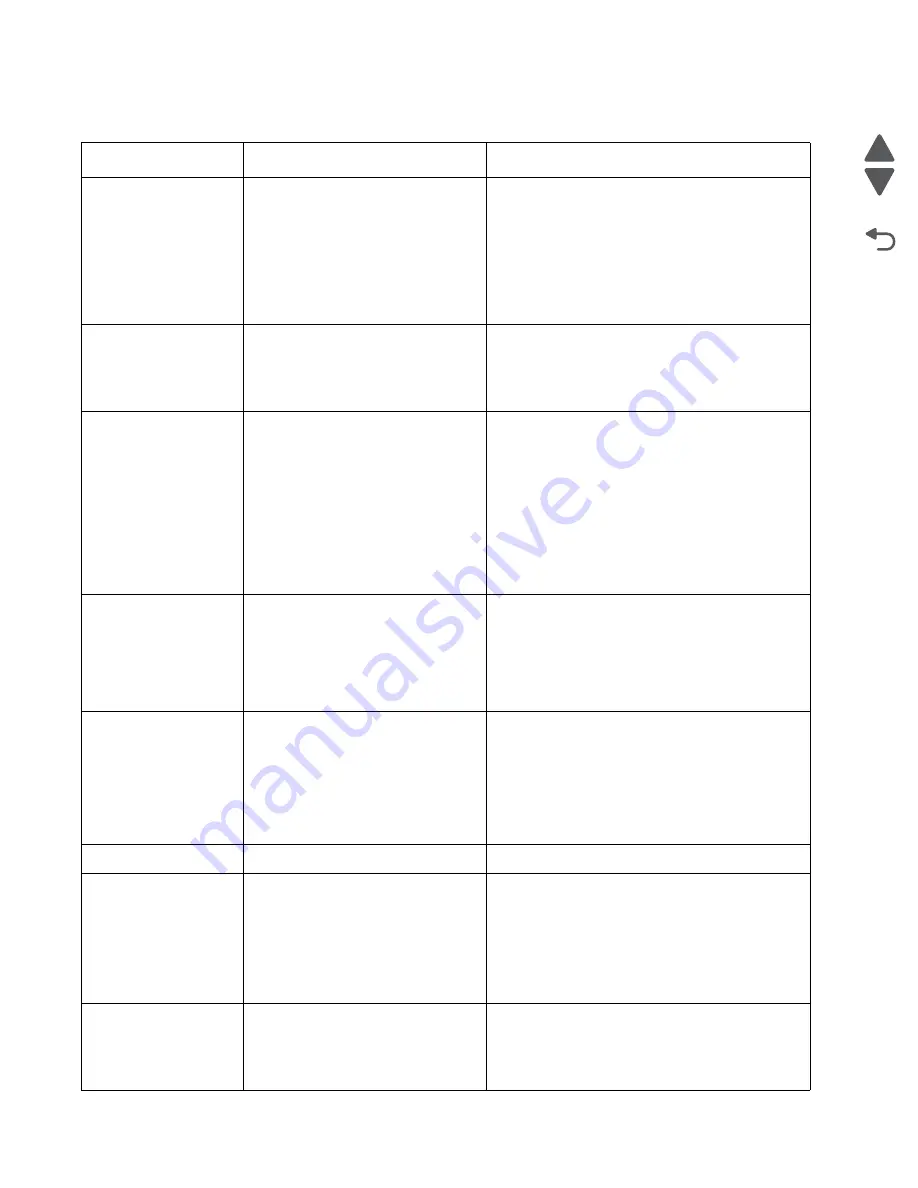
Additional checks—202–203 paper jams
Error code
Description
Action
202.01
Exit sensor is made when printer tries
to print from an idle state.
Possible causes:
• Damaged paper exit sensor or
paper exit sensor flag
• Damaged fuser autoconnect
• Faulty fuser
• Faulty system board
1. Check for anything in the paper path that might
cause the paper to jam.
2. The fuser exit sensor may not be functioning
properly. Go to
“121.xx—Fuser error service
check” on page 2-70
.
202.02
Exit sensor is made early.
Possible causes:
• Incorrect paper settings
• Defective exit sensor
1. Check for anything in the paper path that might
cause the paper to jam.
2. If clearing the jam does not solve the problem,
go to
“121.xx—Fuser error service check” on
page 2-70
.
202.03
Exit sensor is never made.
Possible causes:
• Improper paper loading
• Paper wrapped in fuser
• Damaged paper exit sensor or
paper exit sensor flag
• Damaged fuser autoconnect
• Faulty fuser DC cable connection
• Faulty fuser
• Faulty system board
1. Check for anything in the paper path that might
cause the paper to jam.
2. The fuser exit sensor may not be functioning
properly. Go to
“121.xx—Fuser error service
check” on page 2-70
.
202.04
Exit sensor broke early.
Possible causes:
• Damaged paper exit sensor or
paper exit sensor flag
• Faulty fuser
• Faulty system board
The fuser exit sensor may not be functioning
properly. Go to
“121.xx—Fuser error service
check” on page 2-70
.
202.05,
202.07
Exit sensor never broke.
Possible causes:
• Damaged paper exit sensor or
paper exit sensor flag
• Faulty fuser
• Faulty system board
• Faulty output bin flag
1. Check exit sensor flag on fuser for proper
operation. Be sure the paper is not hanging on
the flag.
2. The fuser exit sensor may not be functioning
properly. Go to
“121.xx—Fuser error service
check” on page 2-70
.
202.08
Exit sensor is never made.
See
“202.03” on page 2-10
.
202.31
Bin-full sensor active when printing
started.
Possible causes:
• Paper jam leaving paper over the
sensor
• Damaged bin-full sensor
• Faulty system board.
1. Clear away anything in the paper path that might
cause the paper to jam.
2. Be sure the paper settings match the media.
3. Flex the media, and stack it flat in the tray.
4. Properly set the paper guides in the paper tray.
5. If the problem persists, go to
“Pick arm stuck
down service check” on page 2-164
.
202.32
Binfull sensor is made early.
Possible causes:
• Incorrect paper settings
• Defective bin-full sensor
1. Check for anything in the paper path that might
cause the paper to jam.
2. If clearing the jam does not solve the problem,
go to
“202.32—Paper Jam error service
check” on page 2-107
.
Содержание C792 Family
Страница 14: ...xiv Service Manual 5062 Go Back Previous Next ...
Страница 19: ...Notices and safety information xix 5062 Go Back Previous Next ...
Страница 20: ...xx Service Manual 5062 Go Back Previous Next ...
Страница 40: ...1 14 Service Manual 5062 Go Back Previous Next ...
Страница 212: ...2 172 Service Manual 5062 Go Back Previous Next ...
Страница 269: ...Repair information 4 15 5062 Go Back Previous Next 11 Slide the lower left cover down to remove it from the left cover ...
Страница 277: ...Repair information 4 23 5062 Go Back Previous Next 3 Separate the system board shield door from the rear upper cover ...
Страница 279: ...Repair information 4 25 5062 Go Back Previous Next 6 Remove the screw B 7 Remove the four screws C B 88A0212 C 88A0323 ...
Страница 311: ...Repair information 4 57 5062 Go Back Previous Next 4 Push the assembly up and pull to remove it ...
Страница 422: ...4 168 Service Manual 5062 Go Back Previous Next 8 Remove the 550 sheet tray controller card assembly from the shield ...
Страница 442: ...4 188 Service Manual 5062 Go Back Previous Next 8 Release the three drive assembly cables from the cable guides C C ...
Страница 468: ...4 214 Service Manual 5062 Go Back Previous Next 7 Remove the motor from the bracket ...
Страница 481: ...Repair information 4 227 5062 Go Back Previous Next Be sure that the pick arm is positioned as shown in the picture ...
Страница 490: ...4 236 Service Manual 5062 Go Back Previous Next 4 Flex the sides to remove the roller frame ...
Страница 572: ...4 318 Service Manual 5062 Go Back Previous Next 8 Remove the two screws H 9 Remove the two screws I and two screws J ...
Страница 573: ...Repair information 4 319 5062 Go Back Previous Next 10 Lift up the frame and slide the right inner cover out ...
Страница 587: ...Repair information 4 333 5062 Go Back Previous Next 4 Slide the guide to the left and remove 1 2 ...
Страница 589: ...Repair information 4 335 5062 Go Back Previous Next 4 Remove the two screws C and then remove the bracket C 3014523 ...
Страница 592: ...4 338 Service Manual 5062 Go Back Previous Next ...
Страница 594: ...5 2 Service Manual 5062 Go Back Previous Next Connectors System board ...
Страница 610: ...5 18 Service Manual 5062 Go Back Previous Next 5 bin mailbox system card ...
Страница 612: ...5 20 Service Manual 5062 Go Back Previous Next Finisher Stacker system card HTU system card ...
Страница 616: ...6 4 Service Manual 5062 Go Back Previous Next ...
Страница 620: ...7 4 Service Manual 5062 Go Back Previous Next Assembly 2 Left and rear covers 1 2 4 5 6 7 8 9 10 11 12 13 14 3 ...
Страница 622: ...7 6 Service Manual 5062 Go Back Previous Next Assembly 3 Front 1 2 4 5 6 7 8 3 3 3 3 ...
Страница 624: ...7 8 Service Manual 5062 Go Back Previous Next Assembly 3 1 Front continued 1 2 4 5 1 1 1 3 ...
Страница 626: ...7 10 Service Manual 5062 Go Back Previous Next Assembly 4 Left 1 2 4 5 6 8 7 3 ...
Страница 628: ...7 12 Service Manual 5062 Go Back Previous Next Assembly 4 1 Left continued 1 2 3 4 ...
Страница 630: ...7 14 Service Manual 5062 Go Back Previous Next Assembly 5 Rear 1 2 3 6 11 8 9 12 4 7 5 13 10 ...
Страница 632: ...7 16 Service Manual 5062 Go Back Previous Next Assembly 6 Optional 550 sheet tray 2 3 1 ...
Страница 634: ...7 18 Service Manual 5062 Go Back Previous Next Assembly 7 Optional 550 sheet drawer assembly 4 5 3 2 2 1 ...
Страница 636: ...7 20 Service Manual 5062 Go Back Previous Next Assembly 8 Optional 2000 sheet high capacity feeder complete 1 ...
Страница 640: ...7 24 Service Manual 5062 Go Back Previous Next Assembly 10 Finisher High capacity ouput stacker assembly ...
Страница 642: ...7 26 Service Manual 5062 Go Back Previous Next Assembly 10 1 Finisher High capacity output stacker assembly continued ...
Страница 644: ...7 28 Service Manual 5062 Go Back Previous Next Assembly 11 Finisher stapler assembly 1 2 ...
Страница 646: ...7 30 Service Manual 5062 Go Back Previous Next Assembly 12 Finisher Stacker assembly complete 1 ...
Страница 648: ...7 32 Service Manual 5062 Go Back Previous Next Assembly 13 5 bin mailbox assembly complete 1 ...
Страница 650: ...7 34 Service Manual 5062 Go Back Previous Next Assembly 14 5 bin mailbox assembly covers 1 5 6 10 11 3 4 2 7 9 8 ...
Страница 654: ...7 38 Service Manual 5062 Go Back Previous Next Assembly 16 HTU complete 1 ...
Страница 656: ...7 40 Service Manual 5062 Go Back Previous Next Assembly 17 HTU covers 1 5 6 8 9 11 13 12 7 2 10 4 3 ...
Страница 658: ...7 42 Service Manual 5062 Go Back Previous Next Assembly 18 HTU left interior 1 5 8 6 2 4 7 9 3 3 3 ...
Страница 662: ...7 46 Service Manual 5062 Go Back Previous Next Assembly 20 HTU with hole punch complete 1 ...
Страница 664: ...7 48 Service Manual 5062 Go Back Previous Next Assembly 21 HTU with hole punch covers 1 5 7 9 10 12 14 13 8 2 11 4 6 3 ...
Страница 682: ...A 2 Service Manual 5062 Go Back Previous Next Print Quality Pages Page 1 total of five ...
Страница 683: ...Appendix A Print samples A 3 5062 Go Back Previous Next Print Quality Pages Page 2 total of five ...
Страница 684: ...A 4 Service Manual 5062 Go Back Previous Next Print Quality Pages Page 3 total of five ...
Страница 685: ...Appendix A Print samples A 5 5062 Go Back Previous Next Print Quality Pages Page 4 total of five ...
Страница 689: ...Appendix A Print samples A 9 5062 Go Back Previous Next Printhead electronic alignment test page Magenta two of two ...
Страница 704: ...I 14 Service Manual 5062 Go Back Previous Next ...


