background image

Wireless Access Point User Guide 


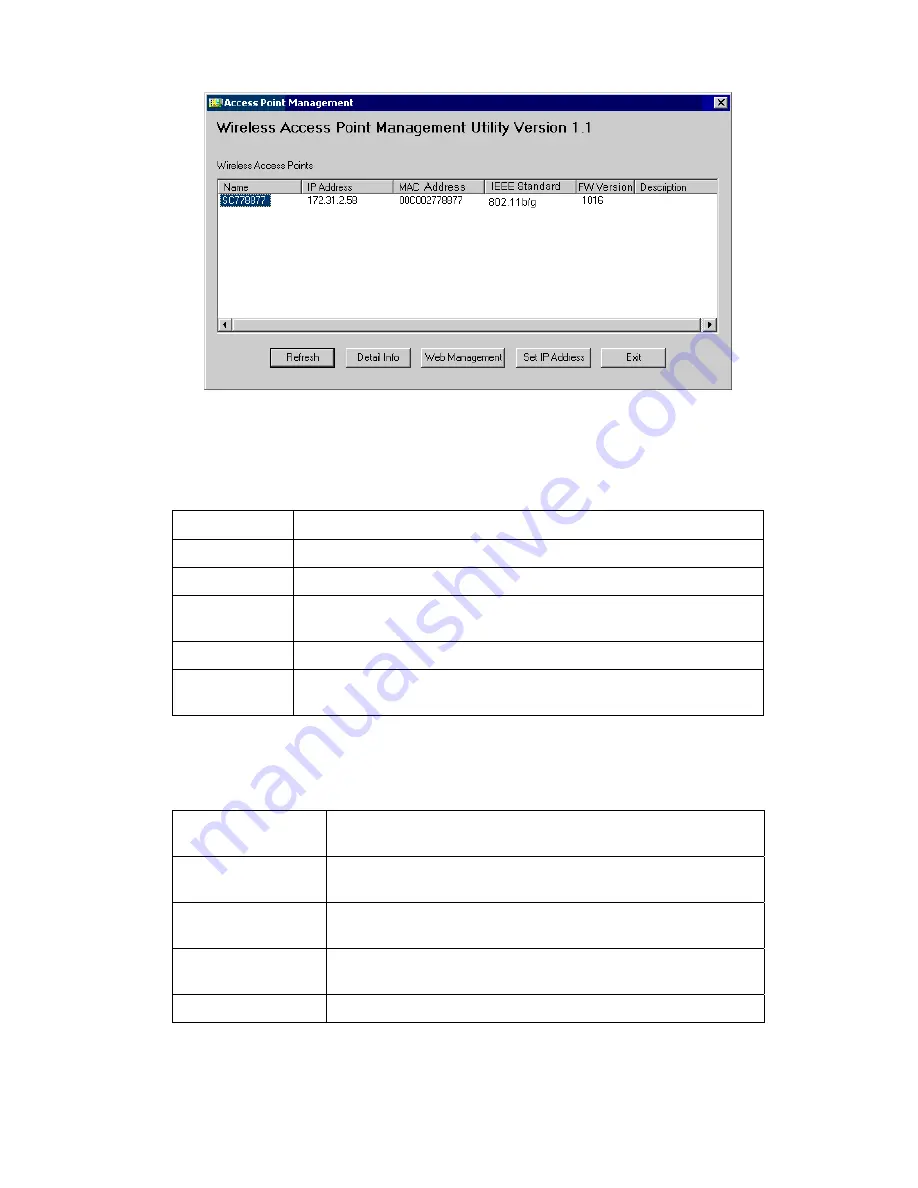
Figure 6: Management utility Screen 

Wireless Access Points 

The main panel displays a list of all Wireless Access Points found on the network. For each 
Access Point, the following data is shown: 

Server Name


The

 Server Name

 is shown on a sticker on the base of the device. 

IP address 

The IP address for the Wireless Access Point. 

MAC Address


The hardware or physical address of the Wireless Access Point. 

IEEE Standard

  The wireless standard or standards used by the Wireless Access Point 

(e.g. 802.11b, 802.11g) 

FW Version


The current Firmware version installed in the Wireless Access Point.


Description


Any extra information for the Wireless Access Point, entered by the 
administrator.


Note

:  If the desired Wireless Access Point is not listed, check that the device is installed and 

ON, then update the list by clicking the 

Refresh

 button. 

Buttons 

Refresh


Click this button to update the Wireless Access Point device listing 
after changing the name or IP Address. 

Detail Info 

When clicked, additional information about the selected Access 
Point will be displayed.


Web Management


Use this button to connect to the Wireless Access Point's Web-
based management interface. 

Set IP Address


Click this button if you want to change the IP Address of the 
Wireless Access Point. 

Exit


Exit the Management utility program by clicking this button. 

Содержание WAP-0005

Страница 1: ...LevelOne WAP 0005 108 Mbps Wireless Access Point User s Manual...

Страница 2: ...cess Control 14 Wireless Screens 17 Basic Settings Screen 17 Security Settings 20 Advanced Settings 33 CHAPTER 4 PC AND SERVER CONFIGURATION 35 Overview 35 Using WEP 35 Using WPA PSK 36 Using WPA 802...

Страница 3: ...TCP IP Settings Windows NT4 0 74 Checking TCP IP Settings Windows 2000 76 Checking TCP IP Settings Windows XP 78 APPENDIX D ABOUT WIRELESS LANS 80 Overview 80 Wireless LAN Terminology 80 APPENDIX E CO...

Страница 4: ...or automatic speed reduction to lower speeds when the environment does not permit maximum throughput Features of your Wireless Access Point The Wireless Access Point incorporates many advanced featur...

Страница 5: ...rt In 802 1x mode either fixed or Dynamic WEP keys can be used Access Control The Access Control feature can check the MAC address of Wireless clients to ensure that only trusted Wireless Stations can...

Страница 6: ...atus On Error condition Off Normal operation Blinking During start up and when the Firmware is being upgraded Power On Normal operation Off No power LAN On The LAN Ethernet port is active Off No activ...

Страница 7: ...sed to clear ALL data and restore ALL settings to the factory default values To Clear All Data and restore the factory default values 1 Power Off the Access Point 2 Hold the Reset Button down while yo...

Страница 8: ...lines Use an elevated location such as wall mounted or on the top of a cubicle Place the Wireless Access Point near the center of your wireless coverage area If possible ensure there are no thick wall...

Страница 9: ...Access Point supports PoE Power over Ethernet To use PoE 1 Do not connect the supplied power adapter to the Wireless Access Point 2 Connect one end of a standard category 5 LAN cable to the Ethernet p...

Страница 10: ...eb Browser Setup using the Windows Utility A simple Windows setup utility is supplied on the CD ROM This utility can be used to assign a suitable IP address to the Wireless Access Point Using this uti...

Страница 11: ...installed in the Wireless Access Point Description Any extra information for the Wireless Access Point entered by the administrator Note If the desired Wireless Access Point is not listed check that t...

Страница 12: ...or your LAN Save any changes 5 Click the Web Management button to connect to the selected Wireless Access Point using your Web Browser If prompted enter the User Name and Password again 6 Configure th...

Страница 13: ...ess Point Until the Wireless Access Point is configured establishing a Wireless connection to it may be not possible If your LAN contains a Router or Routers ensure the PC used for configuration is on...

Страница 14: ...match the Wireless Access Point See Chapter 4 for details If you can t connect It is likely that your PC s IP address is incompatible with the Wireless Access Point s IP address This can happen if yo...

Страница 15: ...u first connect you will see the Status screen This displays the current settings and status of the Wireless Access Point No data can be input on this screen Figure 8 Status Screen For further details...

Страница 16: ...ient Select this option if you have a DHCP Server on your LAN and you wish the Access Point to obtain an IP address automatically Fixed If selected the following data must be entered IP Address The IP...

Страница 17: ...ol This feature can be used to block access to your LAN by unknown or untrusted wireless stations Click Access Control on the menu to view a screen like the following Figure 10 Access Control Screen D...

Страница 18: ...he Access Control screen You will see a screen like the sample below Figure 11 Trusted Wireless Stations Data Trusted Wireless Stations Trusted Wireless Stations This lists any Wireless Stations which...

Страница 19: ...her Stations list Edit To change an existing entry in the Trusted Stations list select it and click this button 1 Select the Station in the Trusted Station list 2 Click the Edit button The address wil...

Страница 20: ...the default and will allow connec tions by both 802 11b and 802 1g wireless stations 802 11b if selected only 802 11b connections are allowed 802 11g wireless stations will only be able to connect if...

Страница 21: ...ode the AP will communicate ONLY with another Bridge mode Wireless Station You must en ter the MAC address physical address of the other Bridge mode Wireless Station in the field provided WEP can and...

Страница 22: ...Setup Broadcast SSID If Enabled the SSID will be broadcast to all Wireless Stations Sta tions which have no SSID or a null value can then adopt the correct SSID for connections to this Access Point 19...

Страница 23: ...ncrypted using the WPA standard If this option is selected This Access Point must have a client login on the Radius Server Each user must have a user login on the Radius Server Each user s wireless cl...

Страница 24: ...ss Point has the correct address port number and shared key for login to your Radius Server These parameters are entered either on the Security page or the Radius based MAC authentication sub screen d...

Страница 25: ...ble enter the port number used for connections to the Radius Server Client Login Name If this field is visible it displays the name used for the Client Login on the Radius Server This Login name must...

Страница 26: ...method used 2 Add users on your RADIUS server as required and allow access by these users 3 Client PCs must have the correct Wireless settings in order to associate with the Wireles Access Point 4 Wh...

Страница 27: ...name and password is correct Internet access is allowed Otherwise the user remains on the login page Clients which pass the authentication are listed as xx xx xx xx xx xx WEB authen tication in the l...

Страница 28: ...ttempt to access the Internet but are not logged in Login Failure URL Enter the URL of the page on your local Web Server you wish users to see if their login fails This may be the same URL as the Logi...

Страница 29: ...ns must have matching key values Passphrase Use this to generate a key or keys instead of entering them directly Enter a word or group of printable characters in the Passphrase box and click the Gener...

Страница 30: ...desired option Other Wireless Stations must use the same method TKIP Unicast point to point transmissions are en crypted using TKIP and multicast broadcast transmissions are not encrypted TKIP 64 bit...

Страница 31: ...larly Key Lifetime This field determines how often the Group key is dynamically updated Enter the desired value Update Group key when any membership terminates If enabled the Group key will be updated...

Страница 32: ...ver Each user must have a user login on the Radius Server Each user s wireless client must support 802 1x and provide the login data when required All data transmission is encrypted using the WPA stan...

Страница 33: ...to point transmissions Enable this if you want the keys to be updated regularly Key Lifetime This field determines how often Pairwise keys are dynamically updated Enter the desired value Group Key Upd...

Страница 34: ...support 802 1x and provide the login data when required All data transmission is encrypted using the WEP standard You only have to select the WEP key size the WEP key is automatically generated Figure...

Страница 35: ...ired value Radius Accounting Enable this if you want this Access Point to send accounting data to the Radius Server If enabled the port used by your Radius Server must be entered in the Radius Account...

Страница 36: ...c screen Select the desired option Do NOT select the 802 11g or OFDM options unless ALL of your wireless clients support this 802 11b clients will not be able to connect to the Access Point if either...

Страница 37: ...reamble Type Select the desired preamble type Output Power Level Select the desired power output Higher levels will give a greater range but are also more likely to cause interference with other devic...

Страница 38: ...ach Wireless station is also more com plex Using WEP For each of the following items each Wireless Station must have the same settings as the Wireless Access Point Mode On each PC the mode must be set...

Страница 39: ...to Infrastructure SSID ESSID This must match the value used on the Wireless Access Point The default value is wireless Note The SSID is case sensitive Wireless Security On each client Wireless securi...

Страница 40: ...02 1x Authentication Each client must obtain a Certificate which is used for authentication for the Radius Server 802 1x Encryption Typically EAP TLS is used This is a dynamic key system so keys do NO...

Страница 41: ...default prompts ensure that DNS is installed and enabled during installa tion Services Installation 1 Select the Control Panel Add Remove Programs 2 Click Add Remove Windows Components from the left s...

Страница 42: ...rver Configuration Figure 21 Components Screen 4 Click Next 5 Select the Enterprise root CA and click Next Figure 22 Certification Screen 6 Enter the information for the Certificate Authority and clic...

Страница 43: ...st be stopped before continuing Click Ok then Finish DHCP server configuration 1 Click on the Start Programs Administrative Tools DHCP 2 Right click on the server entry as shown and select New Scope F...

Страница 44: ...the router address for the current subnet The router address may be left blank if there is no router Click Next 10 For the Parent domain enter the domain you specified for the domain controller setup...

Страница 45: ...d select New Certificate to Issue Figure 27 Certificate Authority Screen 3 Select Authenticated Session and Smartcard Logon select more than one by holding down the Ctrl key Click OK Figure 28 Templat...

Страница 46: ...t the Group Policy tab choose Default Domain Policy then click Edit Figure 30 Group Policy Tab 7 Select Computer Configuration Windows Settings Security Settings Public Key Policies right click Automa...

Страница 47: ...Computer then click Next Figure 32 Certificate Template Screen 10 Ensure that your certificate authority is checked then click Next 11 Review the policy change information and click Finish 12 Click St...

Страница 48: ...Access Point and set the shared secret as entered on the Security Settings of the Wireless Access Point 5 Click Finish 6 Right click on Remote Access Policies select New Remote Access Policy 7 Assumi...

Страница 49: ...the Authentication tab Enable Extensible Authentication Protocol and select Smart Card or other Certificate Deselect other authentication meth ods listed Click OK Figure 35 Authentication Screen 12 Se...

Страница 50: ...ess Login for Users 1 Select Start Programs Administrative Tools Active Directory Users and Computers 2 Double click on the user who you want to enable 3 Select the Dial in tab and enable Allow access...

Страница 51: ...You are using Windows XP You are connecting to a Windows 2000 server for authentication You already have a login User name and password on the Windows 2000 server Client Certificate Setup 1 Connect to...

Страница 52: ...PC and Server Configuration Figure 38 Wireless CA Screen 5 Select User certificate request and select User Certificate the click Next Figure 39 Request Type Screen 6 Click Submit 49...

Страница 53: ...gure 40 Identifying Information Screen 7 A message will be displayed then the certificate will be returned to you Click Install this certificate Figure 41 Certificate Issued Screen 8 You will receive...

Страница 54: ...Connection and select Properties 3 Select the Authentication Tab and ensure that Enable network access control using IEEE 802 1X is selected and Smart Card or other Certificate is selected from the E...

Страница 55: ...le encryption for a wireless network follow this procedure 1 Click on the Wireless Networks tab Figure 44 Wireless Networks Screen 2 Select the wireless network from the Available Networks list and cl...

Страница 56: ...PC and Server Configuration Figure 45 Properties Screen Setup for Windows XP and 802 1x client is now complete 53...

Страница 57: ...key is pro vided for me automatically Instead you must enter the WEP key manually ensuring it matches the WEP key used on the Access Point Figure 46 Properties Screen Note On some systems the 64 bit W...

Страница 58: ...atic However you may need to perform the following operations on a regular basis If using the Access Control feature update the Trusted PC database as required See Access Control in Chapter 3 for deta...

Страница 59: ...s whether the current IP address was obtained from a DHCP Server on your network It will display Enabled or Disabled Wireless SSID The current SSID Channel Frequency The Channel currently in use is di...

Страница 60: ...Activity Log Data Current Time The system date and time is displayed Log The Log shows details of the existing connections to the Wireless Access Point Buttons Refresh Update the data on screen Save t...

Страница 61: ...screen is clicked Figure 49 Station List Screen Data Station List Screen Station List MAC Address The MAC physical address of each Wireless Station is displayed Mode The mode of each Wireless Station...

Страница 62: ...nship Association The number of Association packets received Association creates a connection between the AP and the client Usually clients associ ate with only one 1 AP at any time Disassociation The...

Страница 63: ...ess Access Point User Guide Management Number of Management packets transmitted to or received from Wireless Stations Control Number of Control packets transmitted to or received from Wire less Statio...

Страница 64: ...een The Admin Login screen allows you to assign a password to the Wireless Access Point This password limits access to the configuration interface The default password is password It is recommended th...

Страница 65: ...Wireless Access Point User Guide Figure 52 Password Dialog Enter the User Name and Password as set on the Admin Login screen above 62...

Страница 66: ...ou have a previously saved configuration file you can use this to restore those settings by uploading the file 1 Click the Browse button and navigate to the location of the configuration file 2 Select...

Страница 67: ...nged Read Write Data can be read and setting changed Managers Any Station The IP address of the manager station is not checked Only this station The IP address is checked and must match the address yo...

Страница 68: ...e following Figure 55 Firmware Upgrade Screen To perform the Firmware Upgrade 1 Click the Browse button and navigate to the location of the upgrade file 2 Select the upgrade file Its name will appear...

Страница 69: ...7 GHz Wireless Interface Operating Channels 802 11g 13 for North America 13 for Europe ETSI 14 for Japan 802 11b 11 for North America 14 for Japan 13 for Europe ETSI Operating temperature 0 55 Storage...

Страница 70: ...ng Open System Share Key authentication Wireless Channels Support Automatic Wireless Channel Selection Antenna selection Tx Power Adjustment Country Selection Preamble Type long or short support RTS T...

Страница 71: ...Message Log Access Control list file support Configuration file Backup Restore Statistics support Device discovery program Windows Utility Other Features DHCP client WINS client Firmware Upgrade HTTP...

Страница 72: ...and receiver Connect the equipment into an outlet on a circuit different from that to which the receiver is connected Consult the dealer or an experienced radio TV technician for help To assure conti...

Страница 73: ...nt restart it You can use the following method to determine the IP address of the Wireless Access Point and then try to connect using the IP address in stead of the name To Find the Access Point s IP...

Страница 74: ...C the wireless mode is set to Infrastructure If using the Access Control feature the PC s name and address is in the Trusted Stations list If using 802 1x mode ensure the PC s 802 1x software is confi...

Страница 75: ...no need to change the TCP IP of each PC Just configure the Wireless Access Point to match your existing LAN The following sections provide details about checking the TCP IP settings for various types...

Страница 76: ...P Address automatically This is the default Windows settings To work correctly you need a DHCP server on your LAN Using Specify an IP Address If your PC is already configured for a fixed specified IP...

Страница 77: ...tings Windows NT4 0 1 Select Control Panel Network and on the Protocols tab select the TCP IP protocol as shown below Figure 59 Windows NT4 0 TCP IP 2 Click the Properties button to see a screen like...

Страница 78: ...ddress from a DHCP Server This is the default Windows setting This is the default Windows settings To work correctly you need a DHCP server on your LAN Using Specify an IP Address If your PC is alread...

Страница 79: ...2 Right click the Local Area Connection icon and select Properties You should see a screen like the following Figure 61 Network Configuration Win 2000 3 Select the TCP IP protocol for your network ca...

Страница 80: ...s setting This is the default Windows settings To work correctly you need a DHCP server on your LAN Using a fixed IP Address Use the following IP Address If your PC is already configured for a fixed s...

Страница 81: ...ht click the Local Area Connection and choose Properties You should see a screen like the following Figure 63 Network Configuration Windows XP 3 Select the TCP IP protocol for your network card 4 Clic...

Страница 82: ...the default Windows setting To work correctly you need a DHCP server on your LAN Using a fixed IP Address Use the following IP Address If your PC is already configured for a fixed specified IP addres...

Страница 83: ...eless Stations can then access all LAN resources Access Points can only function in Infrastructure mode and can communicate only with Wireless Stations which are set to Infrastructure mode SSID ESSID...

Страница 84: ...should be set to use the same Channel However most Wireless stations will still scan all Channels to see if there is an existing Ad hoc group they can join WEP WEP Wired Equivalent Privacy is a stand...

Страница 85: ...h stronger than WEP encryption If this option is used The Access Point must have a client login on the Radius Server Each user must have a user login on the Radius Server Each user s wireless client m...

Страница 86: ...the User Name and password for the Password 3 Once connected you can use any of the commands listed in the following Command Reference Using the CLI Serial Port 1 Use a standard serial port cable to...

Страница 87: ...he commands listed in the follow ing Command Reference Command Reference The following commands are available Display CLI Command List admin Temporary factory admin boot flash Boot from flash boot eth...

Страница 88: ...gh Display Higher Trigger Threshold for CCK Phy Errors for ANI Control get cckTrigLow Display Lower Trigger Threshold for CCK Phy Errors for ANI Control get cckWeakSigThr Display ANI Parameter for CCK...

Страница 89: ...isplay Noise Floor get noiseImmunityLvl Display ANI Parameter for Noise Immunity Level get ofdmTrigHigh Display Higher Trigger Threshold for OFDM Phy Errors for ANI Con trol get ofdmTrigLow Display Lo...

Страница 90: ...Version Display Trap Version get trapSendMode Display Trap Send Mode get trapRecvIp Display Trap Receiver IP get station Display Station Status get SuperG Display SuperG Feature Status get systemname...

Страница 91: ...basic11b Set Use of Basic 11b Rates set basic11g Set Use of Basic 11g Rates set beaconinterval Modify Beacon Interval set burstSeqThreshold Set Max Number of frames in a Burst set burstTime Set Burst...

Страница 92: ...Encryption Key set keyentrymethod Select Encryption Key Entry Method set keysource Select Source Of Encryption Keys set login Modify Login User Name set minimumrate Set Minimum Rate set macAuth Set M...

Страница 93: ...rver IP Address set softwareretry Set Software Retry set spurImmunityLvl Set ANI Parameter for Spur Immunity Level set ssid Set Service Set ID set ssidsuppress Set SSID Suppress Mode set SuperG Super...

Страница 94: ...set winsEnable Set WINS Server Enable Disable set winsServerAddr Set WINS Server IP address set wSeparate Set wireless seprate Mode spy report Print spy report spy start Start spy spy stop Stop spy st...

Отзывы: