background image

electronic


Commissioning / Installation


#Leuze 


#Leuze electronic

 GmbH + Co KG, Postfach 11 11, D-73277 Owen/Teck, In der Braike1, D-73277 Owen/Teck, Tel. ++49 (0)7021/5730, Fax ++49 (0)7021/573199


Page 14 of 28 

LZ - ELE - BA - GB - 0006 - 06 

Date: 01.12.2004


3 Commissioning / Installation 


3.1 Electrical connection 

i


Note 

At the realization of the electrical connection the references in chapter 1.2.1, starting 
from page 6 must be considered. 
 
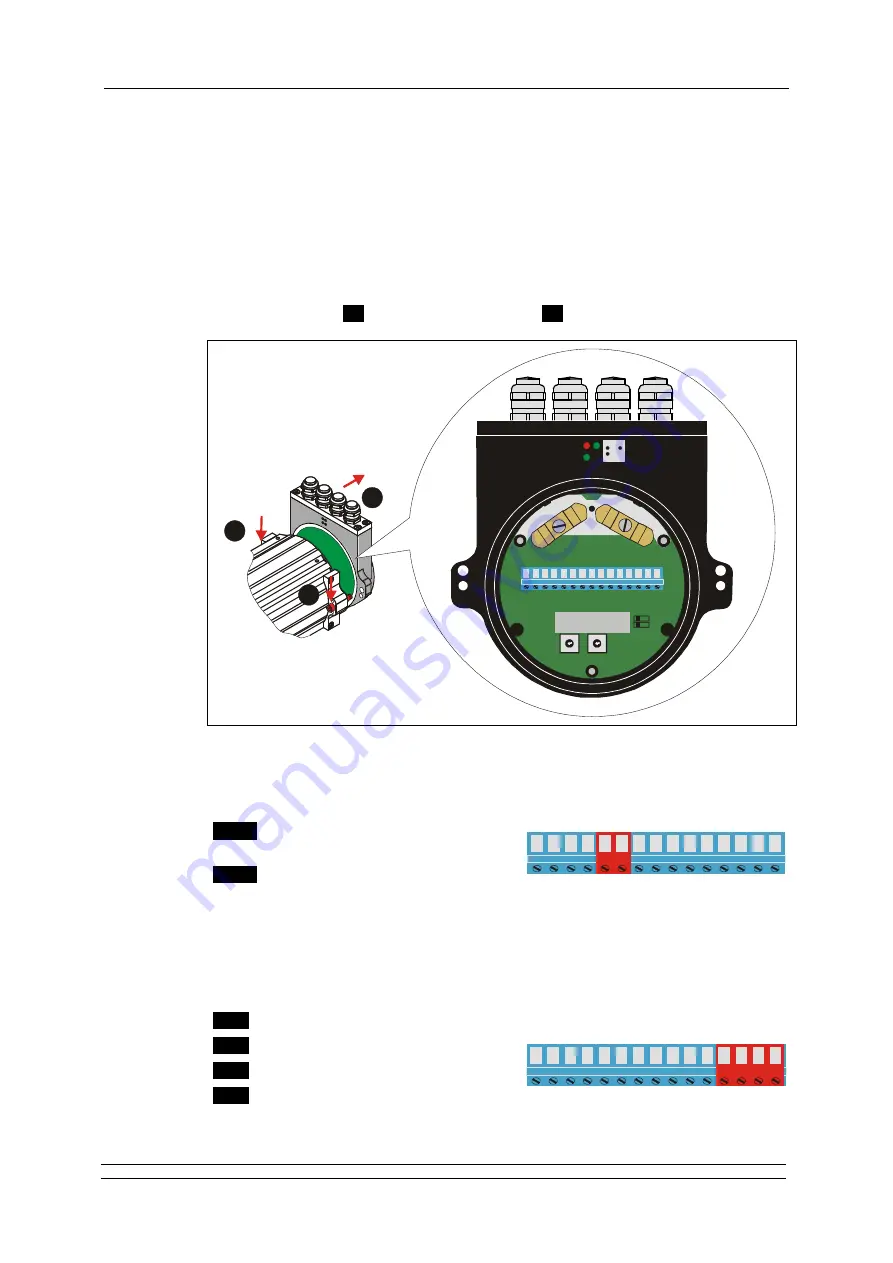
In order to be able to carry out the connection, the connection cap must be removed 
from the laser first. 
For this the screws 

(A)

 are loosened and the cap 

(B)

 is removed away from the laser. 


A

B

A

0 1

 2

 3

 4 

5 6 7

 8

 9 

0 1

 2

 3

 4 

5 6 7

 8

 9 

ERR

RUN

OK

15

1


3.1.1 Supply voltage 


Pin 10

  Standard: 18 – 27 V DC 


Device with heating: 24 V DC (

±

5%) 

Pin 11

 0V, GND 

12

13

14

15

9 8 7 6 5 4 3 2 1

10

11


3.1.2 Profibus-DP 

 
Simultaneous use of the Profibus DP- and SSI - interface possible. 

Pin 1

  Profibus Data PB_A_IN 

Pin 2

  Profibus Data PB_B_IN 

Pin 3

  Profibus Data PB_A_OUT 

Pin 4

  Profibus Data PB_A_OUT 


12

13

14

15

9 8 7 6 5

10

11

4 3 2 1


Содержание OMS2/120 PB

Страница 1: ... Leuze electronic Laser Measuring Device OMS2 120 PB OMS2 170 PB Technical Description for the Profibus DP and SSI Interface ...

Страница 2: ...k Tel 0049 07021 5730 Fax 0049 07021 573199 E mail info leuze de http www leuze de Copyright 2003 Leuze electronic Right of modification We reserve the right to make modifications to the information contained in this document at any time in the interests of improving our products Revision index Revision Date Revision of the warning label in chapter Intended purpose 17 12 2003 New functions in the ...

Страница 3: ...2 Bus addressing 15 3 1 3 SSI interface 15 3 1 4 Switching input Switching output 15 3 1 5 Programming interface 16 3 1 6 Wiring examples 16 3 2 Profibus DP interface Profibus DP master 17 3 2 1 Operating requirements GSD file 17 3 2 2 Setting the station address 17 3 2 3 Bus termination 17 3 2 4 Baud rate 18 3 2 5 Bus status 18 4 Configuration Parameter setting via the Profibus DP master 19 4 1 M...

Страница 4: ...A GB 0006 06 Date 01 12 2004 Transportation Storage Transport instructions Do not drop the device or expose it to shocks or vibrations Device contains an optical system with glass elements Only use the original packaging The wrong packaging material can cause damage to the device during transportation Storage Storage temperature 20 to 75 C Store in dry conditions ...

Страница 5: ...ut via an error message It is therefore essential to integrate the error reports into your own safety system via the evaluation software e g a PLC All persons responsible for the assembly start up and operation of the device must be suitably qualified adhere strictly to this operating manual Your safety and the safety of your equipment depends on this 1 2 Safety information This operating manual c...

Страница 6: ... an uncontrolled or undefined reactivation of the equipment The safety and accident prevention regulations applicable to the specific application must be observed In the case of permanently installed plants or systems without an all pole mains switch and or fuses one of these devices must be installed accordingly and the equipment connected to a PE conductor In the case of 24 V supplies make sure ...

Страница 7: ...ition For the Profibus absolutely the installation requirements bus cable line length shielding etc specified in the EN 50170 standard are to be considered Use a minimum cable cross section of 0 22 mm2 for data transfer purposes Avoid crossing cables where possible If unavoidable only cross them at right angles Especially with the SSI interface it has to be taken care that the screen cover of the ...

Страница 8: ...e electronic supplies the device master file GSD For further information see chapter Operating requirements page 17 Warning Switch off the voltage supply before carrying out wiring work or opening and closing electrical connections Check all electrical connections before switching on the system Incorrectly wired connections can cause operating failures of the laser while wrong connections can lead...

Страница 9: ...lected beam The existence of the blinking reflex for the protection of the eyes may not be assumed Therefore the eyes should be closed consciously or the head should be turned away immediately The device must be installed in such a way that the exposure of persons to the laser beam can only happen accidentally The laser beam may only extend as far as is necessary for the range measurement The beam...

Страница 10: ...according to recognised safety standards 1 5 Safety measures at the installation site Warning Do not perform any welding work once the device is connected and switched on Variations in potential can destroy the device or restrict its operation Do not touch plug contacts with your hands Static charges may destroy electronic components of the device Do not connect unused inputs Observe the voltage s...

Страница 11: ... laser beam of the OMS2 must be on the reflecting foil at any time This can be done using the light spot of the laser diode which is still clearly visible on the reflecting foil even at long distance When aligning the laser measuring device the user may need to take measures to ensure that it can be mechanically adjusted The size of the reflecting foil must be such that the light spot cannot be di...

Страница 12: ...little Here it is valid angle of incidence angle of reflection Figure 4 Transmitting away the surface reflectivity Rotate the reflector foil in the Y or in the Z axis so that the interference signal B always is outside the laser lens Nevertheless keeping the inclination of the reflector foil as low as possible to minimize measuring errors caused by misalignments in the procedure movement For examp...

Страница 13: ... 2 Parallel operation of laser linear paths It has to be taken care in the parallel operation of laser linear paths that a minimum distance of 1 m is kept The reflector foil inclination must be made in such a way that the surface reflectivity see arrows points not into the other laser linear path The alignment is carried out as described in chapter 2 2 1 Figure 5 Minimum distance in parallel opera...

Страница 14: ...In order to be able to carry out the connection the connection cap must be removed from the laser first For this the screws A are loosened and the cap B is removed away from the laser A B A 0 1 2 3 4 5 6 7 8 9 0 1 2 3 4 5 6 7 8 9 ERR RUN OK 15 1 3 1 1 Supply voltage Pin 10 Standard 18 27 V DC Device with heating 24 V DC 5 Pin 11 0V GND 12 13 14 15 9 8 7 6 5 4 3 2 1 10 11 3 1 2 Profibus DP Simultan...

Страница 15: ...ing of the decimal position 12 13 14 15 9 8 7 6 5 10 11 4 3 2 1 ON OFF Termination 0 1 2 3 4 5 6 7 8 9 0 1 2 3 4 5 6 7 8 9 10 0 10 1 3 1 3 SSI interface Simultaneous use of the SSI and Profibus DP interface possible Pin 12 SSI Clock Pin 13 SSI Clock Pin 14 SSI Data Pin 15 SSI Data 9 8 7 6 5 10 11 4 3 2 1 12 13 14 15 3 1 4 Switching input Switching output The programming of the switching input swit...

Страница 16: ...5 9 8 3 1 6 Wiring examples Shield connection see chapter 1 2 1 1 page 7 Profibus connection 1 2 3 4 5 6 7 8 9 10 11 Profibus Data PB_A_IN Profibus Data PB_B_IN Profibus Data PB_A_OUT Profibus Data PB_B_OUT Switching Input programmable Switching Output programmable GND reference potential pin 6 Supply Voltage 0V GND OMS2 incoming Profibus outgoing Profibus SSI connection with parameter setting via...

Страница 17: ... the normal and faulty states respectively For details of how to integrate the files GSD BMP into the system configuration please refer to the relevant documentation of the configuration program for the Profibus master 3 2 2 Setting the station address The station address of the Laser Measuring Device is set exclusively via the rotary switches which becoming visible after removing the cover 100 Se...

Страница 18: ...01 12 2004 3 2 4 Baud rate The Baud rate at which the PROFIBUS is operated may lie within the range of 9 6 kBaud to 12 Mbaud and is detected automatically by the Laser Measuring Device 3 2 5 Bus status At the connection cap the laser has 3 LEDs which display the bus status of the laser ERR RUN OK RUN green Profibus DP active ERR red flashing Profibus DP not active static hardware failure OK green ...

Страница 19: ...SConfiguration Tool is described in an instruction of its own 4 1 Modular configuration Since all functions of the Laser Measuring Device are used not at any time individual functions can be disabled on the bus For this in the mask of configuration software of the profibus master the Laser Measuring Device is represented as a modular compact device That means after insertion of the laser into the ...

Страница 20: ...rred via these two input words Position of the I O data in the input double word ID x LSB MSB Input byte x 0 Input byte x 1 Input byte x 2 Input byte x 3 corresponding parameter data Resolution Sets the resolution of the measurement system The available options are Centimeter Millimeter Default 1 10 millimeter 1 100 millimeter Inch 1 10 Inch Free resolution in 1 100 mm valid values are 1 65535 def...

Страница 21: ...f the device temperature is outside of the range from 0 50 C A low range deviation has still no influence on the measurement and is therefore to be regarded as a warning Hardware Bit 2 in the input byte The bit is set if an internal hardware error were noticed and leads to the error value output Laser diode switched off Bit 3 in the input byte The bit is set if the laser diode was switched off ove...

Страница 22: ...ption is present The available options are Null default The position is set to 0 0xFF All 24 bits are set to 1 0xFFFFFF or 1 last valid value Output of the last valid position 4 1 4 Module Acceleration Is not supported at the moment 4 1 5 Module Counter Measuring Cycle The module uses two input words which are consistently transferred via the bus Over the input words the counter reading of the mea...

Страница 23: ... disabled default Function switched off following parameters without meaning Preset function External switching input is determined as Preset input LD switching input External switching input is used for switching off of the laser diode Alternative Software switching off see chapter 4 1 9 page 25 Preset 1 HI word and LO word It determine the position value to which the laser is adjusted when the p...

Страница 24: ... protocol and is attached after the LSB bit disabled default No SSI error bit Temperature SSI error bit Temperature The bit is set if the device temperature is outside of the range from 0 50 C A low range deviation has still no influence on the measurement and is therefore to be regarded as a warning Intensity SSI error bit Intensity The bit is set if an intensity value of smaller 8 is present or ...

Страница 25: ...eters the switching off of the laser diode is carried out automatically this function is ineffective Switch on laser diode Bit 1 in the output byte By setting this bit the laser diode is switched on This function is ineffective if see Switch off laser diode above Bit 2 and 3 not used Execute adjustment Bit 4 in the output byte By setting this bit the laser is adjusted to the value deposited in Mod...

Страница 26: ...on Code Cause Remedy Bit 0 Intensity error The device checks the intensity of the received laser signal continuously it was detected a below minimum intensity 1 Clean measuring system optics 2 Clean reflecting foil 3 Rule out an interruption of the laser beam If the possibility of soiling or interruption of the laser signal can be ruled out the device must be replaced Bit 1 Device temperature The ...

Страница 27: ...evice does not in general require maintenance by the operator i Note If the lens opening of the laser or the reflecting foil become dirty clean with a soft cloth Do not use an aggressive cleaning material such as thinner or acetone 6 2 Repair Maintenance Repairs to the devices must only be carried out by the manufacturer Contact your Leuze electronic distributor or service organisation should repa...

Страница 28: ...f GSD file Programming via alternatively via RS485 and PC soft OMSConfiguration Tool SSI Interface Output code Binary Gray Clock input Optocoupler Clock frequency 80 kHz 820 kHz Cable length Depending on clock frequency shielding etc SSI transmission RS422 4 wire twisted pair cables and shielded Number of data bits 24 26 with error bit transmission Profibus DP Interface PROFIBUS DP according to DI...

Страница 29: ......

Страница 30: ...vigator com IVO Leuze Vogtle Malanca s r l Tel Int 39 02 26110643 Fax Int 39 02 26110640 E mail ivoleuze tin it http www ivoleuze com Galoz electronics Ltd Tel Int 972 0 3 9023456 Fax Int 972 0 3 9021990 E mail admin galoz co il Global Tech Corp Tel Int 91 0 20 4470085 Fax Int 91 0 20 4 470086 E mail global_tech vsnl com C Illies Co Ltd Tel Int 81 0 3 34434111 Fax Int 81 0 3 34434118 E mail tyo mp...

Отзывы: