Leonton PG5-1002-10GSFP-24 Series Скачать руководство пользователя страница 3

FCC Notice


This  equipment  has  been  tested  and found to  comply  with  the  limits  for  a  Class-A  digital device, 
pursuant  to  Part  15  of  the  FCC  rules.  These  limits  are  designed  to  provide  reasonable  protection 
against harmful interference in a residential installation. This equipment generates, uses, and can 
radiate radio frequency energy. It may cause harmful interference to radio communications if the 
equipment  is  not  installed  and  used  in  accordance  with  the  instructions.  However,  there  is  no 
guarantee that interference will not occur in a particular installation. If this equipment does cause 
harmful  interference  to  radio  or  television  reception,  which  can  be  determined  by  turning  the 
equipment off and on, the user is encouraged to try to correct the interference by one or more of 
the following measures:


Reorient or relocate the receiving antenna.


Increase the separation between the equipment and receiver.


Connect the equipment into an outlet on a circuit different from that to which the receiver 
is connected.


Consult the dealer or an experienced radio/TV technician for help.


Caution: Any changes or modifications not expressly approved by the grantee of this device could 
void the user's authority to operate the equipment.


Déclaration FCC 

Cet équipement a été testé et reconnu conforme aux limites de la classe A pour les équipements 
numériques,  conformément  à  la  section  15  des  Réglementations  FCC.  Ces  limites  sont  conçues 
pour  fournir  une  protection  raisonnable  contre  toutes  interférences  nuisibles  dans  un  milieu 
résidentiel. Cet équipement génère, utilise, et peut émettre de l’énergie de fréquence radio et, s’il 
n’est  pas  installé  et  utilisé  conformément  au  manuel  d’instruction,  peut  perturber  la  réception 
radio. Cependant, il n’est pas garanti que l’équipement ne produira aucune interférence dans une 
installation particulière. Si cet équipement cause des interférences nuisibles à la réception radio ou 
télévisée, qui peuvent être déterminées en l’éteignant et le rallumant, l’utilisateur est encouragé à 
essayer de remédier au problème en prenant les mesures suivantes: 
* Réorienter ou déplacer l’antenne réceptrice. 
* Augmenter la distance entre l’équipement et le récepteur. 
*  Connecter  l’équipement  à  une  prise  secteur  sur  un  circuit  différent  de  celui  utilisé  par  le 
récepteur. 
* Consulter le négociant ou un technicien radio/TV expérimenté. 


Caution: Any changes or modifications not expressly approved by the grantee of  this device could 
void the user's authority to operate the equipment.


ATTETNION

: Tout changement ou modification non expressément approuvé par le concessionnaire 

de cet appareil pourrait annuler l'autorité de l'utilisateur à utiliser l'équipement.


Содержание PG5-1002-10GSFP-24 Series

Страница 1: ...LEONTON PG5 1002 10GSFP 24 Series User Manual...

Страница 2: ...t not limited to the implied warranties of merchantability and fitness for a particular purpose Leonton Technologies Co Ltd may make improvements and or changes to the product and or specifications of...

Страница 3: ...equipment D claration FCC Cet quipement a t test et reconnu conforme aux limites de la classe A pour les quipements num riques conform ment la section 15 des R glementations FCC Ces limites sont con u...

Страница 4: ...equired to take adequate measures CE Mark AVERTISSEMENT Ceci est un produit de classe A Dans un environnement domestique ce produit peut tre utilis en pr sence d interf rences radio This document is t...

Страница 5: ...l Dimensions 3 Front Panel 4 Top View 4 LED Indicators 5 Ethernet Ports 6 Cabling 7 Wiring the Power Inputs 9 Wiring the Fault Alarm Contact 9 Mounting Installation 11 DIN Rail Mounting 11 Wall Mounti...

Страница 6: ...industrial automation application and harsh environments Key Features Interface Performance All Copper ports support auto MDI MDI X function PG5 1002 10GSFP 24 Embedded 8 10 100 1000Tx PSE 30W port 2...

Страница 7: ...ustrial use power The industrial Ethernet switch s hardware specs ports cabling information and wiring installation will be described within this user manual ATTETNION Si la tension CC est fournie par...

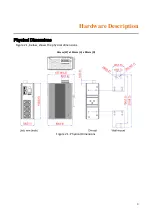
Страница 8: ...3 Hardware Description Physical Dimensions Figure 2 1 below shows the physical dimensions 54mm W x 142mm H x 99mm D Figure 2 1 Physical Dimensions...

Страница 9: ...aged Ethernet switch is shown below in Figure 2 2 Figure 2 2 The Front Panel Top View Figure 2 3 below shows the top panel of the PG5 1002 10GSFP 24 series switches that is equipped with one 6 pin rem...

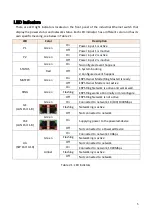
Страница 10: ...appens MASTER Green On ERPS Owner Mode Ring Master is ready Off ERPS Owner Mode is not active RING Green On ERPS Ring Network is active and works well Flashing ERPS Ring works abnormally or misconfigu...

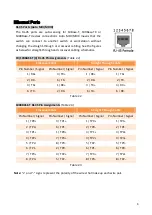
Страница 11: ...raight Through Cable Pin Number Signal Pin Number Signal Pin Number Signal Pin Number Signal 1 RX 3 TX 1 RX 1 TX 2 RX 6 TX 2 RX 2 TX 3 TX 1 RX 3 TX 3 RX 6 TX 2 RX 6 TX 6 RX Table 2 2 1000BASE T RJ 45...

Страница 12: ...se employ optional optical transceiver SFP that complies with IEC 60825 1 and classified as Class 1 laser product Attention Veuillez utiliser un metteur r cepteur optique SFP conforme la norme CEI 608...

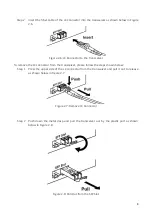
Страница 13: ...ctor from the transceiver please follow the steps shown below Step 1 Press the upper side of the LC connector from the transceiver and pull it out to release as shown below in Figure 2 7 Figure 2 7 Re...

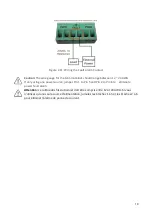
Страница 14: ...nal Block Caution Only use copper conductors 125 C tighten to 5 in lbs 0 56 Nm The wire gauge for the terminal block should range between 18 20 AWG Attention Utilisez uniquement des conducteurs en cui...

Страница 15: ...G If only using one power source jumper Pin 1 to Pin 5 and Pin 2 to Pin 6 to eliminate power fault alarm Attention Le calibre des fils du bornier doit tre compris entre 12 et 24 AWG Si vous n utilisez...

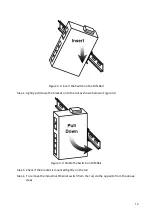
Страница 16: ...ure 3 1 The Rear Side of the Switch and DIN Rail Bracket Follow the steps below to learn how to hang the industrial Ethernet switch Step 1 Use the screws to install the DIN Rail bracket on the rear si...

Страница 17: ...ull down the bracket on to the rail as shown below in Figure 3 3 Figure 3 3 Stable the Switch on DIN Rail Step 5 Check if the bracket is mounted tightly on the rail Step 6 To remove the industrial Eth...

Страница 18: ...ttom of the industrial Ethernet switch Step 3 Use the screws to screw the wall mounting bracket on the industrial Ethernet switch Step 4 Use the hook holes at the corners of the wall mounting bracket...

Страница 19: ...r to the Mounting Installation section Step 4 Power on the industrial Ethernet switch and then the power LED light will turn on If you need help on how to wire power please refer to the Wiring the Pow...

Страница 20: ...assist in identifying problems the switch can be easily monitored with the LED indicators which help to identity if any problems exist Please refer to the LED Indicators section for LED light indicat...

Отзывы: