background image

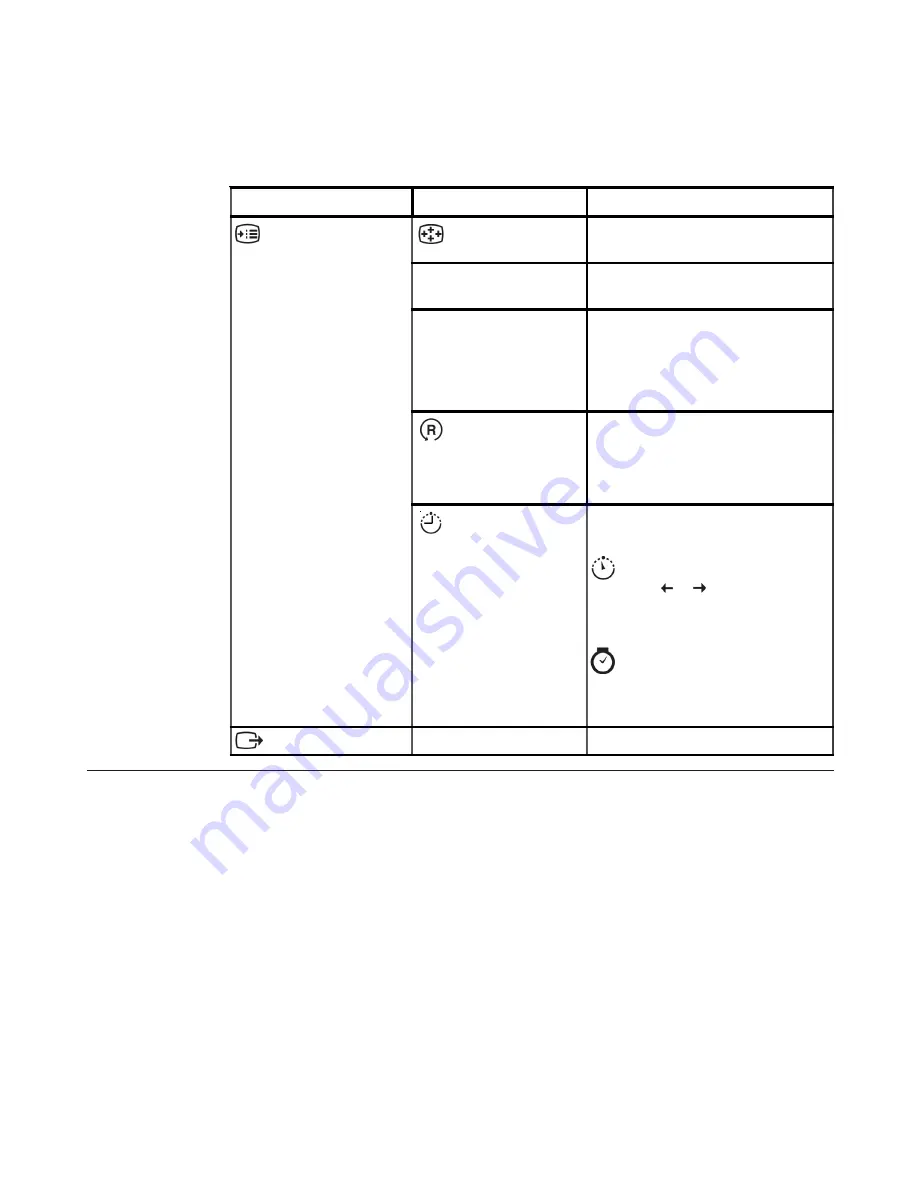
OSD Icon on Main Menu Submenu

Description

      Options

Menu Position

Menu position adjusts menu location on
the screen.

Default

Default returns the menu position to the

default settings.

Custom

Horizontal: Changes the horizontal
position of the OSD.
Vertical: Changes the vertical
position of the OSD.

Save

Factory Reset

Cancel

Reset

Resets monitor to the original factory

settings.

       Accessibility

Controls button and menu settings for
accessibility preferences.

Button repeat rate:

Select              to change.
Off

Default

Slow

Menu time out: Sets the length of
time the OSD will remain active

after the last time a button is

pressed.

      Exit

Exit

Exit the main menu

 or 

·

·

·

·
·

·
·
·

Table 2-2. OSD functions (continued)

Selecting a supported display mode

The display mode the monitor uses is controlled by the computer. Therefore, refer to
your computer documentation for details on how to change display modes.

The image size, position and shape might change when the display mode changes.
This is normal and the image can be readjusted using automatic image setup and the
image controls.

Unlike CRT monitors, which require a high refresh rate to minimize flicker, LCD or
Flat Panel technology is inherently flicker-free.

Note: 

If your system has previously been used with a CRT monitor and is currently

configured to a display mode outside the range of this monitor, you may need
to re-attach the CRT monitor temporarily until you have re-configured the
system; preferably to 1024 x 768 at 60 Hz, which is the Native Resolution Display
mode.

2-5

L151 Flat Panel Monitor User’s Guide

Содержание Thinkvision 9165-AC2

Страница 1: ...L151p Flat Panel Monitor User s Guide ...

Страница 2: ...e Government is subject to the GSAADPSchedule contract with Lenovo Group Limited if any or the standard terms of this commercial license or if the agency is unable to accept this Program under these terms then we provide this Program under the provisions set forth in Commercial Computer Software Restricted Rights at FAR 52 227 19 when applicable or under Rights in Data General FAR 52 227 14 Altern...

Страница 3: ... habits 2 2 Accessibility information 2 3 Adjusting your monitor image 2 3 Using the direct access controls 2 3 Using the On Screen Display OSD controls 2 3 Selecting a supported display mode 2 5 Understanding power management 2 6 Caring for your monitor 2 7 Detaching the monitor stand 2 7 Chapter 3 Reference information 3 1 Monitor specifications 3 1 Troubleshooting 3 2 Manual image setup 3 3 Man...

Страница 4: ...Safety information Copyright Lenovo 2007 iii ...

Страница 5: ...oster Monitor Safety Troubleshooting and Warranty Guide Reference and Driver CD Flat Panel Monitor Power Cord Analog Interface Cable Attached to monitor Attaching the base and handling your monitor To set up your monitor please see the illustrations below Note Do not touch the monitor within the screen area The screen area is glass and can be damaged by rough handling or excessive pressure Note To...

Страница 6: ... setting user controls and using the cable lock slot Types of adjustments Please see the illustration below for an example of the tilt range User controls Your monitor has controls on the front which are used to adjust the display For information on how to use these controls please see Adjusting your monitor image on page 2 3 ...

Страница 7: ...o attach it Setting up your monitor This section provides information to help you set up your monitor Connecting and turning on your monitor Note Be sure to read the Safety Information located in the Monitor Safety Troubleshooting and Warranty Guide before carrying out this procedure 1 Power off your computer and all attached devices and unplug the computer power cord Chapter 1 Getting started 1 3...

Страница 8: ...Note One end of the signal cable is already pre attached to your monitor 3 Insert the power cord into the monitor then plug the monitor power cord and the computer cord into grounded electrical outlets 4 Power on the monitor and the computer 1 4 L151 Flat Panel Monitor User s Guide ...

Страница 9: ...page 3 3 Registering your option Thank you for purchasing this Lenovo product Please take a few moments to register your product and provide us with information that will help Lenovo to better serve you in the future Your feedback is valuable to us in developing products and services that are important to you as well as in developing better ways to communicate with you Register your option on the ...

Страница 10: ...llowing topics describe how to optimize equipment setup to achieve and maintain good working posture Positioning and viewing your monitor Position and adjust your computer monitor for comfortable viewing by considering the following items Viewing distance Optimal viewing distances for monitors range from approximately 510mm to 760mm 20 in to 30 in and can vary depending on ambient light and time o...

Страница 11: ...he setup of your computer equipment have a large effect on your posture while using your computer Be sure to optimize the position and orientation of your equipment by following the tips outlined in Arranging your work area on page 2 1 so you can maintain a comfortable and productive posture Also be sure to use the adjustment capabilities of your computer components and office furniture to best su...

Страница 12: ...cess controls The direct access controls can be used when the On Screen Display OSD is not displayed Table 2 1 Direct access controls Using the On Screen Display OSD controls The settings adjustable with the user controls are viewed through the On Screen Display OSD as shown below To use the controls 1 Press to open the main OSD menu 2 Use or to move among the icons Select an icon and press to acc...

Страница 13: ...ight Vertical Position Moves the image up or down Image Setup Automatic Automatically optimizes the image Manual Manually optimizes the image See Menual image setup page 3 3 Clock Phase Save Image Properties Color Adjusts intensity of red green and blue Preset mode Default sRGB Reddish Bluish Custom Red Increases or decreases the saturation of red in the image Green Increases or decreases the satu...

Страница 14: ...s continued Selecting a supported display mode The display mode the monitor uses is controlled by the computer Therefore refer to your computer documentation for details on how to change display modes The image size position and shape might change when the display mode changes This is normal and the image can be readjusted using automatic image setup and the image controls Unlike CRT monitors whic...

Страница 15: ... 2 4 Power indicator State Power Indicator Screen Restoring Operation Compliance On Steady green Normal Standby Suspend Steady amber Blank Press a key or move the mouse There may be a slight delay before the image reappears Note Standby also occurs if there is no image output to the monitor ENERGY STAR Off Off Blank Press a key or move the mouse There may be a slight delay before the image reappea...

Страница 16: ...ontact may cause permanent damage to your screen Use any cleaner which contains an anti static solution or similar additives This may harm the coating of the screen area Do Lightly dampen a soft cloth with water and use this to gently wipe the covers and the screen Remove grease or finger marks with a damp cloth and a little mild detergent Detaching the monitor stand Gently squeeze both ends of th...

Страница 17: ... in V Power input Supply voltage Max supply current 100 240 V ac 60 50 3 Hz 1 5 A Power consumption Note Power consumption figures are for the monitor and the power supply combined Normal operation Standby Suspend Off 25 W 2 W 1 W Video input Input signal Horizontal addressability Vertical addressability Clock frequency Analog Direct Drive 75 ohm 0 7 V 1024 pixels max 768 lines max 80 MHz Communic...

Страница 18: ...gnal cable is firmly plugged into the system and monitor Connecting and turning on your monitor on Page 1 3 The color settings may be incorrect Select another color setting from the OSD menu Adjusting your monitor image on page 2 3 The automatic image setup function was not performed Perform automatic image setup Adjusting your monitor image on page 2 3 The power indicator is not lit and there is ...

Страница 19: ...ing on your monitor on Page 1 3 The monitor brightness and contrast are at the lowest setting Adjust the brightness and contrast setting on the OSD menu Adjusting your monitor image on page 2 3 One or more of the pixels appear discolored This is a characteristic of the LCD technology and is not an LCD defect If there are more than five pixels missing contact the Lenovo Support Center Appendix A Se...

Страница 20: ...ista do the following 1 Turn off the computer and all attached devices 2 Ensure that the monitor is connected correctly 3 Turn on the monitor and then the system unit Allow the system to boot into Windows Vista operating system 4 Open the Display Properties window by clicking Start Control Panel and then double clicking the Hardware and Sound icon 5 Click the Personalization icon 6 Click the Displ...

Страница 21: ...Windows XP 4 Open the Display Properties window by clicking Start Settings Control Panel select enter into the Display control panel 5 Click the Settings tab 6 Click the Advanced button 7 Click the Monitor tab 8 Click the Properties button 9 Click the Drivers tab 10 Open the Hardware Update Wizard window by clicking on the Update Driver If appears CanWindows connect to Windows Update window please...

Страница 22: ...ick the Monitor tab 8 Click the Properties button 9 Click the Drivers tab 10 Open the Upgrade Device DriverWizard window by clicking on Update Driver and then click Next 11 Select Display a list of the known drivers for this device so that I can choose a specific driver option and then click Next 12 Click the Have Disk button Click on the Browse button and navigate to the following directory X Mon...

Страница 23: ...ty does not apply to a product which has been damaged due to accident misuse abuse improper installation usage not in accordance with product specifications and instructions natural or personal disaster or unauthorized alterations repairs or modifications The following are examples of misuse or abuse and not covered by warranty Images burned onto the screen of a CRT monitor Burned image is prevent...

Страница 24: ... r e b m u n t r a P n o i t p i r c s e D r o l o C l e d o M e p y T e n i h c a M M T M 0 4 9 1 R 3 4 e d i w d r o W _ 1 5 1 L _ r o t i n o M k c a l B s s e n i s u B 2 C A 5 6 1 9 1 4 9 1 R 3 4 n a p a J _ 1 5 1 L _ r o t i n o M k c a l B s s e n i s u B 2 C A 5 6 1 9 5 6 9 9 P 1 3 g o l a n A e l b a c o e d i V k c a l B s s e n i s u B 2 B A 5 6 1 9 2 C A 5 6 1 9 2 4 9 1 R 3 4 e s a B d...

Страница 25: ...cal support Installation and configuration support through the Customer Support Center will be withdrawn or made available for a fee at Lenovo s discretion 90 days after the option has been withdrawn from marketing Additional support offerings including step by step installation assistance are available for a nominal fee To assist the technical support representative have available as much of the ...

Страница 26: ...a 0800 0189 Spanish Brazil Sao Paulo region 11 3889 8986 Toll free outside Sao Paulo region 0800 7014 815 Brazilian Portuguese Canada 1 800 565 3344 English French In Toronto only call 416 383 3344 Chile 800 224 488 Spanish China 800 810 1818 Mandarin China Hong Kong S A R Home PC 852 2825 7799 Commercial PC 852 8205 0333 ThinkPad and WorkPad 852 2825 6580 Cantonese English Putonghua Colombia 1 80...

Страница 27: ...35 58 German Greece 30 210 680 1700 Guatemala 335 8490 Spanish Honduras Tegucigalpa San Pedro Sula 232 4222 San Pedro Sula 552 2234 Spanish Hungary 36 1 382 5720 India 1600 44 6666 Alternate Toll Free 91 80 2678 8940 English Indonesia 800 140 3555 62 21 251 2955 English Bahasa Indonesian Ireland Up and running support 01 815 9202 Warranty service and support 01 881 1444 English Italy Up and runnin...

Страница 28: ...xembourg 352 298 977 5063 French Malaysia 1800 88 8558 English Bahasa Melayu Malta 356 23 4175 Mexico 001 866 434 2080 Spanish Middle East 44 0 1475 555 055 Netherlands 31 20 514 5770 Dutch New Zealand 0800 446 149 English Nicaragua 255 6658 Spanish Norway Up and running support 6681 1100 Warranty service and support 8152 1550 Norwegian Panama 206 6047 Spanish Peru 0 800 50 866 Spanish Philippines...

Страница 29: ... Italian Taiwan 886 2 8723 9799 Mandarin Thailand 1 800 299 229 Thai Turkey 00800 4463 2041 Turkish United Kingdom Up and running support 01475 555 055 Warranty service and support hardware 08705 500 900 Warranty service and support software 08457 151 516 English United States 1 800 426 7378 English Uruguay 000 411 005 6649 Spanish Venezuela 0 800 100 2011 Spanish Vietnam For northern area and Han...

Страница 30: ...RRANTIES OF NON INFRINGEMENT MERCHANTABILITY OR FITNESS FOR A PARTICULAR PURPOSE Some jurisdictions do not allow disclaimer of express or implied warranties in certain transactions therefore this statement may not apply to you This information could include technical inaccuracies or typographical errors Changes are periodically made to the information herein these changes will be incorporated in n...

Страница 31: ... on development level systems and there is no guarantee that these measurements will be the same on generally available systems Furthermore some measurements may have been estimated through extrapolation Actual results may vary Users of this document should verify the applicable data for their specific environment Trademarks The following terms are trademarks of Lenovo in the United States other c...

Отзывы: