background image

Chapter 5. Typical conferencing scenarios

Note:

This chapter provides typical conferencing scenarios with illustrations to help end users quickly get 

started with MTR. Illustrations might look different from your product. For the latest information about MTR, 
go to 

https://support.microsoft.com/en-us/office/microsoft-teams-rooms-help-e667f40e-5aab-40c1-bd68- 

611fe0002ba2?ui=en-us&rs=en-us&ad=us

.

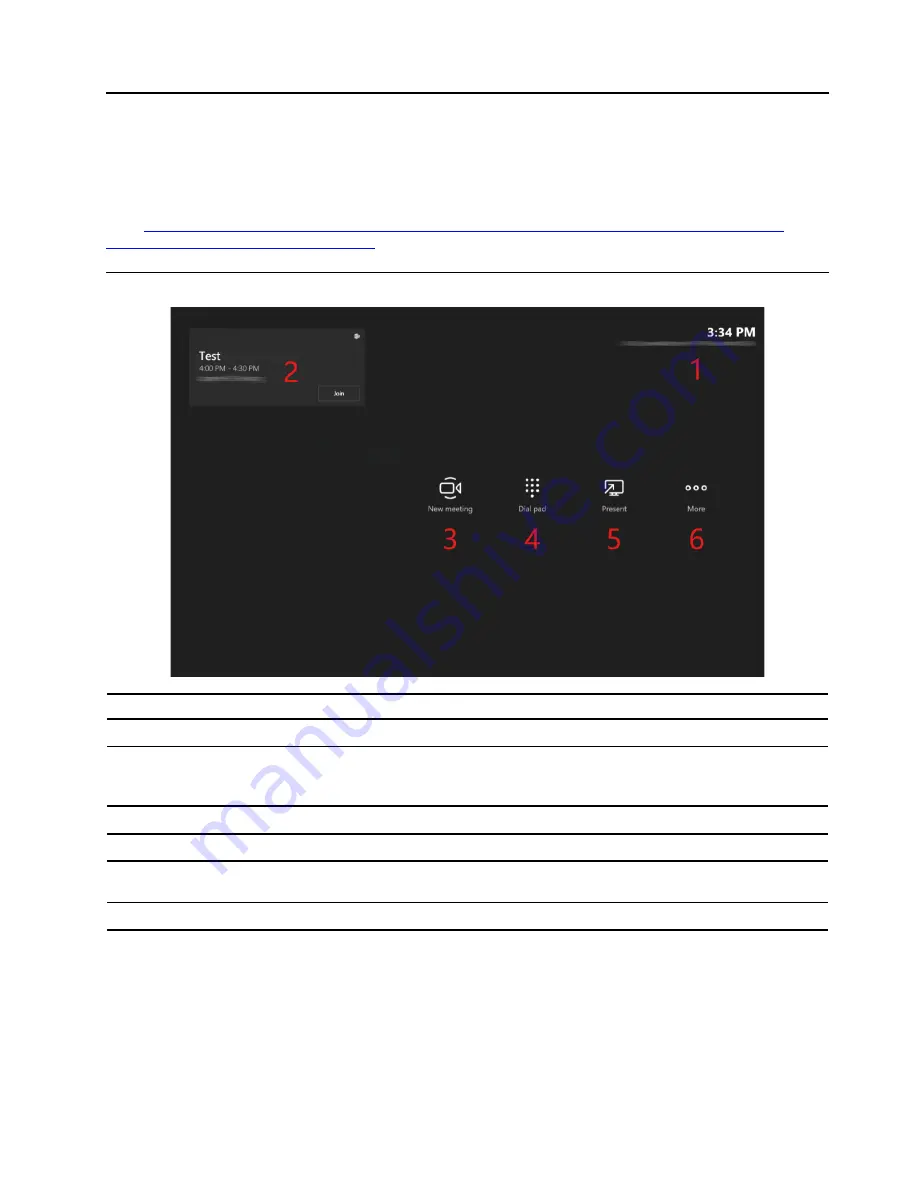
Learn about MTR home screen

UI

Function

Conference room name

Used to search for the conference room email address (MTR account).

Room calender

Show the scheduled meeting information (title, time, and host).

Touch 

Join 

to join a scheduled meeting quickly.

New meeting

Select it to start a new meeting.

Dial pad

Select it to make a phone call.

Present

Select it to start or stop content sharing from the connected computer through 
HDMI-in connection.

More

Select it for more information and settings.

© Copyright Lenovo 2021

39

Содержание ThinkSmart Cor

Страница 1: ...ThinkSmart Core Kits Deployment and User Guide for Microsoft Teams Rooms MTR ...

Страница 2: ...B Important safety information on page 73 Documentation in the box First Edition July 2021 Copyright Lenovo 2021 LIMITED AND RESTRICTED RIGHTS NOTICE If data or software is delivered pursuant to a General Services Administration GSA contract use reproduction or disclosure is subject to restrictions set forth in Contract No GS 35F 05925 ...

Страница 3: ...EFI BIOS 47 Enter the BIOS menu 47 Navigate in the BIOS interface 47 Change the display language of UEFI BIOS 47 Change the display mode of UEFI BIOS for selected models 48 Set the system date and time 48 Change the boot priority order 48 Enable or disable a device 49 Enable or disable the configuration change detection feature 49 Enable or disable the automatic power on feature 49 Enable or disab...

Страница 4: ...contact Lenovo 68 Lenovo Customer Support Center 68 Appendix A Specifications 71 Appendix B Important safety information 73 Appendix C Compliance information 85 Appendix D Accessibility information 95 Appendix E Notices and trademarks 97 ii ThinkSmart Core Kits Deployment and User Guide for Microsoft Teams Rooms MTR ...

Страница 5: ...ocumentation content is subject to change without notice To get the latest documentation go to https smartsupport lenovo com Microsoft makes periodic feature changes to the Windows operating system through Windows Update Refer to Microsoft resources for the latest information Copyright Lenovo 2021 iii ...

Страница 6: ...iv ThinkSmart Core Kits Deployment and User Guide for Microsoft Teams Rooms MTR ...

Страница 7: ...ar conferencing solutions to transform conferencing into a collaborative productive and smart experience End users will enjoy the familiar Microsoft Teams Rooms referred to as MTR interface and IT administrators will enjoy the easily deployed and managed Windows 10 IoT system Copyright Lenovo 2021 1 ...

Страница 8: ...es 4 6 people to large room 15 x 32 inch 12 16 people ThinkSmart Core Full Room Kit 2 Extra large room above 16 people Contact your place of purchase if any item is missing or damaged Ensure that you retain your proof of purchase and packing material They might be required to receive warranty service 2 ThinkSmart Core Kits Deployment and User Guide for Microsoft Teams Rooms MTR ...

Страница 9: ... Power connector Connect to a power supply 10 HDMI in connector Connect to your computer only Do not connect an external HDMI display to this connector for selected models Note Ensure that the camera or soundbar device connected to ThinkSmart Core is MTR certified before using with the MTR software Statement on USB transfer rate Depending on many factors such as the processing capability of the ho...

Страница 10: ...kes the conference more focus on the speaker and the content of whiteboard Notes The camera will run the speaker tracking function when the speaker speaks with normal sound volume greater than 60dB for over 2 seconds The speaker should be less than 5 meters away from the camera The camera will run the whiteboard recognition function when the speaker is nearby and speaks for over 2 seconds The came...

Страница 11: ...ThinkSmart Controller Motion detection Auto wake up the screen when a person approaches toward it The detection angle is 90 and the detection distance is up to 3 meters Chapter 1 Solution overview 5 ...

Страница 12: ...6 ThinkSmart Core Kits Deployment and User Guide for Microsoft Teams Rooms MTR ...

Страница 13: ...cessories Software Get started by a Microsoft Teams Rooms license Network Firewall Scenario TCP 443 Signaling packets TCP 443 UDP 3478 TCP UDP 50 000 59 999 Audio Video packets TCP 443 TCP UDP 50 000 59 999 Desktop sharing TCP 80 and 443 Http https Bandwidth up down Scenario 30 kbps Peer to peer audio calling 130 kbps Peer to peer audio calling and screen sharing 500 kbps Peer to peer quality vide...

Страница 14: ...8 ThinkSmart Core Kits Deployment and User Guide for Microsoft Teams Rooms MTR ...

Страница 15: ...to meet various deployment needs IT administrators can deploy them according to the actual situation of the conferencing room The following illustration is for reference only Note Ensure that you deploy with the accompanying devices and components for optimal performance Copyright Lenovo 2021 9 ...

Страница 16: ...ThinkSmart Cam 1 Do one of the following to mount the camera and connect the camera cable Mount on ThinkSmart Bar XL 10 ThinkSmart Core Kits Deployment and User Guide for Microsoft Teams Rooms MTR ...

Страница 17: ... Mount on TV Chapter 3 Hardware deployment 11 ...

Страница 18: ... Mount on wall Attention Keep the camera within 2 meters 6 6 feet from the floor 12 ThinkSmart Core Kits Deployment and User Guide for Microsoft Teams Rooms MTR ...

Страница 19: ... Mount below TV Chapter 3 Hardware deployment 13 ...

Страница 20: ... Mount above TV 2 Adjust the camera angle 14 ThinkSmart Core Kits Deployment and User Guide for Microsoft Teams Rooms MTR ...

Страница 21: ...soundbar within 2 meters 6 6 feet from the floor Mount above TV or below TV 2 Connect the soundbar to a power supply Connect the satellite microphones and the soundbar cable to the soundbar 3 Turn on the soundbar by pressing and holding its power button for 3 seconds Chapter 3 Hardware deployment 15 ...

Страница 22: ...ndbar over 8 5 meters 27 9 feet away from the opposite wall Keep the satellite microphones 2 6 meters 6 6 19 6 feet apart from each other The soundbar supports Bluetooth connection with a non MTR device such as a notebook computer table mobile phone 16 ThinkSmart Core Kits Deployment and User Guide for Microsoft Teams Rooms MTR ...

Страница 23: ... NanoSaver lock standard using Cleat locking technology The security lock slot is located in the Controller stand Note You are responsible for evaluating selecting and implementing the locking device and security feature Lenovo makes no comments judgments or warranties about the function quality or performance of the locking device and security feature You can purchase locks from Lenovo Chapter 3 ...

Страница 24: ...t you connect your computer to the HDMI in connector and connect the external displays to the HDMI out connectors 3 Press the power button to turn on Core 4 Use the keyboard and mouse to complete the following software deployment Windows OOBE settings on page 21 Claim device to ThinkSmart Manager on page 23 18 ThinkSmart Core Kits Deployment and User Guide for Microsoft Teams Rooms MTR ...

Страница 25: ...ore Note Sometimes the on screen keyboard is not popped out after you touch the input box on ThinkSmart Controller In such case you can keep the external keyboard connected to ThinkSmart Core for operation 6 Do one of the following to mount Core Mount under table recommended Mount on wall Chapter 3 Hardware deployment 19 ...

Страница 26: ...ndard using T bar locking technology Kensington Lenovo MiniSaver lock standard using Cleat locking technology Note You are responsible for evaluating selecting and implementing the locking device and security feature Lenovo makes no comments judgments or warranties about the function quality or performance of the locking device and security feature You can purchase locks from Lenovo 20 ThinkSmart ...

Страница 27: ...ll see the Windows OOBE basic settings window Follow on screen instructions to set the region and keyboard language Note It is working as designed to show the OOBE window on the external display rather than ThinkSmart Controller Please complete the settings with your keyboard and mouse Copyright Lenovo 2021 21 ...

Страница 28: ...22 ThinkSmart Core Kits Deployment and User Guide for Microsoft Teams Rooms MTR ...

Страница 29: ...ngs are completed wait several minutes until the Claim Device to ThinkSmart Manager window is displayed Then you can claim ThinkSmart Core through the QR code or the PIN code After claiming a new Windows administrator password will be generated by ThinkSmart Manager automatically See the following sections for details Note ThinkSmart Controller touch screen is ready for use now However for optimal...

Страница 30: ...ssword prompt will be displayed 2 Set a new Windows administrator password and select Change password to complete the process For information about claiming device after Windows OOBE see ThinkSmart Manager User Guide at https smartsupport lenovo com us en downloads DS542392 to complete the claiming process 24 ThinkSmart Core Kits Deployment and User Guide for Microsoft Teams Rooms MTR ...

Страница 31: ...using the link in the e mail you can try to log in to ThinkSmart Manager with your Lenovo ID Important Do not use Lenovo ID s Social Sign on feature Facebook Google or Windows Live ID for your ThinkSmart Manager We recommend you use an e mail address and password to ensure full functionality 2 The first user from an organization will be required to create a new organization Select Create a new org...

Страница 32: ...ollowing sections show the claiming way from the ThinkSmart Manager application For information about the other claiming way see ThinkSmart Manager User Guide at https smartsupport lenovo com us en downloads DS542392 Claiming from the ThinkSmart Manager application Prerequisite Prepare a mobile device such as smart phone that can scan a QR code Ensure that ThinkSmart Core and the mobile device are...

Страница 33: ...vice to scan the QR code Follow on screen instructions to install the ThinkSmart Manager application and log in with your Lenovo ID 2 Complete the following operations on your mobile device Chapter 4 Software deployment 27 ...

Страница 34: ...nkSmart Core to ThinkSmart Manager Once scanned the application will add ThinkSmart Core automatically Add manually Once selected the application will guide you to select Machine Type and enter Serial Number and the PIN code to add ThinkSmart Core manually 28 ThinkSmart Core Kits Deployment and User Guide for Microsoft Teams Rooms MTR ...

Страница 35: ...ions to ThinkSmart Core from cloud Select it if you have configured ThinkSmart Core locally and don t want to apply the default organization configurations Do not select it if you want to apply the default organization configurations Chapter 4 Software deployment 29 ...

Страница 36: ...5 The claiming is successful 30 ThinkSmart Core Kits Deployment and User Guide for Microsoft Teams Rooms MTR ...

Страница 37: ...ur Lenovo ID 2 Select Devices on the left navigation panel The Device List page is displayed 3 Select the device you want to manage The device information window is displayed 4 Select Configuration Windows on the right panel Then follow the on screen instructions to view the administrator password For information about configuring and managing devices through ThinkSmart Manager see ThinkSmart Mana...

Страница 38: ...32 ThinkSmart Core Kits Deployment and User Guide for Microsoft Teams Rooms MTR ...

Страница 39: ...ing is completed wait several minutes until the MTR Setup window is displayed 1 Select the box and select Next 2 Enter an MTR account and password and select the desired meeting mode Select Next Chapter 4 Software deployment 33 ...

Страница 40: ...3 Select Next and Finish to complete the settings 34 ThinkSmart Core Kits Deployment and User Guide for Microsoft Teams Rooms MTR ...

Страница 41: ...More Settings 2 Enter the Windows administrator password as prompted The MTR Settings page will be displayed Then you can configure the MTR settings and select Save and exit to save the settings For example From the Device tab turn on Dual monitor mode to enable the two external displays connected to ThinkSmart Core Chapter 4 Software deployment 35 ...

Страница 42: ...hone and speaker for conferencing Note The content camera setting is for a certified content camera only ThinkSmart Cam is not a content camera so please keep the original setting 36 ThinkSmart Core Kits Deployment and User Guide for Microsoft Teams Rooms MTR ...

Страница 43: ...trator account 1 Go to the MTR Settings page 2 Select Windows Settings 3 Select Administrator and enter the administrator password To switch from the administrator account to the MTR account 1 Open the Start menu 2 Select Administrator Sign out 3 Select Skype Sign in Chapter 4 Software deployment 37 ...

Страница 44: ...38 ThinkSmart Core Kits Deployment and User Guide for Microsoft Teams Rooms MTR ...

Страница 45: ...d68 611fe0002ba2 ui en us rs en us ad us Learn about MTR home screen UI Function Conference room name Used to search for the conference room email address MTR account Room calender Show the scheduled meeting information title time and host Touch Join to join a scheduled meeting quickly New meeting Select it to start a new meeting Dial pad Select it to make a phone call Present Select it to start o...

Страница 46: ...on to attendees and the conference room email address MTR account Once the meeting is accepted it will appear on the room calender shortly 2 Select Join to join the meeting 40 ThinkSmart Core Kits Deployment and User Guide for Microsoft Teams Rooms MTR ...

Страница 47: ...you want to invite Select Invite to create a new meeting Invite ThinkSmart Core during a meeting 1 Search and select the conference room name from the MTR application on your computer 2 Accept the call on ThinkSmart Controller to join the meeting Chapter 5 Typical conferencing scenarios 41 ...

Страница 48: ...Smart Core Your screen will be shared with in room attendees automatically 2 Join the meeting from the MTR home screen on ThinkSmart Controller Your screen will be shared with remote attendees too Stop sharing your screen To stop sharing with remote attendees select the stop presenting icon from ThinkSmart Controller To stop sharing with in room attendees disconnect your computer from ThinkSmart C...

Страница 49: ...try to enter the BIOS menu If both the power on password and supervisor password are set you can enter either password However you must use your supervisor password to change any configuration settings Hard disk password Setting a hard disk password prevents unauthorized access to the data on the storage drive When a hard disk password is set you are prompted to enter a valid password each time yo...

Страница 50: ...ter 6 Select the storage drive you will wipe and click NEXT 7 Select the entire storage drive or partition to wipe as desired 8 Select the method as desired and click NEXT 9 Click Yes to confirm your option when the prompting window is displayed 10 If you have set a hard disk password for the storage drive enter the password Otherwise set a temporary password following the on screen instructions T...

Страница 51: ...nbound and outbound connections are authorized If the computer is preinstalled with a firewall program it helps protect against computer Internet security threats unauthorized access intrusions and Internet attacks It also protects your privacy For more information about how to use the firewall program refer to the help system of your firewall program To use Windows firewalls 1 Type Control Panel ...

Страница 52: ...46 ThinkSmart Core Kits Deployment and User Guide for Microsoft Teams Rooms MTR ...

Страница 53: ...n select No or press Esc to skip the password prompt and enter the BIOS menu However you cannot change the system configurations that are protected by passwords Navigate in the BIOS interface Attention The default configurations are already optimized for you in boldface Improper change of the configurations might cause unexpected results Depending on your keyboard you can navigate in the BIOS inte...

Страница 54: ...he boot priority order permanently 1 Depending on the type of the storage device do one of the following If the storage device is internal go to step 2 If the storage device is a disc ensure that the computer is on or turn on the computer Then insert the disc into the optical drive If the storage device is an external device other than a disc connect the storage device to the computer 2 Restart th...

Страница 55: ...ation change detection feature If you enable configuration change detection when the POST detects configuration changes of some hardware devices such as storage drives or memory modules an error message will be displayed when you turn on the computer To enable or disable the configuration change detection feature 1 Restart the computer When the logo screen is displayed press F1 or Fn F1 2 Select S...

Страница 56: ...mpliance you need to disable the Fast Startup function 1 Go to Control Panel and view by large icons or small icons 2 Click Power Options Choose what the power buttons do Change settings that are currently unavailable 3 Clear the Turn on fast startup recommended option from the Shutdown settings list Change BIOS settings before installing a new operating system BIOS settings vary by operating syst...

Страница 57: ...ected devices 2 Insert the BIOS update disc into the optical drive and then turn off the computer 3 Disconnect all power cords from electrical outlets Then remove any parts that impede access to the Clear CMOS Recovery jumper 4 Move the jumper from the standard position to the maintenance position 5 Reconnect the power cords for the computer and the monitor to electrical outlets 6 Turn on the comp...

Страница 58: ...onnect all power cords from electrical outlets 8 Move the jumper back to the standard position 9 Reinstall all the parts that have been removed Then reconnect the power cords for the computer and the monitor to electrical outlets 10 Turn on the computer and the monitor When the logo screen is displayed press F1 or Fn F1 11 To prevent data loss ensure that BIOS settings are restored to an earlier p...

Страница 59: ...Core During the boot press F12 multiple times to load the Startup Device Menu Based on your infrastructure select the IPv4 or IPv6 option to initiate the network boot Does ThinkSmart Core support USB boot Yes Insert a USB key into one of the USB connectors and then restart ThinkSmart Core During the boot press F12 multiple times to load the Startup Device Menu Based on your infrastructure select t...

Страница 60: ...hinkSmart Core supports MTR certified audio or video peripherals For more information see https products office com en us microsoft teams across devices devices Does ThinkSmart Core support wireless display No Can I use ThinkSmart Core as a PC No ThinkSmart Core is an appliance and is designed to be a meeting space based tabletop conference room AV device Does ThinkSmart Core support deployment vi...

Страница 61: ...ve the problem you are experiencing run the diagnostic program and recover your operating system 3 If the problem persists contact Lenovo See Chapter 10 Help and support on page 65 Troubleshooting Use the troubleshooting information to find solutions to problems that have definite symptoms Startup and shutdown problems Problem Solution The ThinkSmart Core does not start up after the power button i...

Страница 62: ...on ThinkSmart Controller Please connect a keyboard and mouse to ThinkSmart Core for operations Sometimes the on screen keyboard is not displayed accurately such as Keyboard not fully displayed Keyboard letters not fully displayed Please connect a keyboard and mouse to ThinkSmart Core for operations Sometimes the display mode is duplicate mode after ThinkSmart Core enters the MTR account The displa...

Страница 63: ...et the refresh rate 1 Right click a blank area on the desktop 2 Click Display settings On the Display tab click Advanced display settings Display adapter properties for Display 1 3 Click the Monitor tab and then reset the refresh rate to be the highest and non interlaced The ThinkSmart Controller screen image is discolored The ThinkSmart Controller screen might be affected by interference from nea...

Страница 64: ...er settings 3 Right click the Ethernet LAN adapter icon and click Enable Update or reinstall the Ethernet LAN driver Install all networking software that is necessary for your network environment Check with your LAN administrator for the necessary networking software Set the same duplex for the switch port and the adapter If you configured the adapter for full duplex ensure that the switch port is...

Страница 65: ...splay all Bluetooth devices Right click each Bluetooth device and then click Enable device 4 Expand Network adapters to display all network devices Right click each Bluetooth device and then click Enable device Turn on the Bluetooth radio 1 Open the Start menu 2 Click Settings Devices Bluetooth other devices 3 Turn on the Bluetooth switch to enable the Bluetooth feature Update or reinstall the Blu...

Страница 66: ...ice online Install any device drivers or programs supplied with the USB device Refer to the documentation that comes with the USB device for more information Disconnect and reconnect the USB connector to reset the USB device Ensure that the Smart USB Protection function is disabled in UEFI BIOS Diagnostics Use diagnostic solutions to test hardware components and report operating system controlled ...

Страница 67: ...e reset It is normal that ThinkSmart Controller will go blank for a while during the reset process Reset from BIOS Note The items in the graphical user interface GUI might change without notice 1 Ensure that an external display is connected to the computer 2 Ensure that a keyboard is connected to the computer 3 Restart your computer At the beginning of the boot process keep pressing F11 on the key...

Страница 68: ...pared USB drive to the computer 4 Type recovery in the search box Then click Create a recovery drive 5 Click Yes in the User Account Control window to allow the Recovery Media Creator program to start 6 In the Recovery Drive window follow the on screen instructions to create a recovery USB drive Use the recovery USB drive If your computer cannot be started go to Chapter 10 Help and support on page...

Страница 69: ...te might not be tested by Lenovo It is recommended that you get device drivers from Lenovo 1 Open the Start menu 2 Click Settings Update Security Windows Update 3 Follow the on screen instructions Chapter 9 Troubleshooting diagnostics and recovery 63 ...

Страница 70: ...64 ThinkSmart Core Kits Deployment and User Guide for Microsoft Teams Rooms MTR ...

Страница 71: ...placed by customers with a greater skill level Trained service technicians can also provide service to install or replace the parts under the type of warranty designated for the customer s machine If you intend on installing the CRU Lenovo will ship the CRU to you CRU information and replacement instructions are shipped with your product and are available from Lenovo at any time upon request You m...

Страница 72: ...ibility information https www lenovo com accessibility Additional services Thank you Lenovo customer for your purchase of a ThinkSmart Core kit During and after the warranty period you can purchase additional services from Lenovo at https pcsupport lenovo com warrantyupgrade Service availability and service name might vary by country or region We expect you will have years of productive meeting ex...

Страница 73: ...chnicians will assist with updates and device changes and provide easy to follow Do s and Don ts Device operability health check ins will ensure collaboration solution is healthy and running smoothly Redeployment of solution if required into a different meeting space is included Note These services are delivered virtually with multi lingual technicians available WW ready to handle live support via...

Страница 74: ...e warranty period Problem determination Trained personnel are available to assist you with determining if you have a hardware problem and deciding what action is necessary to fix the problem Lenovo hardware repair If the problem is determined to be caused by Lenovo hardware under warranty trained service personnel are available to provide the applicable level of service Engineering change manageme...

Страница 75: ...The LLW also is preinstalled on ThinkSmart Core To access the LLW go to the following directory C Windows System32 oobe info default Chapter 10 Help and support 69 ...

Страница 76: ...70 ThinkSmart Core Kits Deployment and User Guide for Microsoft Teams Rooms MTR ...

Страница 77: ...es Height 56 5 mm 2 2 inches Depth 91 3 mm 3 6 inches Weight without packaging Maximum configuration as shipped 3 6 kg 7 9 lb Power supply 65 watt automatic voltage sensing power supply Satellite microphones Dimensions Width 100 mm 3 9 inches Height 20 mm 0 8 inches Weight without packaging Maximum configuration as shipped 220 g 0 5 lb ThinkSmart Controller and ThinkSmart Core ThinkSmart Controlle...

Страница 78: ...t Preloaded Lenovo apps ThinkSmart Manager Preloaded 3rd party apps Microsoft Teams Rooms Operating environment Maximum altitude without pressurization Operating From 15 2 m 50 ft to 3048 m 10 000 ft Storage From 15 2 m 50 ft to 10 668 m 35 000 ft Temperature Operating From 10 C 50 F to 35 C 95 F Storage in original shipping packaging From 20 C 4 F to 60 C 140 F Storage without packaging From 10 C...

Страница 79: ...on computer products contain a coin sized internal battery that provides power to the system clock even when the computer is unplugged so the battery safety information applies to all computer products Conditions that require immediate action Products can become damaged due to misuse or neglect Some product damage is serious enough that the product should not be used again until it has been inspec...

Страница 80: ...ation are referred to as Customer Replaceable Units or CRUs Lenovo provides documentation with instructions when it is appropriate for customers to install options or replace CRUs You must closely follow all instructions when installing or replacing parts The Off state of a power indicator does not necessarily mean that voltage levels inside a product are zero Before you remove the covers from a p...

Страница 81: ...securely and completely plugged into receptacles Do not use any power adapter that shows corrosion at the ac input pins or shows signs of overheating such as deformed plastic at the ac input pins or anywhere on the power adapter Do not use any power cords where the electrical contacts on either end show signs of corrosion or overheating or where the power cord appears to have been damaged in any w...

Страница 82: ...h the equipment will be installed For units intended to be operated in Norway Sweden Finland Use a cord set with a two prong attachment plug The cord set should have the appropriate safety approvals for the country in which the equipment will be installed If you intend to use your product in a country or region that is different from your ordering location please purchase an additional Lenovo powe...

Страница 83: ...Consult an electrician for more information if you have questions about power loads and branch circuit ratings Be sure that the power outlet you are using is properly wired easily accessible and located close to the equipment Do not fully extend power cords in a way that will stress the cords Be sure that the power outlet provides the correct voltage and current for the product you are installing ...

Страница 84: ...dy seek medical care immediately Do not Throw or immerse into water Heat to more than 100 C 212 F Repair or disassemble Leave in an extremely low air pressure environment Leave in an extremely high temperature environment Crush puncture cut or incinerate Dispose of the battery as required by local ordinances or regulations The following statement applies to users in the state of California U S A C...

Страница 85: ...er Keep the cover closed whenever the computer is plugged in Regularly inspect the outside of the computer for dust accumulation Remove dust from vents and any perforations in the bezel More frequent cleanings might be required for computers in dusty or high traffic areas Do not restrict or block any ventilation openings Do not store or operate your computer inside furniture as this might increase...

Страница 86: ...cement and do not connect the telephone cable to or disconnect it from the telephone outlet on the wall Liquid crystal display LCD notice DANGER To avoid shock hazards Do not remove the covers Do not operate this product unless the stand is attached Do not connect or disconnect this product during an electrical storm The power cord plug must be connected to a properly wired and grounded power outl...

Страница 87: ... specifications of EN 50332 2 The headphone output connector of your computer complies with EN 50332 2 Sub clause 7 This specification limits the computer s maximum wide band true RMS output voltage to 150 mV To help protect against hearing loss ensure that the headphones or earphones you use also comply with EN 50332 2 Clause 7 Limits or a wide band characteristic voltage of 75 mV Using headphone...

Страница 88: ...isconnect all power cords from electrical outlets before removing the computer cover or any part that has the above label attached DO NOT disassemble components that have the above label attached There are no serviceable parts inside these components Your product is designed for safe use However hazardous voltage current and energy levels are present inside any component that has this label attach...

Страница 89: ...mponents When you install a static sensitive option or CRU touch the static protective packaging containing the part to a metal expansion slot cover or other unpainted metal surface on the computer for at least two seconds This reduces static electricity in the package and your body When possible remove the static sensitive part from the static protective packaging and install the part without set...

Страница 90: ...nt cartons cushion the units to avoid damage When you move the computer to another country or region you must take local electrical standards into consideration If the local electrical outlet style is different from the type you are currently using contact the Lenovo Customer Support Center to purchase either an electrical plug adapter or a new power cord Clean your computer CAUTION Remove any med...

Страница 91: ...port lenovo com European Union EU United Kingdom UK Radio Equipment Compliance EU Contact Lenovo Slovakia Landererova 12 811 09 Bratislava Slovakia UK contact Lenovo Redwood Crockford Lane Basingstoke RG24 8WQ UK This product is in conformity with all the requirements and essential norms that apply to EU Council Radio Equipment Directive 2014 53 EU on the approximation of the laws of the Member St...

Страница 92: ...성이 있으므로 인명안전과 관련된 서비스는 할 수 없음 SAR 정보 본 장치는 전파 노출에 대한 가이드라인을 충족합니다 본 장치는 무선 송수신기 입니다 본 장치는 국제 가이드라인으로 권장되는 전파 노출에 대한 제한을 초과하지 않도록 설계되었습니다 장치 액세서리 및 최신 부품을 사용할 경우 SAR 값이 달라질 수 있 습니다 SAR 값은 국가 보고 및 테스트 요구 사항과 네트워크 대역에 따라 다를 수 있습니다 본 장치 는 사람의 신체에서 20mm 이상의 거리에서 사용할 수 있습니다 Electromagnetic emission notices Federal Communications Commission FCC Supplier s Declaration of Conformity Notes The statements be...

Страница 93: ...Party Lenovo United States Incorporated 7001 Development Drive Morrisville NC 27560 Email FCC lenovo com Industry Canada compliance statement CAN ICES 003 B NMB 003 B European Union EU United Kingdom UK Electromagnetic Compatibility Compliance This product is in conformity with the protection requirements of EU Council Directive 2014 30 EU on the approximation of the laws of the Member States as w...

Страница 94: ... ac power cord The ac power cord shipped with your product can be used only for this specific product Do not use the ac power cord for other devices Korea Communications Commission KCC statement This is electromagnetic wave compatibility equipment for business Type A Sellers and users need to pay attention to it This is for any areas other than home Environmental information This section provides ...

Страница 95: ...ects of EEE and batteries on the environment and human health due to the presence of hazardous substances Lenovo electrical and electronic equipment EEE may contain parts and components which at end of life might qualify as hazardous waste EEE and waste electrical and electronic equipment WEEE can be delivered free of charge to the place of sale or any distributor that sells electrical and electro...

Страница 96: ... Japan provides through its PC Collecting and Recycling Services for the collecting reuse and recycling of disused computers and monitors For details visit the Lenovo Web site at https www lenovo com us en social_responsibility sustainability ptb_japan Pursuant to the Law for Promotion of Effective Utilization of Resources the collecting and recycling of home used computers and monitors by the man...

Страница 97: ...mando o modelo número de série e cidade a fim de enviarmos as instruções para o correto descarte do seu produto Lenovo Recycling information for mainland China Restriction of Hazardous Substances RoHS Directive of countries and regions The latest environmental information about Lenovo products is available at https www lenovo com us en compliance eco declaration European Union EU United Kingdom UK...

Страница 98: ...Ukraine RoHS India RoHS RoHS compliant as per E Waste Management Rules Mainland China RoHS 92 ThinkSmart Core Kits Deployment and User Guide for Microsoft Teams Rooms MTR ...

Страница 99: ...enovo products Export classification notice This product is subject to the United States Export Administration Regulations EAR and has an Export Classification Control Number ECCN of 5A992 c It can be re exported except to any of the embargoed countries in the EAR E1 country list Lenovo product service information for Taiwan Taiwan precautionary vision statement 警語 使用過度恐傷害視力 注意事項 使用30分鐘請休息10分鐘 未滿2...

Страница 100: ...4 корпус 1 помещение VII тел 7 495 645 83 38 факс 7 495 645 78 77 Импортер Наименование адрес импортера и информация для связи с ним указаны на этикетке на упаковке продукции Согласно ГОСТ 2 601 2013 Единая система конструкторской документации Эксплуатационные документы пункт 5 1 подпункт 5 1 2 этикетка является видом эксплуатационных документов Дата изготовления месяц и год Указана на этикетке на...

Страница 101: ...er access to information and technology You can get the most up to date accessibility information from https www lenovo com accessibility If you need additional support with the accessibility features go to https pcsupport lenovo com supportphonelist to find the support phone numbers for your country or region Copyright Lenovo 2021 95 ...

Страница 102: ...96 ThinkSmart Core Kits Deployment and User Guide for Microsoft Teams Rooms MTR ...

Страница 103: ...ht to improve and or modify the products and software programs described in the manuals included with your computer and the content of the manual at any time without additional notice The software interface and function and hardware configuration described in the manuals included with your computer might not match exactly the actual configuration of the computer that you purchase For the configura...

Страница 104: ...s product Lenovo may update this document at any time without notice For the latest information or any questions or comments contact or visit the Lenovo Web site https smartsupport lenovo com Trademarks LENOVO LENOVO logo THINKSMART and THINKSMART logo are trademarks of Lenovo Intel Thunderbolt is a trademark of Intel Corporation or its subsidiaries in the U S and or other countries Microsoft Wind...

Страница 105: ......

Страница 106: ......

Отзывы: