


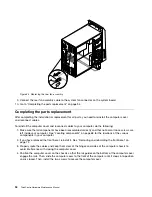


Figure 20. Accessing the microprocessor
8. Lift the microprocessor straight up and out of the microprocessor socket, as shown in Removing the
microprocessor.
Notes:
a. Your microprocessor and socket might look different from the one illustrated.
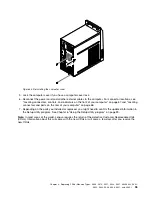
b. Note the orientation of the microprocessor in the socket. You can either look for the small triangle
1
on one corner of the microprocessor or note the orientation of the notches
2
on the microprocessor.
This is important when installing the new microprocessor on the system board.
c. Touch only the edges of the microprocessor. Do not touch the gold contacts on the bottom.
d. Do not drop anything onto the microprocessor socket while it is exposed. The socket pins must be
kept as clean as possible.
Figure 21. Removing the microprocessor
9. Make sure that the small handle is in the raised position.
10. Remove the new microprocessor
1
from the protective cover
2
that protects the gold contacts of the
new microprocessor.
84
ThinkCentre Hardware Maintenance Manual
Содержание ThinkCentre M70e
Страница 2: ......
Страница 8: ...vi ThinkCentre Hardware Maintenance Manual ...
Страница 17: ...Chapter 2 Safety information 9 ...
Страница 18: ... 18 kg 37 lbs 32 kg 70 5 lbs 55 kg 121 2 lbs 1 2 PERIGO 10 ThinkCentre Hardware Maintenance Manual ...
Страница 21: ...Chapter 2 Safety information 13 ...
Страница 22: ...1 2 14 ThinkCentre Hardware Maintenance Manual ...
Страница 23: ...Chapter 2 Safety information 15 ...
Страница 29: ...Chapter 2 Safety information 21 ...
Страница 33: ...Chapter 2 Safety information 25 ...
Страница 40: ...32 ThinkCentre Hardware Maintenance Manual ...
Страница 74: ...66 ThinkCentre Hardware Maintenance Manual ...
Страница 104: ...96 ThinkCentre Hardware Maintenance Manual ...
Страница 402: ...394 ThinkCentre Hardware Maintenance Manual ...
Страница 407: ......
Страница 408: ...Part Number 71Y8558 Printed in USA 1P P N 71Y8558 71Y8558 ...