


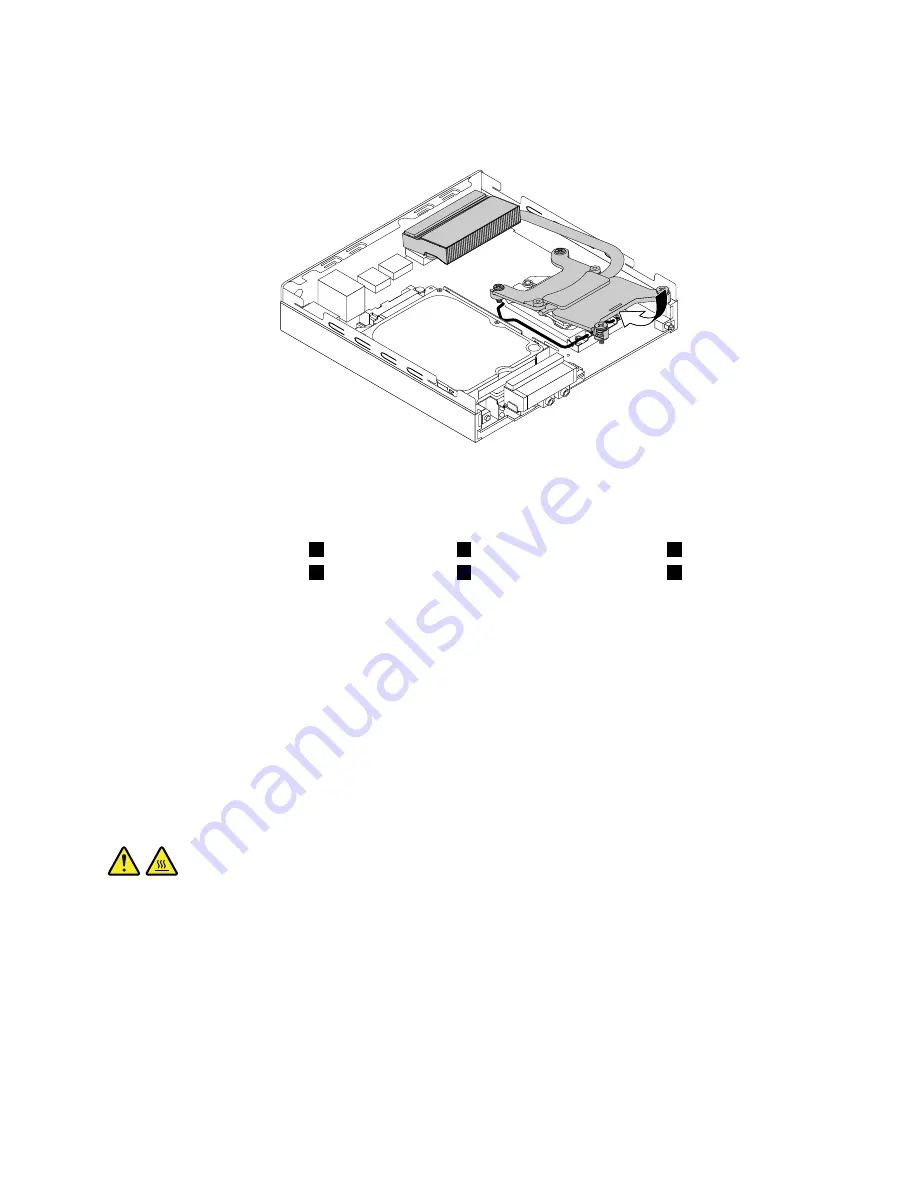
7. Position the new heat sink on the system board as shown so that the four screws align with the
corresponding screw holes in the system board.
Figure 49. Installing the heat sink
8. Tighten the four screws to secure the new heat sink and fan assembly in the following sequence. Do
not over-tighten the screws.
a. Partially tighten screw
1
, fully tighten screw
2
, and then fully tighten screw
1
.
b. Partially tighten screw
3
, fully tighten screw
4
, and then fully tighten screw
3
.
9. Install the internal speaker holder. See “Replacing the internal speaker holder” on page 114.
10. Install the internal speaker. See “Replacing the internal speaker” on page 112.
11. Install the system fan. See “Replacing the system fan” on page 110.
What to do next:
• To work with another piece of hardware, go to the appropriate section.
• To complete the installation or replacement, go to “Completing the parts replacement” on page 133.
Replacing the microprocessor
Attention:
Do not open your computer or attempt any repair before reading and understanding the Chapter
1 “Read this first: Important safety information” on page 1.
CAUTION:
The heat sink and microprocessor might be very hot. Before you open the computer cover, turn off
the computer and wait several minutes until the computer is cool.
To replace the microprocessor, do the following:
1. Remove any media from the drives and turn off all connected devices and the computer. Then,
disconnect all power cords from electrical outlets and disconnect all cables that are connected to the
computer.
2. Remove the computer cover. See “Removing the computer cover” on page 108.
3. Disconnect all cables connected to the system board.
4. Remove the system fan. See “Replacing the system fan” on page 110.
.
Installing or replacing hardware
117
Содержание ThinkCentre M700
Страница 6: ...iv ThinkCentre M700 and M900 Hardware Maintenance Manual ...
Страница 8: ...vi ThinkCentre M700 and M900 Hardware Maintenance Manual ...
Страница 16: ...8 ThinkCentre M700 and M900 Hardware Maintenance Manual ...
Страница 20: ...12 ThinkCentre M700 and M900 Hardware Maintenance Manual ...
Страница 21: ...1 2 Chapter 1 Read this first Important safety information 13 ...
Страница 22: ...1 2 14 ThinkCentre M700 and M900 Hardware Maintenance Manual ...
Страница 27: ...1 2 Chapter 1 Read this first Important safety information 19 ...
Страница 28: ...1 2 20 ThinkCentre M700 and M900 Hardware Maintenance Manual ...
Страница 31: ...Chapter 1 Read this first Important safety information 23 ...
Страница 56: ...48 ThinkCentre M700 and M900 Hardware Maintenance Manual ...
Страница 64: ...56 ThinkCentre M700 and M900 Hardware Maintenance Manual ...
Страница 66: ...Figure 8 Installing a padlock 58 ThinkCentre M700 and M900 Hardware Maintenance Manual ...
Страница 70: ...62 ThinkCentre M700 and M900 Hardware Maintenance Manual ...
Страница 142: ...134 ThinkCentre M700 and M900 Hardware Maintenance Manual ...
Страница 148: ...140 ThinkCentre M700 and M900 Hardware Maintenance Manual ...
Страница 152: ...144 ThinkCentre M700 and M900 Hardware Maintenance Manual ...
Страница 156: ...148 ThinkCentre M700 and M900 Hardware Maintenance Manual ...
Страница 159: ...Appendix D China Energy Label Copyright Lenovo 2015 2016 151 ...
Страница 160: ...152 ThinkCentre M700 and M900 Hardware Maintenance Manual ...
Страница 162: ...154 ThinkCentre M700 and M900 Hardware Maintenance Manual ...
Страница 165: ......
Страница 166: ......