To erase a lost or forgotten password, do the following:
1. Remove all media from the drives and turn off all attached devices and the computer. Then, disconnect
all power cords from electrical outlets and disconnect all cables that are connected to the computer.
2. Remove the computer cover.
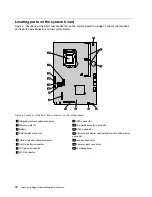
3. Locate the Clear CMOS /Recovery jumper on the system board.
4. Move the jumper from the standard position (pin 1 and pin 2) to the maintenance position (pin 2 and
pin 3).
5. Reinstall the computer cover and connect the power cord.
6. Repeat step 1 through step 2.
7. Move the Clear CMOS /Recovery jumper back to the standard position (pin 1 and pin 2).
8. Reinstall the computer cover and connect the power cord.
Enabling or disabling a device
This section provides information on how to enable or disable user access to the following devices:
USB Setup
Use this option to enable or disable a USB connector. When a USB connector is
disabled, the device connected to the USB connector cannot be used.
SATA Controller
When this feature is set to
Disable
, all devices connected to the SATA connectors
(such as hard disk drives or the optical drive) are disabled and cannot be accessed.
To enable or disable a device, do the following:
1. Start the Setup Utility program. See “Starting the Setup Utility program” on page 55.
2. From the Setup Utility program main menu, select
Devices
.
3. Depending on the device you want to enable or disable, do one of the following:
• Select
USB Setup
to enable or disable a USB device.
• Select
ATA Drive Setup
to enable or disable a SATA device.
4. Select the desired settings and press Enter.
5. Press F10 to save changes and exit the Setup Utility program. See “Exiting the Setup Utility program”
on page 58.
Selecting a startup device
If your computer does not start up from a device such as the disc or hard disk drive as expected, do one of
the following to select the startup device you want.
Selecting a temporary startup device
Use this procedure to select a temporary startup device.
Note:
Not all discs and hard disk drives are bootable.
1. Turn off your computer.
2. Repeatedly press and release the F12 key when turning on the computer. When the Please select
boot device window displays, release the F12 key.
3. Select the desired startup device and press Enter. The computer will start up from the device you
selected.
Note:
Selecting a startup device from the Please select boot device window does not permanently change
the startup sequence.
Chapter 6
.
Using the Setup Utility program
57
Содержание 3569
Страница 1: ...ThinkCentre Edge Hardware Maintenance Manual Machine Types 3569 3571 and 3574 ...
Страница 2: ......
Страница 3: ...ThinkCentre Edge Hardware Maintenance Manual Machine Types 3569 3571 and 3574 ...
Страница 8: ...2 ThinkCentre Edge Hardware Maintenance Manual ...
Страница 15: ...Chapter 2 Safety information 9 ...
Страница 19: ...Chapter 2 Safety information 13 ...
Страница 20: ...1 2 14 ThinkCentre Edge Hardware Maintenance Manual ...
Страница 21: ...1 2 Chapter 2 Safety information 15 ...
Страница 26: ...1 2 20 ThinkCentre Edge Hardware Maintenance Manual ...
Страница 27: ...1 2 Chapter 2 Safety information 21 ...
Страница 30: ...24 ThinkCentre Edge Hardware Maintenance Manual ...
Страница 34: ...28 ThinkCentre Edge Hardware Maintenance Manual ...
Страница 60: ...54 ThinkCentre Edge Hardware Maintenance Manual ...
Страница 70: ...64 ThinkCentre Edge Hardware Maintenance Manual ...
Страница 75: ...Figure 3 Locating major FRUs and CRUs Chapter 8 Locations 69 ...
Страница 85: ...Figure 13 Reinstall the rubber on the foot stand Chapter 9 Replacing FRUs 79 ...
Страница 127: ......
Страница 128: ...Part Number Printed in USA 1P P N 1P ...


