


Fn key combinations
The following table shows the function of each combination of Fn with a function
key.
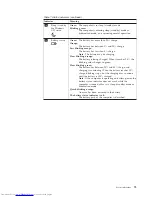
Table 8. Fn key combinations
Key combination Description
Fn+F1
Reserved.
Fn+F2
Lock the computer.
Fn+F3
Select a power plan (in Windows XP, power scheme) that has been
created by Power Manager, or adjust the power level by using the
slider control. When you press this combination, a panel for selecting a
power plan (power scheme) appears.
Notes:
1.
To use the Fn+F3 key combination, you must have the ThinkPad
PM device driver installed on the computer.
2.
If you have logged on with an administrator user ID, and you press
Fn+F3, the panel for selecting a power plan (power scheme)
appears. If you have logged on with another user ID, and you press
Fn+F3, the panel does not appear.
3.
You cannot turn off the computer display by pressing Fn+F3.
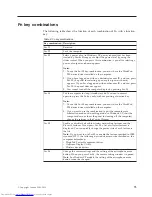
Fn+F4
Put the computer in sleep (standby) mode. To return to normal
operation, press the Fn key only, without pressing a function key.
Notes:
1.
To use the Fn+F4 key combination, you must have the ThinkPad
PM device driver installed on the computer.
2.
If you want to use the combination to put the computer into
hibernation mode or do-nothing mode (in Windows XP, shut the
computer down or show the panel for turning off the computer),
change the settings in the Power Manager.
Fn+F5
Enable or disable the built-in wireless networking features and the
Bluetooth
features. If you press Fn+F5, a list of wireless features is
displayed. You can quickly change the power state of each feature in
the list.
Note:
If you want to use Fn+F5 to enable the feature specified in IEEE
standard 802.11, the following device drivers must be installed on the
computer beforehand:
v
ThinkPad Power Management driver
v
OnScreen Display Utility
v
Wireless device drivers
Fn+F6
Change the camera settings and the setting of the microphone mute
button. When you press Fn+F6, the camera setting window is opened.
Note:
For Window XP models, the setting of the microphone mute
button cannot be changed.
© Copyright Lenovo 2009, 2010
75
Содержание 2901A3U
Страница 1: ...ThinkPad T400s T410s and T410si Hardware Maintenance Manual ...
Страница 2: ......
Страница 3: ...ThinkPad T400s T410s and T410si Hardware Maintenance Manual ...
Страница 8: ...vi ThinkPad T400s T410s and T410si Hardware Maintenance Manual ...
Страница 18: ...10 ThinkPad T400s T410s and T410si Hardware Maintenance Manual ...
Страница 19: ...Safety information 11 ...
Страница 26: ...18 ThinkPad T400s T410s and T410si Hardware Maintenance Manual ...
Страница 27: ...Safety information 19 ...
Страница 28: ...20 ThinkPad T400s T410s and T410si Hardware Maintenance Manual ...
Страница 29: ...Safety information 21 ...
Страница 30: ...22 ThinkPad T400s T410s and T410si Hardware Maintenance Manual ...
Страница 31: ...Safety information 23 ...
Страница 34: ...26 ThinkPad T400s T410s and T410si Hardware Maintenance Manual ...
Страница 35: ...Safety information 27 ...
Страница 37: ...Safety information 29 ...
Страница 41: ...Safety information 33 ...
Страница 42: ...34 ThinkPad T400s T410s and T410si Hardware Maintenance Manual ...
Страница 43: ...Safety information 35 ...
Страница 45: ...Safety information 37 ...
Страница 46: ...38 ThinkPad T400s T410s and T410si Hardware Maintenance Manual ...
Страница 62: ...54 ThinkPad T400s T410s and T410si Hardware Maintenance Manual ...
Страница 78: ...70 ThinkPad T400s T410s and T410si Hardware Maintenance Manual ...
Страница 82: ...74 ThinkPad T400s T410s and T410si Hardware Maintenance Manual ...
Страница 86: ...78 ThinkPad T400s T410s and T410si Hardware Maintenance Manual ...
Страница 90: ...82 ThinkPad T400s T410s and T410si Hardware Maintenance Manual ...
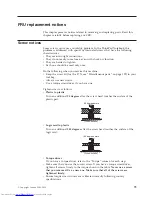
Страница 113: ...Table 18 Removal steps of wireless USB adapter or Intel Turbo Memory continued 3 Removing and replacing a FRU 105 ...
Страница 127: ...Table 24 Removal steps of LCD unit continued 7 7 Removing and replacing a FRU 119 ...
Страница 139: ...Table 27 Removal steps of LCD bezel assembly continued 2 2 2 2 2 2 2 3 Removing and replacing a FRU 131 ...
Страница 158: ...150 ThinkPad T400s T410s and T410si Hardware Maintenance Manual ...
Страница 226: ...218 ThinkPad T400s T410s and T410si Hardware Maintenance Manual ...
Страница 229: ......
Страница 230: ...Part Number 45M2271_03 1P P N 45M2271_03 ...


