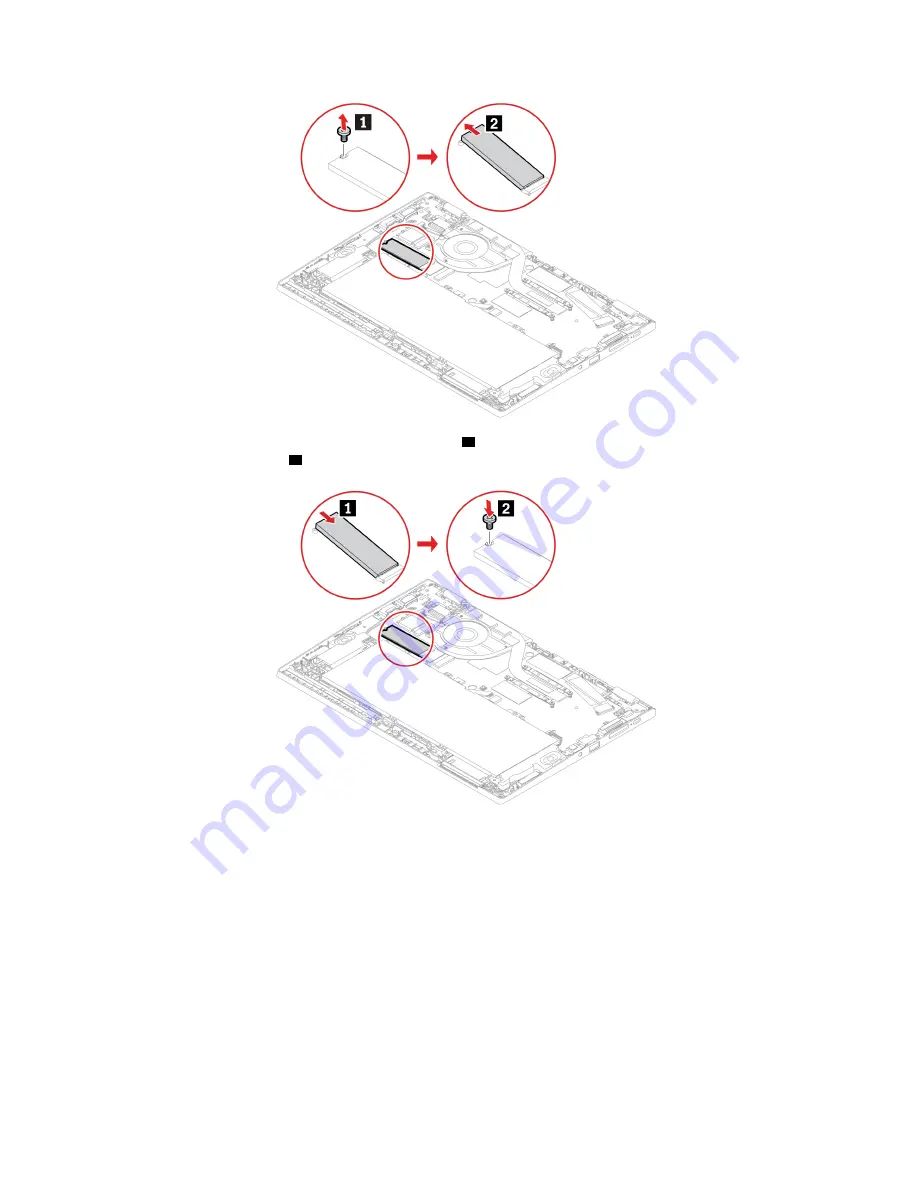
6. Insert the new M.2 solid-state drive to the drive slot
1
. Then, pivot the drive downward and install the
screw to secure the drive
2
.
7. Reinstall the base cover assembly.
8. Turn over the computer. Connect the ac power adapter and all disconnected cables to the computer.
Keyboard
Prerequisite
Before you start, read Appendix A “Important safety information” on page 57 and print the following
instructions.
Replacement procedure
Note:
You might be instructed to slide the keyboard frame forward or backward in some of the following
steps. In this case, ensure that you do not press or hold the keys while sliding the keyboard frame.
Otherwise, the keyboard frame cannot be moved.
46
L13 Gen 2, L13 Yoga Gen 2, S2 Gen 6, and S2 Yoga Gen 6 User Guide
Содержание 21AD001KUS
Страница 1: ...L13 Gen 2 L13 Yoga Gen 2 S2 Gen 6 and S2 Yoga Gen 6 User Guide ...
Страница 6: ...iv L13 Gen 2 L13 Yoga Gen 2 S2 Gen 6 and S2 Yoga Gen 6 User Guide ...
Страница 14: ...8 L13 Gen 2 L13 Yoga Gen 2 S2 Gen 6 and S2 Yoga Gen 6 User Guide ...
Страница 36: ...30 L13 Gen 2 L13 Yoga Gen 2 S2 Gen 6 and S2 Yoga Gen 6 User Guide ...
Страница 42: ...36 L13 Gen 2 L13 Yoga Gen 2 S2 Gen 6 and S2 Yoga Gen 6 User Guide ...
Страница 46: ...40 L13 Gen 2 L13 Yoga Gen 2 S2 Gen 6 and S2 Yoga Gen 6 User Guide ...
Страница 76: ...70 L13 Gen 2 L13 Yoga Gen 2 S2 Gen 6 and S2 Yoga Gen 6 User Guide ...
Страница 80: ...74 L13 Gen 2 L13 Yoga Gen 2 S2 Gen 6 and S2 Yoga Gen 6 User Guide ...
Страница 89: ...Appendix D Compliance and TCO Certified information 83 ...
Страница 96: ...90 L13 Gen 2 L13 Yoga Gen 2 S2 Gen 6 and S2 Yoga Gen 6 User Guide ...
Страница 99: ......
Страница 100: ......


