


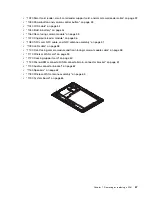


Removal steps of the built-in battery
1
3
2
5
4
Notes:
• Do not close the connector flips before inserting the cable.
• When installing, ensure that the cables are not twisted or subject to any tension, and ensure that the
connectors are attached firmly.
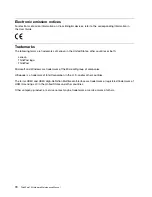
6
6
6
Step
Screw (quantity)
Color
Torque
6
M1.6 × 2.0 mm, flat-head, nylon-coated (3)
Black
0.098 Nm
(1.00 kgf-cm)
1060 Rear-facing camera module
Before you start, do the following:
1. Follow the instructions in “Before servicing the tablet” on page 46.
2. For access, remove the back cover assembly. See “1010 Back cover assembly” on page 48.
3. Remove the connector of the built-in battery from the system board. See step 1 in “1050 Built-in
battery” on page 54.
Chapter 7
.
Removing or replacing a FRU
55
Содержание 20E3
Страница 1: ...ThinkPad 10 Hardware Maintenance Manual Machine Types 20E3 and 20E4 ...
Страница 9: ...DANGER DANGER DANGER DANGER DANGER Chapter 1 Safety information 5 ...
Страница 10: ...DANGER 6 ThinkPad 10 Hardware Maintenance Manual ...
Страница 38: ...2 3 4 5 6 2 7 8 Chapter 7 Removing or replacing a FRU 49 ...