background image

Page 20

EVACUATE LINE SET AND INDOOR COIL

The unit is shipped with a factory refrigerant charge. The
liquid and suction line valves were closed after final testing
at the factory. Do not operate these valves until the line set
and indoor coil have been evacuated and leak checked, or
the charge is lost.

NOTE -

 Do not use any portion of the factory charge for

purging or leak testing. The factory charge is for filling the
system only after a complete evacuation and leak check
has been performed.

Line set and indoor coil should be evacuated using the re­
commend deep vacuum method of 500 microns. If deep
vacuum equipment is not available, the alternate triple
evacuation method may be used by following the specified
procedure.

If vacuum must be interrupted during the evacuation pro­
cedure, always break vacuum with dry nitrogen.

Deep Vacuum Method

The deep vacuum method requires a vacuum pump cap­
able of pulling a vacuum to 500 microns and a vacuum
gauge capable of accurately measuring this vacuum level.
The deep vacuum method is the most positive way of as­
suring a system is free of air and water.

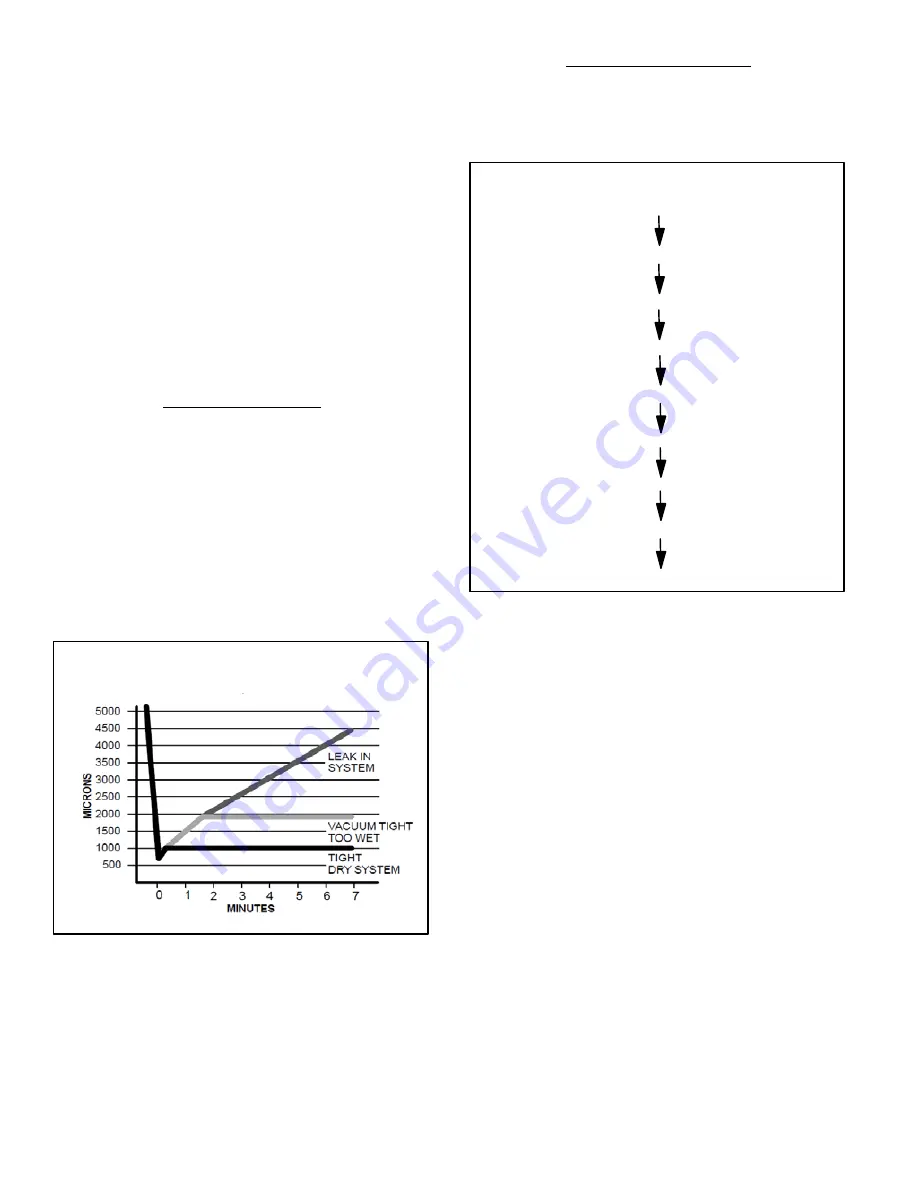
Watch the vacuum gauge as the system is pulling down.
The response of the gauge is an indicator of the condition
of the system (refer to figure 19).

With no leaks in the system, allow the vacuum pump to run
for 30 minutes minimum at the deep vacuum level.

Deep Vacuum Gauge Response and 

System Conditions

FIGURE 19

Triple Evacuation Method

The triple evacuation method should only be used when
system does not contain any water in liquid form and vacu­
um pump is only capable of pulling down to 28 inches of
mercury (711mm Hg). Refer to figure 20 and proceed as
follows:

EVACUATE

BREAK VACUUM WITH DRY NITROGEN

WAIT

BREAK VACUUM WITH DRY NITROGEN

WAIT

EVACUATE

CHECK FOR TIGHT, DRY SYSTEM (IF IT HOLDS DEEP VACUUM)

CHARGE SYSTEM

Triple Evacuation Sequence

EVACUATE

FIGURE 20

1. Pull system down to 28 inches of mercury (711mm Hg)

and allow pump to continue operating for an additional
15 minutes.

2. Close manifold valves or valve at vacuum pump and

shut-off vacuum pump.

3. Connect a nitrogen cylinder and regulator to system

and fill with nitrogen until system pressure is 2 psig.

4. Close nitrogen valve and allow system to stand for one

hour. During this time, dry nitrogen will diffuse
throughout the system absorbing moisture.

5. Repeat this procedure as indicated in figure 20.
6. After the final evacuate sequence, confirm there are

no leaks in the system. If a leak is found, repeat the en­
tire process after repair is made.

7. Reconnect the manifold gauge to the vacuum pump,

turn the pump on, and continue to evacuate the line set
and indoor unit until the absolute pressure does not
rise above 500 microns (29.9 inches of mercury) within
a 20

*

minute period after shutting off the vacuum

pump and closing the manifold gauge valves.

Содержание XP21 Series

Страница 1: ...nd service must be performed by a licensed professional installer or equivalent or service agency CAUTION Before attempting to perform any service or mainte nance turn the electrical power to unit OFF...

Страница 2: ...18 1 2 470 8 203 1 25 4 7 16 113 LIQUID LINE INLET VAPOR LINE INLET ELECTRICAL INLETS BASE WITH ELONGATED LEGS SIDE VIEW ACCESS VIEW DISCHARGE AIR 37 940 024 THRU 036 47 1194 048 AND 060 16 7 8 429 8...

Страница 3: ...nts from dryers water heaters and furnaces should be directed away from the outdoor unit Prolonged exposure to exhaust gases and the chemicals contained within them may cause condensation to form on t...

Страница 4: ...ze barrier at least the same height and width as out door unit Install barrier 24 inches 610 mm from the sides of the unit in the direction of prevailing winds 24 610 WIND BARRIER PREVAILING WINTER WI...

Страница 5: ...efore unit start up to pre vent compressor damage as a result of slugging CAUTION ELECTROSTATIC DISCHARGE ESD Precautions and Procedures Electrostatic discharge can affect electronic components Take c...

Страница 6: ...wires between the thermostat and the furnace air handler con trol and four wires between the outdoor unit and the furnace air handler control When a thermostat cable with more than four wires is used...

Страница 7: ...E TARGET 40 DEGREE TARGET DEFAULT 55 50 45 40 55 50 45 40 55 50 45 40 55 50 45 40 DEGREE TARGET 100 90 DEGREE TARGET 70 DEGREE TARGET 50 DEGREE TARGET 90F 70F 50F TARGET 90F 70F 50F 90F 70F 50F 100F 9...

Страница 8: ...d up on the fan blade and orifice ring is when the outdoor ambient is below 35 F and the unit is OFF for more than 30 minutes PREVIOUS TERMINATION TEMPERATURE TERMINATION TEMPERATURE FOR NEXT DEFROST...

Страница 9: ...t s o r f e d l l i w n o i t a n i m r e t g n i t t e s 1 J e h t w o l l o f m u m i x a M E T O N r o f d e w o l l a e m i t s e t u n i m 4 1 s i t s o r f e d See table on Page 10 Next defrost...

Страница 10: ...eached the specified defrost termination temperature in less than 14 minutes Termination temperature set on outdoor control is 50 F 70 F 90 F or 100 F Defrost for 14 minute maximum without the coil te...

Страница 11: ...isplay optional 2 R to L connection is required for this model when using the ComfortSense 7000 catalog number Y0349 only Resistor Kit catalog number 47W97 required and ordered separately 3 Air handle...

Страница 12: ...tage operation 5 Cut loop jumper clippable wire Short DS to R for Humiditrol applications This will slow the outdoor unit s fan speed to a specific RPM A wire must be installed between the DS terminal...

Страница 13: ...nox units charged with HFC 410A refrigerant Residual mineral oil can act as an insulator preventing proper heat transfer It can also clog the expansion device and reduce sys tem performance and capaci...

Страница 14: ...oor unit s liquid line orifice housing LOW HIGH EXISTING INDOOR UNIT GAUGE MANIFOLD CYLINDER CONTAINING CLEAN HCFC 22 TO BE USED FOR FLUSHING Positioned to deliver liquid refrigerant LIQUID LINE SERVI...

Страница 15: ...itrogen flow will have an exit point NITROGEN HIGH LOW B A C PIPING PANEL REMOVAL PREPARING LINE SET CAP AND CORE REMOVAL Remove piping panel to access service valves Cut ends of the refrigerant lines...

Страница 16: ...ater saturated cloths under the valve body to protect the base paint 4FLOW NITROGEN Flow regulated nitrogen at 1 to 2 psig through the refrigeration gauge set into the valve stem port connection on th...

Страница 17: ...KIT MATCH UPS AND APPLICATION INFORMATION A REMOVE THE FIELD PROVIDED FITTING THAT TEMPORARILY RECON NECTED THE LIQUID LINE TO THE INDOOR UNIT S DISTRIBUTOR AS SEMBLY B INSTALL ONE OF THE PROVIDED TEF...

Страница 18: ...der of HFC 410A refrigerant to the center port of the manifold gauge set Open the valve on the HFC 410A cylinder vapor only B Open the high pressure side of the manifold to allow HFC 410A into the lin...

Страница 19: ...ge caused by deep vacuum operation will void warranty OUTDOOR UNIT TO VAPOR SERVICE VALVE TO LIQUID LINE SERVICE VALVE MICRON GAUGE VACUUM PUMP A34000 1 4 SAE TEE WITH SWIVEL COUPLER 500 MANIFOLD GAUG...

Страница 20: ...30 minutes minimum at the deep vacuum level Deep Vacuum Gauge Response and System Conditions FIGURE 19 Triple Evacuation Method The triple evacuation method should only be used when system does not c...

Страница 21: ...ting to the outside coil tub ing The location of the coil sensor is important for proper defrost operation NOTE The heat pump control accurately measures the performance of the system as frost accumul...

Страница 22: ...els must be in place any time the unit is in operation If you are unsure about the filter required for your system call your Lennox dealer for assistance IMPORTANT Sprinklers and soaker hoses should n...

Страница 23: ...unit 3 Check the cleanliness of indoor blower and clean blower if necessary 4 Inspect the indoor coil drain pans and condensate drains for rust debris obstructions leaks or cracks Pour water in pans...

Страница 24: ...ies with Y2 out terminal on the outdoor control 5 Cycle main power ON 6 Allow pressures and temperatures to stabilize before taking any reading may take up to 10 minutes 7 Record all of the readings f...

Страница 25: ...st Stage Expected results during Y2 demand toggle switch ON Y2 Second Stage Compressor Voltage Same Same Amperage Higher Higher Condenser Fan motor Amperage Same or Higher Same or Higher Temperature A...

Страница 26: ...ure Return Air Temperature HEATING MODE Vapor Pressure Liquid Pressure Supply Air Temperature Ambient Temperature Return Air Temperature System Refrigerant Charge Refer to manufacturer s information o...

Отзывы: