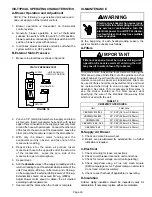
Page 29
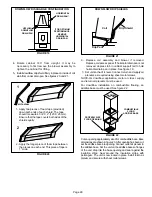
FIGURE 19
HORIZONTAL
DRAIN PAN*
UPFLOW/
DOWNFLOW
DRAIN PAN
DOWNFLOW DISCHARGE CONFIGURATION
*FOR OPTIMUM
PERFORMANCE,
REMOVE
HORIZONTAL
DRAIN PAN.
4− Rotate cabinet 180
_
from upright. It may be
necessary to first remove the blower assembly to
lighten the cabinet for lifting.
5− Install downflow drip shield firmly in place on inside of coil
slab from under drain pan. See figures 20 and 21.
1
2
side view
1− Apply two pieces of foam tape (provided)
down both ends of each shield. The tape
should measure 4 3/4" X 2" (120 X 25 mm).
Ensure that the tape covers both sides of the
shield equally.
2− Apply the longer piece of foam tape between
the pieces on each end. This piece of tape is
1" wide.
FIGURE 20
DOWNFLOW DRIP SHIELDS
Coil
Drip Shield
Drip Pan
FIGURE 21
6− Replace coil assembly and blower if removed.
Replace coil access panel. If horizontal drain pan is not
removed, depress tab in cabinet support rail to hold
horizontal drain pan in place. See figure 19.
7− Set unit so that it is level. Connect return and supply air
plenums as required using sheet metal screws.
NOTE−For downflow application, metal or class I supply
and return air plenums must be used.
For downflow installation on combustible flooring, an
additive base must be used. See figure 22.
FIGURE 22
COMBUSTIBLE
FLOOR
ADDITIVE BASE
PROPERLY SIZE
FLOOR OPENING
BLOWER
COIL UNIT
Cut an opening appropriately sized for combustible base. Base
dimensions are shown in figure 23. After opening has been cut,
set the additive base into opening. Connect outlet air plenum to
the additive base. Set the unit on the additive base so flanges
of the unit drop into the base opening and seal against the
insulation strips. Seal around the insulation strips with
permagum. The unit is now locked in place. Install return air
plenum and secure with sheet metal screws.


