background image

E2

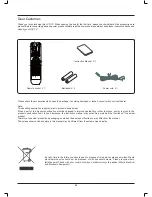
Dear Customer:

Thank you for purchasing this LCD TV. When opening the box for the first time, please check whether all the accessories are 
present. Before connecting parts and power, please carefully read the user manual and always keep these instructions handy and 
close by your LCD TV.

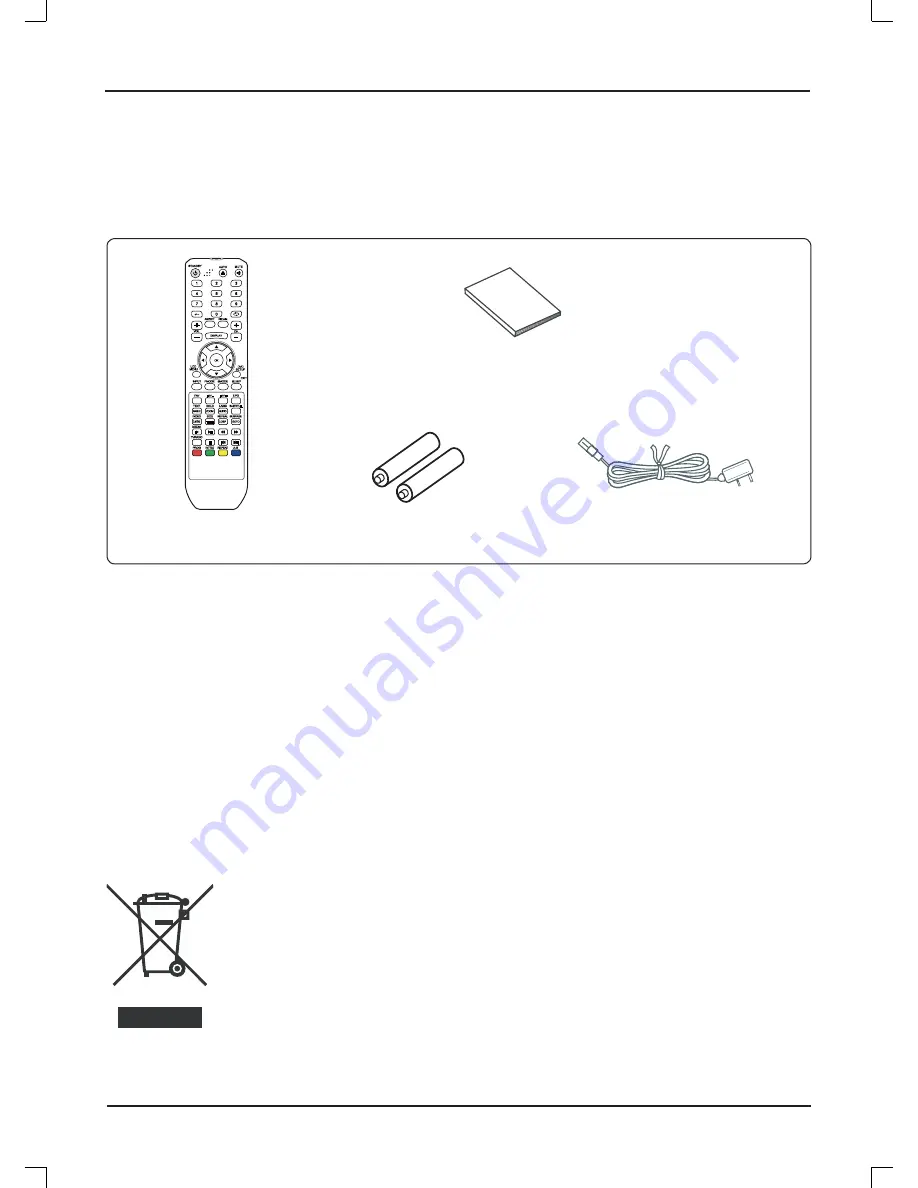
Remote control


 X 1

Batteries  X  2

Instruction Manual  X  1

Please check the accessories when open the package. If anything damaged or lacked, consult with your local dealer .

Note: 
This handling description is printed prior to product development.
When a part of the product speci

fi

 cation must be changed to improve operability or other functions, priority is given to the 

product speci

fi

 cation itself. In such instances, the instruction manual may not entirely match all the functions of the actual 

product.
Therefore, the actual product and packaging, as well as the name and illustration, may differ from the manual.
The screen shown as an example in this manual may be different from the actual screen display.

Power cord  X  1

If at any time in the future you should need to dispose of this product, please note that: Waste 
electrical products should not be disposed of with household waste. Please recycle where 
facilities exist. Check with your Local Authority or retailer for recycling advice (Waste Electrical 
and Electronic Equipment).

VOL

VOL

DISPLAY

DISPLAY

CH.

CH.

OK

OK

EXIT

EXIT

INPUT

INPUT

PMODE

PMODE

SMODE

SMODE

SLEEP

SLEEP

MUTE

MUTE

STANDBY

NICAM

NICAM

ASPECT

ASPECT

AUTO

AUTO

MENU

MENU

DVD

DVD

SETUP

SETUP

FAV

FAV

EPG

EPG

TEXT

TEXT

HOLD

HOLD

LANG

LANG

SUBTITLE

SUBTITLE

ANGLE

ANGLE

ZOOM

ZOOM

AUDIO

AUDIO

INDEX

INDEX

SIZE

SIZE

REVEAL

REVEAL

SUBPAGE

SUBPAGE

D.MENU

D.MENU

TITLE

TITLE

D.DISP

D.DISP

GOTO

GOTO

MEDIA

MEDIA

PROG

INTRO

INTRO

REPEAT

REPEAT

A-B

A-B

TV/RADIO

TV/RADIO

F

F

A

A

V

V

+

+

F

F

A

A

V

V

-

-

-/--

LCD

LCD

Содержание DVT-1933

Страница 1: ...DVT 1933 USER MANUAL For more information and support please visit www lenco eu...

Страница 2: ...of contents PRECAUTONS E3 CONTROLS E4 USING THE TV FOR THE FIRST TIME E7 BASIC OPERATIONS E8 OSD MENU SETTING E9 BULID IN DVD PLAYER OPERATIONS E16 MAINTENANCE E19 TROUBLE SHOOTING E19 SPECIFICATIONS...

Страница 3: ...e the actual product and packaging as well as the name and illustration may differ from the manual The screen shown as an example in this manual may be different from the actual screen display Power c...

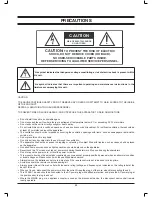
Страница 4: ...oths curtains etc Do not place this unit in any liquid Do not insert any tiny object into the unit through the ventilation The apparatus shall not be exposed to dropping or splashing No object filled...

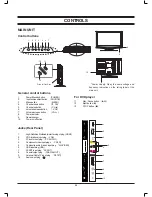
Страница 5: ...A interface input plug VGA PC audio input plug PC AUDIO Component video input plugs Y Pb Pr Composite audio video input plug R L VIDEO USB input plug USB SCART input plug SCART Coaxial output plug COA...

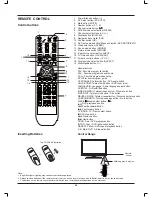
Страница 6: ...source select button INPUT 16 LCD menu button LCD MENU 17 Volume control buttons VOL 18 Display mode select button ASPECT 19 Multi digitals button Special buttons FAV Favorite program list button FAV...

Страница 7: ...HOLD LANG LANG SUBTITLE SUBTITLE ANGLE ANGLE ZOOM ZOOM AUDIO AUDIO INDEX INDEX SIZE SIZE REVEAL REVEAL SUBPAGE SUBPAGE D MENU D MENU TITLE TITLE D DISP D DISP GOTO GOTO MEDIA MEDIA PROG INTRO INTRO RE...

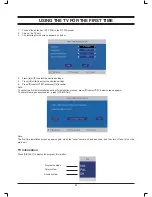
Страница 8: ...S and press OK to confirm Note To cancel the first time installation during it s installation process press p to select NO below screen appears To cancel clearing channel search press LCD MENU 4 5 6 T...

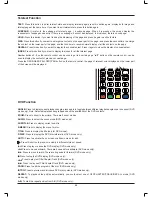
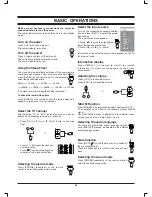
Страница 9: ...ss DISPLAY on the remote control the related information of current source appears on the screen automatically NICAM Function Press NICAM on the remote control when input source is TV This operation d...

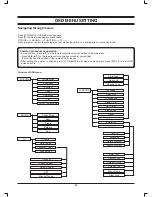
Страница 10: ...ss b a o p on the remote control to change or confirm your settings Follow the tips at the bottom of the related OSD screens After setting of an option is finished press LCD MENU to exit stage by stag...

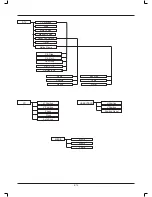
Страница 11: ...g Del TV Ch Del Radio Ch Ch Orgn Ch Sort Ch Group Advanced Setting Timer Native Game Audio Subtitle Rating Box Man Tetris Hitrat PC H Position V Position Phase Clock Auto Sync HDMI YPBPR H Position V...

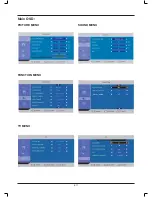
Страница 12: ...E11 PERSONAL PICTURE MENU ENGLISH FULL WEST EURO OFF 60 SECONDS ON FUNCTION MENU TV MENU SOUND MENU Main OSD AVC OFF PERSONAL HOTEL MODE DK PAL OFF 49 7MHz GERMANY...

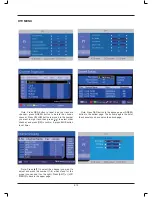
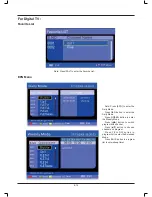
Страница 13: ...ss o p to select other channel and press OK to confirm it press BLUE button to set timer Note Press RED button to the above page or GREEN button to the bottom page The bottom page is the list of the c...

Страница 14: ...e Picture menu is the same as that of TV mode except the COLOUR SHARPNESS and TINT are invalid in gray and COLOUR TEMPERATURE is valid Available options WARM COLD and NORMAL Note Press b a to select V...

Страница 15: ...ter the Daily Mode Press RED button to enter the Daily Mode Press GREEN button to enter the Weekly Mode Press b a button to switch program with channel Press o p button to choose channel and program P...

Страница 16: ...efault source Set an input source channel as default while turning on the TV unit Default Prog Set a TV programme number as default while alternate into DTV or TV Max Volume To set the maxinium volume...

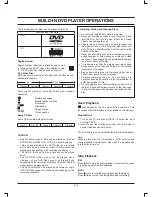
Страница 17: ...the unit Fingerprints and dust should be carefully wiped from the signal surface of the disc glossy side with a soft cloth Wipe in a straight motion from the center to the outside of the disc Never u...

Страница 18: ...isc will be heard Selecting On Screen Information P r e s s D I S P L A Y r e p e a t e d l y t o s h o w t h e d i s c information Title Chapter Title elapsed playing time Language etc Point A Point...

Страница 19: ...e DVD player OSD menu Press a or b to move and highlight between different sub menu Press o or p to enter the highlighted sub menu Press DVD SETUP to exit the OSD menu General setup menu IMPORTANT NOT...

Страница 20: ...e power cord into an AC outlet The wrong input source is selected Select a correct input source The input source is failed to connect with the TV Make correct connections No sound only Volume control...

Страница 21: ...z 230MHz UHF 474MHz 862MHz Power Requirements Power Input 100 240V 50 60 Hz Power Consumption Maximum 50W DVD Features Laser Wave Length 650 nm 795 nm DVD Region Number 2 Connections Input TV Tuner RF...

Страница 22: ...BENUTZER HANDBUCH F r weitere Informationen und Support besuchen die Sie Webseite www lenco eu DVT 1933...

Страница 23: ...alt VORSICHTSMASSNAHMEN G3 BEDIENELEMENTE G4 INBETRIEBNAHME G7 GRUNDLEGENDE BEDIENUNG G8 OSD MEN EINSTELLUNGEN G9 EINGEBAUTE DVD PLAYER FUNKTIONEN G16 WARTUNG G19 FEHLERBEHEBUNG G19 TECHNISCHE DATEN G...

Страница 24: ...Verpackung sowie Beschreibungen und Abbildungen k nnen dann von denen in der Bedienungsanlei tung abweichen Das folgende Beispiel zeigt in welcher Weise die Bedienungsanleitung von der Bildschirmange...

Страница 25: ...nde die mit Fl ssigkeiten gef llt sind wie z B Vasen sollten niemals auf das Ger t gestellt werden Gegenst nde mit offenen Flammen wie z B Kerzen sollten niemals auf das Ger t gestellt werden Ber hre...

Страница 26: ...F r den DVD Player High Definition Multimedia Interface Eingang HDMI VGA Eingang VGA PC Audioeingang PC AUDIO Component Video Eingang Y Pb Pr Composite AV Eingang R L VIDEO USB Port USB SCART Eingang...

Страница 27: ...ANGLE ZOOM ZOOM AUDIO AUDIO INDEX INDEX SIZE SIZE REVEAL REVEAL SUBPAGE SUBPAGE D MENU D MENU TITLE TITLE D DISP D DISP GOTO GOTO MEDIA MEDIA PROG INTRO INTRO REPEAT REPEAT A B A B TV RADIO TV RADIO F...

Страница 28: ...GE D MENU D MENU TITLE TITLE D DISP D DISP GOTO GOTO MEDIA MEDIA PROG INTRO INTRO REPEAT REPEAT A B A B TV RADIO TV RADIO DVD Funktion ANGLE Bet tigen Sie diese Taste zur Anzeige des aktuellen Kameraw...

Страница 29: ...e p zur Auswahl von YES und bet tigen Sie OK zur Best tigung Hinweis Um den Installationsvorgang abzubrechen bet tigen Sie p zur Auswahl von NO und der folgende Dialog erscheint Bet tigen Sie die LCD...

Страница 30: ...er t Informationsanzeige Bet tigen Sie die Taste DISPLAY auf der Fernbedienung um detaillierte Informationen zum aktuellen Einsgangssignal auf dem Bildschirm anzuzeigen NICAM Funktion Bet tigen Sie NI...

Страница 31: ...Ih rer Einstellungen achten Sie auf die Hinweise im unteren Teil der Bildschirmanzeige Nachdem Sie mit der Einstellung einer Option fertig sind bet tigen Sie die Taste LCD MENU um das Men Schritt f r...

Страница 32: ...g Del TV Ch Del Radio Ch Ch Orgn Ch Sort Ch Group Advanced Setting Timer Native Game Audio Subtitle Rating Box Man Tetris Hitrat PC H Position V Position Phase Clock Auto Sync HDMI YPBPR H Position V...

Страница 33: ...G11 Bildschirmmen PERSONAL BILDMEN ENGLISH FULL WEST EURO OFF 60 SECONDS ON Funktionsmen FERNSEHMEN AUDIOMEN AVC OFF PERSONAL HOTEL MODE DK PAL OFF 49 7MHz GERMANY...

Страница 34: ...Bet tigen Sie dann OK zur Best tigung und bet tigen Sie die blaue Farbtaste zum Einstellen des Timers Hinweis Bet tigen Sie die rote Farbtaste f r die obere Seite und die gr ne Farbtaste f r die unter...

Страница 35: ...mit dem Unterschied dass COLOUR SHARP NESS und TINT deaktiviert schattiert sind und COLOUR TEMPERATURE aktiviert ist verf gbare Optionen WARM COLD and NORMAL Hinweis Benutzen Sie die Tasten b a zur Au...

Страница 36: ...e um den Tagesmodus zu aktivie ren Bet tigen Sie die gr ne Farb taste um den Wochenmodus zu aktivieren Bet tigen Sie b a zum Wech seln des Kanals Bet tigen Sie die Taste o p zur Auswahl eines Kanals u...

Страница 37: ...source Standardsignal Stellen Sie hier ein Ein gangssignal ein dass als Standardsignal beim Einschal ten des Fernsehers benutzt werden soll Default Prog Standardprogramm Stellen Sie hier ein Fernsehp...

Страница 38: ...i nem weichen Tuch von der Aufnahmeseite entfernt werden Wischen Sie die Disc immer in einer geraden Bewegung von der Mitte nach Au en Benutzen Sie niemals Chemikalien wie z B Platten reiniger Antista...

Страница 39: ...rmationensanzeige Bet tigen Sie die Taste DISPLAY mehrfach zur Anzeige von Disc Informationen Titel Kapitel Abspielzeit Sprache etc Verschiende Wiedergabefunktionen DVD Men auswahl Anmerkungen Die Bed...

Страница 40: ...unter den gleichen Umst nden benutzt werden Die Einstellungen bleiben solange erhalten bis Sie sie wie der ndern selbst wenn Sie das Ger t vom Strom abtren nen Bet tigen Sie die Taste DVD SETUP zur A...

Страница 41: ...mit einer Steckdose Es wurde das falsche Eingangssignal gew hlt W hlen die das korrekte Eingangssignal Das gew nschte Eingangssignal ist nicht vorhanden berpr fen Sie die Anschl sse Kein Ton Die Lauts...

Страница 42: ...862MHz Stromnetzanforderungen Stromversorgung 100 240V 50 60 Hz Stromverbrauch maximal 50W DVD Laser Wellenl nge 650 nm 795 nm DVD Region 2 Anschluss Eing nge TV Tuner RF 75 1 Component Video Eingang...

Страница 43: ...GEBRUIKERS HANDLEIDING Voor meer informatie en ondersteuning verwijzen wij u naar www lenco eu DVT 1933...

Страница 44: ...gave VOORZORGSMAATREGELEN D3 BEDIENING D4 DE EERSTE KEER DE TV GEBRUIKEN D7 BASIS BEDIENING D8 OSD MENU INSTELLING D9 INGEBOUWDE DVD SPELER BEDIENING D16 ONDERHOUD D19 PROBLEMEN OPLOSSEN D19 SPECIFICA...

Страница 45: ...et werkelijke product en de verpakking evenals de naam en illustratie afwijken van de handleiding Het scherm dat wordt weergegeven als voorbeeld in deze handleiding kan afwijken van het werkelijke sch...

Страница 46: ...als vazen op het apparaat Plaats geen naakte vlammen zoals brandende kaarsen op het apparaat Raak nooit het tv scherm of antenne stopcontact aan tijdens onweer Stop het gebruik tijdens onweersbuien Ga...

Страница 47: ...sknoppen Voor DVD speler High Definition Multimedia interface ingang HDMI VGA interface ingang VGA PC audio ingang PC AUDIO Component video ingang Y Pb Pr Composiet audio video ingang R L VIDEO USB in...

Страница 48: ...D MENU TITLE TITLE D DISP D DISP GOTO GOTO MEDIA MEDIA PROG INTRO INTRO REPEAT REPEAT A B A B TV RADIO TV RADIO F FA AV V F FA AV V LCD LCD 1 Power Standby knop z 2 DVD eject knop PC AUTO 3 Mute knop...

Страница 49: ...IA PROG INTRO INTRO REPEAT REPEAT A B A B TV RADIO TV RADIO DVD Functies ANGLE Druk op deze knop om de huidige hoek te tonen druk nogmaals om in volgorde te schakelen tussen de verschillende hoeken Al...

Страница 50: ...vestigen Opmerking Om de eerste installatie te annuleren tijden het installatieproces drukt u op p om NO te selecteren het onderstaande scherm verschijnt Om het wissen van het zoeken naar kanalen te a...

Страница 51: ...of dapparaat Informatie tonen Druk op DISPLAY op de afstandsbediening de gerelateer de informatie van de huidige bron zal automatisch op het scherm verschijnen NICAM Functie Druk op NICAM op de afstan...

Страница 52: ...f bevestigen Volg de tips aan de onderkant van de gerelateerde OSD schermen Nadat het instellen van een optie klaar is drukt u op LCD MENU om stap voor stap te verlaten terwijl u met EXIT direct het O...

Страница 53: ...g Del TV Ch Del Radio Ch Ch Orgn Ch Sort Ch Group Advanced Setting Timer Native Game Audio Subtitle Rating Box Man Tetris Hitrat PC H Position V Position Phase Clock Auto Sync HDMI YPBPR H Position V...

Страница 54: ...D11 Hoofd OSD PERSONAL BEELDMENU ENGLISH FULL WEST EURO OFF 60 SECONDS ON FUNCTIEMENU TV MENU GELUIDSMENU AVC OFF PERSONAL HOTEL MODE DK PAL OFF 49 7MHz GERMANY...

Страница 55: ...OK om het te bevestigen druk op de BLAUWE knop om de timer in te stellen Opmerking Druk op de RODE knop om naar de boven liggende pagina te gaan of de GROENE knop om naar de onderliggende pagina te g...

Страница 56: ...s in TV modus behalve dat COLOUR KLEUR SHARPNESS SCHERPHEID en TINT ongeldig in grijs zijn en COLOUR TEMPERATURE KLEURTEMPERA TUUR geldig is Beschikbare opties WARM COLD en NORMAL Opmerking Druk op b...

Страница 57: ...p de RODE knop om de Dagelijkse Modus te betreden Druk op de GROENE knop om de Wekelijkse Modus te betreden Druk op de b a knop op om programma met kanaal te wisse len Druk op de o p knop om een kanaa...

Страница 58: ...ource Standaardbron Stel een invoerbron in als standaard wanneer de TV wordt aangezet Default Prog Standaardzender Stel een TV kanaalnum mer in als standaard als de TV naar TV of DTV gaat Max Volume M...

Страница 59: ...e met een zachte doek Veeg in een rechte beweging vanuit het midden naar de buitenkant van de schijf Gebruik nooit chemicali n zoals Platen Reiniger an tistatische sprays of vloeistoffen benzeen of th...

Страница 60: ...eschikbaar is op de disk gehoord worden Selecteren van On Screen Op Scherm Informatie Druk herhaaldelijk op DISPLAY om de diskinformatie te tonen Titel Hoofdstuk Titel Verstreken Speeltijd Taal etc Ve...

Страница 61: ...heden bediend worden De instellingen kunnen behouden worden in het geheugen tot ze worden veranderd zelfs als het apparaat wordt uitgezet Druk op DVD SETUP om het DVD speler OSD menu te activeren Druk...

Страница 62: ...in een stopcontact De verkeerde invoerbron is geselecteerd Selecteer een correcte invoerbron Het verbinden van de invoerbron met de TV is mislukt Maak juiste verbindingen Alleen geen geluid Volumebedi...

Страница 63: ...z Voeding Stroominvoer 100 240V 50 60 Hz Stroomverbruik Maximaal 50W DVD Kenmerken Laser Golflengte 650 nm 795 nm DVD Regionummer 2 Aansluitingen Invoer TV Tuner RF 75 1 Component Video Ingang Y Pb Pr...

Страница 64: ...For more information and support please visit www lenco eu...

Отзывы: