


21
THROUGH DOVETAILS
Chapter 8
D4R Pro User Guide
8-7
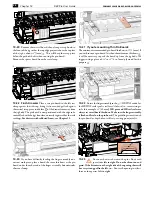
Clamp a tail board
against the left front side stop, top edge
touching flush under the guidefingers, inside face
i
away from the
jig body. Although you will cut tails first, adjust the guidefinger
layout in
d
TD PINS mode. The adjustment screws are on top
in this mode, and it's easier to visualize the final joint pattern.
8-8
Loosen the support bracket knobs and raise the finger assem-
bly about
1
⁄
8
"[3mm]
➀
above the boards and retighten the knobs.
This will allow easy and accurate guidefinger adjustment.
1
8-9
This joint layout is only a suggestion for this trial. It has a
typical, traditional
symmetrical
layout of pins, with half-pins at
each edge. The Leigh jig, however, allows for an infinite variety
of joint designs, and boards of different thicknesses can also be
joined to each other as shown in this illustration. Before attempt-
ing joints of
asymmetrical
layout, please see chapter 14.
8-11
Lock the left-most half-pin guidefinger about
1
⁄
8
"[3mm]
➀
in from the left edge of the board. Always apply light downward
pressure to each guidefinger as the finger screws are tightened
➁
.
This will ensure the fingers are flat and level on the bar.
8-10
Ignoring the extreme outer guidefinger next to the scale (it
just supports the router), loosen the next eight guidefingers and slide
them over the workpiece. NOTE: The first few times you use your
jig, some fingers may "stick". This is normal. To "unstick", loosen the
finger screw about 3/4 turn. Press down firmly on the screwdriver (in
the screw) to loosen the finger locking wedge (you should feel a click).
1
2
8-12
Leave three pairs of guidefingers over the board and lock
the right-most half-pin guidefinger about
1
⁄
8
"[3mm]
➀
in from
the right edge of the board. Judge this distance by eye: it need not
be exact. The sockets and pins will align automatically.
1
Содержание D4R Pro
Страница 14: ...JIG ASSEMBLY MOUNTING AND USING THE CLAMPS 6 Chapter 1 D4R Pro User Guide ...
Страница 24: ...WOOD PREPARATION 16 Chapter 6 D4R Pro User Guide ...
Страница 86: ...BIT SELECTION 78 Appendix II D4R Pro User Guide ...
Страница 90: ...JIG PARTS 82 Appendix III D4R Pro User Guide ...
Страница 92: ...PRINTED IN CANADA Joining Tradition with Today Printed in Canada ...