background image

3

User Interface

3.1

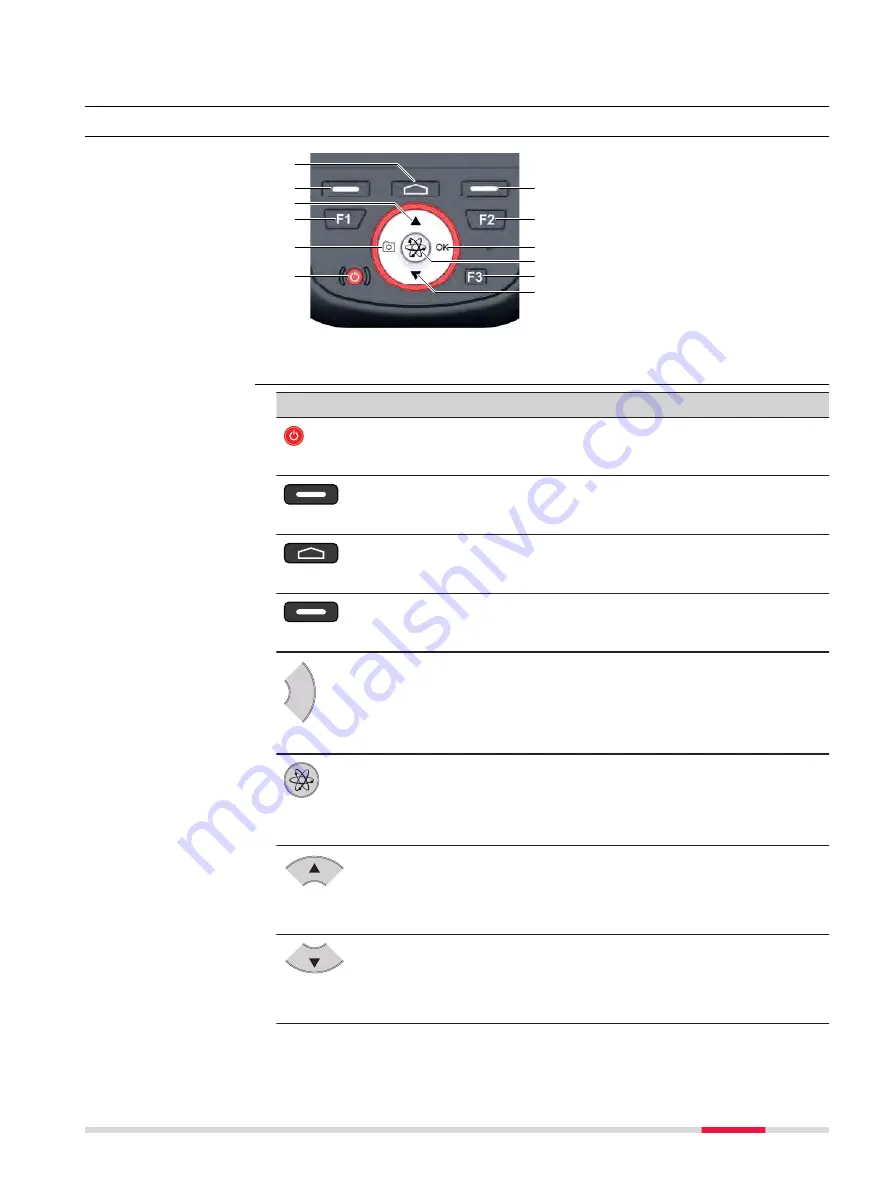
Keyboard

009320_001

a

d

c

b

e

f

g

h

i

j

k

l

  a Home key

b

Left softkey

c

Direction Pad UP

d

F1 key

e

Camera key

f

Power key

g

Right softkey

h

F2 key

i

OK key

j

Satellite/GNSS key

k

F3 key

l

Direction Pad DOWN

Key

Function (WEH)

Function (Android)

Power key

Power, Suspend & Resume

Power, Suspend & Resume

Left softkey

Left

Back

Home key

Home

(Returns to main screen)

Home

(Returns to main screen)

Right softkey

Right

Menu

OK

OK key

OK

OK

Satellite/

GNSS key

Measure in Zeno Field

Measure in Zeno Mobile

Direction Pad

UP

Up

Up

Direction Pad

DOWN

Down

Down

Keypad

Functions of the Keys

User Interface

21

Содержание Zeno 20 Series

Страница 1: ...Leica Zeno 20 Windows Embedded Handheld User Manual Version 1 2 English ...

Страница 2: ...spective owners This manual applies to the Windows Embedded Handheld version of the LeicaZeno 20 device Name Description Format Leica Zeno 20 Quick Guide Provides an overview of the product together with technical data and safety directions Intended as a quick reference guide ü ü LeicaZeno 20 User Manual All instructions required in order to operate the product to a basic level are contained in th...

Страница 3: ...ith the latest software and keep up to date with the latest documentation myService View the current service status and full service his tory of your products in Leica Geosystems service centres Access detailed information on the services performed and download your latest calibration cer tificates and service reports mySupport Create new support requests for your products that will be answered by...

Страница 4: ... 20 24 4 1 2 Inserting and Removing a SIM Card and SD Card 24 4 1 3 Attaching the AS10 AS05 Antenna to the Zeno 20 26 4 2 Batteries 26 4 2 1 Operating Principles 27 4 2 2 Changing the Battery 27 4 2 3 Charging the Battery 28 4 3 Power Functions 29 4 4 Connecting the Zeno 20 to PC via Windows Mobile Device Center 30 4 5 Optimising the Zeno 20 for GNSS Tracking 31 4 6 Setting up the Zeno 20 with a D...

Страница 5: ...7 2 Conformity to National Regulations 44 7 3 Dangerous Goods Regulations 45 8 Software Licence Agreement 46 Table of Contents 5 ...

Страница 6: ... injury and property damage For your safety it is important to read and fully understand the fol lowing table with the different signal words and their definitions Supplemen tary safety information symbols may be placed within a warning message as well as supplementary text Type Description DANGER Indicates an imminently hazardous situation which if not avoided will result in death or serious inju...

Страница 7: ... to ear voice operations This device does not have body worn accessories This device is designed to be used only in the hand or in fixed installations by mounting it on a pole or a vehicle When the device is not mounted on a pole or a vehicle you may use it in handheld mode only and should keep it away from your body as described in 4 5 Optimising the Zeno 20 for GNSS Tracking Do not place the dev...

Страница 8: ...ed 1 5 Hazards of Use DANGER Risk of electrocution Because of the risk of electrocution it is dangerous to use poles levelling staffs and extensions in the vicinity of electrical installations such as power cables or electrical railways Precautions Keep at a safe distance from electrical installations If it is essential to work in this environment first contact the safety authorities responsible f...

Страница 9: ...an sustain injury Precautions When setting up the product make sure that the accessories are correctly adapted fitted secured and locked in position Avoid subjecting the product to mechanical stress WARNING Lightning strike If the product is used with accessories for example masts staffs poles you may increase the risk of being struck by lightning Precautions Do not use the product in a thundersto...

Страница 10: ...fluids This can cause leakage fire or explosion of the batteries Precautions Protect the batteries from mechanical influences and high ambient temper atures Do not drop or immerse batteries into fluids WARNING Short circuit of battery terminals If battery terminals are short circuited e g by coming in contact with jewellery keys metallised paper or other metals the battery can overheat and cause i...

Страница 11: ...selves and third parties to the risk of severe injury and rendering the environment liable to contamination Precautions The product must not be disposed with household waste Dispose of the product appropriately in accordance with the national regulations in force in your country Always prevent access to the product by unauthorised personnel Product specific treatment and waste management informati...

Страница 12: ...d by the manufacturer CAUTION Intense electromagnetic radiation For example near radio transmit ters transponders two way radios or diesel generators Although the product meets the strict regulations and standards which are in force in this respect Leica Geosystems cannot completely exclude the possibil ity that function of the product may be disturbed in such an electromagnetic environment Precau...

Страница 13: ...lar phone devices in aircraft 1 7 FCC Statement Applicable in U S WARNING This equipment has been tested and found to comply with the limits for a Class B digital device pursuant to part 15 of the FCC rules These limits are designed to provide reasonable protection against harmful interference in a residential installation This equipment generates uses and can radiate radio frequency energy and if...

Страница 14: ...RSSs Operation is subject to the following two conditions 1 This device may not cause interference and 2 This device must accept any interference including interference that may cause undesired operation of the device Canada Déclaration de Conformité Le présent appareil est conforme aux CNR d Industrie Canada applicables aux appareils radio exempts de licence L exploitation est autorisée aux deux ...

Страница 15: ...ause interference 2 This device must accept any interference including interference that may cause undesired operation of the device Le présent émetteur radio a été approuvé par Industrie Canada pour fonction ner avec les types d antenne énumérés ci dessous et ayant un gain admissible maximal et l impédance requise pour chaque type d antenne Les types d ant enne non inclus dans cette liste ou dont...

Страница 16: ...MA Android Zeno 20 CDMA WEH Touch screen ü ü ü ü Colour dis play ü ü ü ü Internal modem W WWAN GSM W WWAN GSM W WWAN CDMA W WWAN CDMA Internal bat teries1 ü ü ü ü MicroSD Card ü ü ü ü Bluetooth ü ü ü ü Wireless LAN 802 11b g n ü ü ü ü Wi Fi ü ü ü ü Operating System Android 4 2 2 Windows Embedded Handheld 6 5 Professional Android 4 2 2 Windows Embedded Handheld 6 5 Professional L1 L2 GNSS board ü ü...

Страница 17: ...0 is delivered with the operating system and software that you ordered The software is already licensed The installation includes the latest released Zeno updates the latest released GNSS board firmware and the purchased Auth Code Refer to the according software documentation for more information 2 2 2 Power Concept Use the batteries chargers and accessories recommended by Leica Geosystems to ensu...

Страница 18: ...m soft ware and is not certified for permanent data transfer i e as data stor age for measurement data Use only certified industrial grade USB flash drives such as the LeicaMS1 order number 765199 2 3 System Components The Zeno 20 package includes the following components 009342_001 a Zeno 20 b AZ206 c AZ201 d AZ203 e AZ211 f AZ209 g h a Zeno 20 Android OR Zeno 20 Windows Embedded Handheld b Recha...

Страница 19: ...6_001 a d c b e f a Internal GNSS Antenna and Board b External GNSS Antenna Con nector c Screen d Keypad e LED Indicators f Microphone 009317_001 a d c b e f a Holder for Handstrap b Camera and Flash c Speaker d Compartment with Slots for Battery SIM Card and SD Card e Release Lever for Battery Compartment f Handstrap Fixation 009318_001 a b a USB A Host Port b Micro USB Host Port works also as Po...

Страница 20: ...009319_001 a d c b a Battery Connectors b SIM Card Slot c MicroSDHC Card Slot d Latch for Battery Pack Battery Compartment 20 Description of the System ...

Страница 21: ...3 key l Direction Pad DOWN Key Function WEH Function Android Power key Power Suspend Resume Power Suspend Resume Left softkey Left Back Home key Home Returns to main screen Home Returns to main screen Right softkey Right Menu OK OK key OK OK Satellite GNSS key Measure in Zeno Field Measure in Zeno Mobile Direction Pad UP Up Up Direction Pad DOWN Down Down Keypad Functions of the Keys User Interfac...

Страница 22: ...can choose between the options Power Off Soft Reset or Hard Reset Select Cancel to close the Shut Down menu and return to normal operation Refer to 5 4 Resetting the Zeno 20 Device for more information about resetting the Zeno 20 3 2 Operating Principles The user interface is operated through the capacitive touch screen You can either use the supplied stylus or touch the screen with the finger Ope...

Страница 23: ... Status of LED Description Battery LED off Batteries are in use discharging green Batteries are fully charged Device is ready for operation red Batteries are charging flashing red Batteries are low and should be charged flashing amber Error GPS LED off No connection green GPS FIX is good red GPS FIX is not good LED Indicators Status of the LED Indicators User Interface 23 ...

Страница 24: ...er 3 While peeling away the carrier foil bit by bit slowly smooth out the display foil onto the display Use a microfibre cloth to smooth out potential air bubbles between display and display foil Do not use sharp objects If you want to reattach the display foil you can easily remove and fix it again 4 1 2 Inserting and Removing a SIM Card and SD Card Keep the card dry Use it only within the specif...

Страница 25: ... or SD card The device must not be subject to high electrostatic potentials when it is open Minimise contact with internal components of the device Avoid any discharges of static electricity near the device when inserting the SIM or SD card 5 5 6 3 2b 4a 4a 4a 4b 2a 2a 2a 5s OFF 1 009346_001 The slots for the SIM card and the SD card are inside the battery compartment of the Zeno 20 1 Turn off the...

Страница 26: ...the antenna cable into the external antenna connector If you use Zeno Field Zeno Connect or Zeno Mobile attaching the antenna cable automatically sets the external antenna as the currently used antenna If you detach the antenna cable the internal antenna is used again auto matically 4 2 Batteries The Zeno 20 device is designed to work with one removable battery placed inside the battery compartmen...

Страница 27: ...nificantly from the actual battery capacity available The batteries can be operated from 30 C to 60 C 22 F to 140 F Low operating temperatures reduce the capacity that can be drawn high operating temperatures reduce the service life of the battery 4 2 2 Changing the Battery The batteries are hot swappable You can remove an empty battery and replace it with a charged one without turning off the dev...

Страница 28: ...shock due to missing ground connection If unit is not connected to ground death or serious injury can occur Precautions The power cable and power outlet must be grounded The following advice is only valid for battery charger power adapter and car adapter WARNING Unauthorised opening of the product Either of the following actions may cause you to receive an electric shock Touching live components U...

Страница 29: ... Alternatives Connect the AZ208 car charger to the Zeno 20 and to a cigarette lighter of a car 12V 24V DC Connect the Zeno 20 to a computer using the AZ211 data trans fer cable Note The data transfer cable has a lower charging capability than the AC power adapter Remove the battery from the Zeno 20 and charge it with the Desktop Charger 823055 This charger allows you to charge up to two batteries ...

Страница 30: ... Power Off After turning off the Zeno 20 wait for at least 5 seconds before turning the device on again 4 4 Connecting the Zeno 20 to PC via Windows Mobile Device Center Windows Mobile Device Center is the synchronisation software for Windows Embedded Handheld devices ON 1 009339_001 AZ211 2a 2b Ensure that the Windows Mobile Device Center software is installed on the computer 1 Turn on the Zeno 2...

Страница 31: ...ssi ble 009332_001 4 6 Setting up the Zeno 20 with a Disto S910 You can combine the Zeno 20 with a Disto S910 to get a TPS similar setup Position the setup close to the asset where the GNSS conditions are good and measure your target with the Disto S910 This method allows you to measure inaccessible or unreachable points from a safe distance and to collect data in areas where the GNSS reception is...

Страница 32: ... the resulting point accuracies Make sure that the refer ence point is at least 25 m away from your current position 2 When measuring new points with the Disto S910 that are far from your current position the point accuracy decreases 3 The better the accuracy of the reference point and of the current position the better the resulting point accuracies When measuring points with GNSS make sure that ...

Страница 33: ...key Windows key e Softkeys The icons within the status bar indicate the current status of the main system functions 008561_001 a b c d e f a Numeric keypad b LAN Bluetooth mode c Modem Phone connection mode d Current volume setting e AC connection mode f Current time Icon Description 008572_001 Wi Fi connection in progress Wi Fi is activated Bluetooth connection in progress Bluetooth is activated ...

Страница 34: ...to the left Icon Description Tap on the icon to zoom in out Indicates numeric keypad Tap on the icon to access the bluetooth settings Tap on the icon to access the Wireless Manager Tap on the icon to access the phone settings Tap on the icon to access the volume settings Tap on the icon to access the battery control panel Tap on the icon to access the Clock Alarm control panel The softkeys at the ...

Страница 35: ...Key define tab 3 To select a key definition file tap OPEN 4 To apply the selected key definition file tap Apply To reset the key definition file to default tap Default key defini tion file 5 To exit the window tap OK in the command bar or press the OK key on the keypad Note The functions that you assign to the hotkeys do not apply when working within Zeno Field There are predefined functions for Z...

Страница 36: ... software files from myWorld and install them again During a hard reset the following actions are executed automatically All data and applications stored in the RAM memory are deleted The operating system is reloaded The Auto Install is launched to install any CAB or REG files in the folder AutoInstall Cabfile 1 Press the Power key for at least 4 s to open the Shut Down menu 2 Within the Shut Down...

Страница 37: ...e screen to open the navigation bar 2 Tap on the icon of a radio Phone Bluetooth Wi Fi to open the respective settings window 3 Within the settings window tap on the link Settings Each radio has its on configuration program You need to have spe cific information about the wireless network you want to connect to 4 Within the configuration program enter the necessary information and start the connec...

Страница 38: ...eld you can define a switch off time for the antenna The antenna automatically switches off when not being used for the defined length of time You can define the switch off time within StartÞSettingsÞSys temÞGPS ÞPower Management Alternatively you can control the antenna power within Zeno Field or Zeno Connect When disconnecting from the antenna in the Leica Zeno software the antenna is switched o...

Страница 39: ... max 410998 byte Bit count 8 Format BMP 2 To open the CustomLogoEditor app tap on the button and open the File Explorer Select Windows CustomLogoEditor to start the app 3 To select the image file that you want to install as start up screen tap on Open and browse for the file in the respective folder To switch back to the default Leica start up screen tap on Delete Logo Software 39 ...

Страница 40: ...e batteries from the product and the charger before storing After storage recharge batteries before using Protect batteries from damp and wetness Wet or damp batteries must be dried before storing or use A storage temperature range of 0 C to 30 C 32 F to 86 F in a dry environment is recommended to minimize self discharging of the battery At the recommended storage temperature range batteries conta...

Страница 41: ...plugs clean and dry Blow away any dirt lodged in the plugs of the con necting cables Wet connectors must be dry before attaching the dust cap Cables and plugs Connectors with dust caps Care and Transport 41 ...

Страница 42: ...SDHC slot Storage 4 GB built in storage Length m Width m Thickness m 0 27 0 099 0 050 Type Weight kg lbs Zeno 20 with battery 0 87 1 92 Zeno 20 without battery 0 72 1 59 Data can be recorded on the USB memory stick on an SD card or in the inter nal memory Type External supply voltage Zeno 20 Nominal voltage 5 V DC Type Battery Voltage Capacity Operating time typical Zeno 20 Li Ion 3 7 V 7800 mAh 7...

Страница 43: ...signals tracking Basic configura tion GPS L1 only Upgrade options GPS L2 L2C GLONASS L1 L2 BeiDou B1 Galileo E1 Integrated real time SBAS WAAS EGNOS GAGAN MSAS 1 Output data protocols NMEA 0183 GGA VTG GLL GSA GSV RMC GST GGQ LLQ via Zeno Connect on WEH or position provided by Android Location Service via Zeno Connect on Android Real time protocols RTCM 2 x RTCM 3 0 RTCM 3 1 Leica CMR CMR Update r...

Страница 44: ... 24 applicable in US Hereby Leica Geosystems AG declares that the radio equipment type Zeno 20 UMTS is in compliance with Directive 2014 53 EU and other applicable European Directives The full text of the EU declaration of conformity is available at the fol lowing internet address http www leica geosystems com ce Class 1 equipment according to European Directive 2014 53 EU RED can be placed on the...

Страница 45: ... Leica Geosystems has developed Guidelines on How to carry Leica products and How to ship Leica products with Lithium batteries Before any transportation of a Leica product we ask you to consult these guidelines on our web page http www leica geosystems com dgr to ensure that you are in accordance with the IATA Dangerous Goods Regulations and that the Leica products can be transported correctly Da...

Страница 46: ...ogether with all products and can also be referred to and downloaded at the Leica Geosystems home page at http leica geosystems com about us compliance standards legal documents or collected from your Leica Geosystems distributor You must not install or use the software unless you have read and accepted the terms and conditions of the Leica Geosystems Software Licence Agree ment Installation or us...

Страница 47: ......

Страница 48: ...osystems AG Heinrich Wild Strasse CH 9435 Heerbrugg Switzerland Phone 41 71 727 31 31 www leica geosystems com 837175 1 2 0en Original text Printed in Switzerland 2018 Leica Geosystems AG Heerbrugg Switzerland ...

Отзывы: