background image

24

Version 1.0, Revision A 

Cleaning and maintenance

6

6.  Cleaning and maintenance

6.1  Cleaning the instrument

• 

Before cleaning the instrument, turn it off using the main switch and disconnect it from the power 

supply.

• 

Empty the water tray.

• 

The instrument must have cooled down for cleaning.

• 

Use wet, lint-free tissue paper to clean the instrument.

•  Cleaning products suitable for the removal of paraffin can be used to clean the instrument.

• 

Do not use organic solvents (e.g. alcohol or xylene).

6.2  Replacing fuses

Warning 

Replacing the fuses without switching off the instrument and unplugging the power plug.

Electrical shock which causes injury of persons.

• 

Turn the instrument off with the power switch and disconnect the power plug from the mains before 

replacing the fuses. Empty the water tray

.

Caution 

Using the wrong fuses which are not with the same specification defined in the section of Technical 

data in the Instructions for Use.

Instrument malfunction.

•  Only use fuses of the same specification defined in the section of Technical data in the Instructions for 

Use.

Use only the supplied replacement fuses. Both fuses must have the same rating (check the imprint). 

Replace the fuses in pairs.

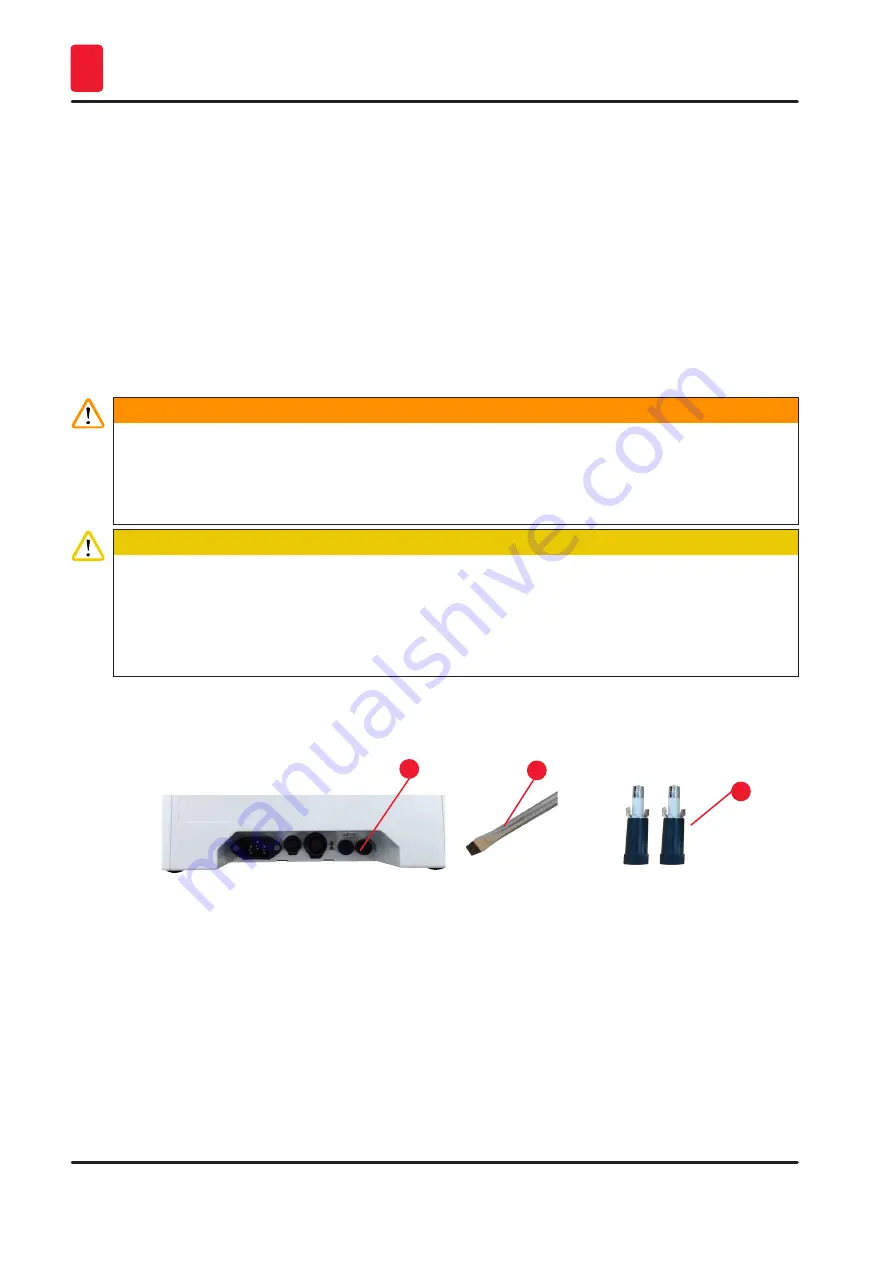
Fig. 18 


1

2

3

1.  Use a straight screwdriver 

(

 Fig. 18-

1

)

 to rotate the fuse holder 

(

 Fig. 18-

2

)

 to 10 o'clock 

direction.

2.  Pull out the fuse holder 

(

 Fig. 18-

3

)

 carefully.

3.  Replace the defective fuses with two new ones.

4.  Insert the fuse holders and use the straight screwdriver to rotate them in place.

Содержание HistoCore Water Bath

Страница 1: ...Water Bath Water Bath Instructions for Use English Order No 14 0607 80101 Revision A Always keep this manual with the instrument Read carefully before working with the instrument Version 1 0 Revision...

Страница 2: ......

Страница 3: ...ormation regarding the contents or technical details of the present Instructions for Use are not to be considered warranted characteristics of our products These are determined only by the contract pr...

Страница 4: ...mponents 12 3 1 2 Rear view 12 3 2 Main features of the instrument 13 3 3 Technical data 13 4 Setting up the instrument 15 4 1 Installation site requirements 15 4 2 Standard delivery packing list 15 4...

Страница 5: ...ury Symbol Title of the symbol Note Description Indicates information which is important but not related to any risk Symbol Title of the symbol Item number Fig 7 1 Description Item numbers for numberi...

Страница 6: ...ol Title of the symbol UKCA Description The UKCA UK Conformity Assessed marking is a new UK product marking that is used for goods being placed on the market in Great Britain England Wales and Scotlan...

Страница 7: ...package contents are fragile and must be handled with care Symbol Title of the symbol Keep dry Description The package must be kept in a dry environment Symbol Title of the symbol Stack limit Descript...

Страница 8: ...ide dryer to help dry the water on the slides It could be used by biomedical research institute Warning Any other use of the instrument is considered Off Label use Failure to observe these instruction...

Страница 9: ...and environmental safety in the operator s country Warning The protective devices located on the instrument and the accessories must not be removed or modified Only qualified service personnel author...

Страница 10: ...ument and strictly follow operating instructions described in the Instructions for Use when operating or replacing the item marked 2 2 2 Transport and installation Danger Hazardous substances combusti...

Страница 11: ...ly gets contact with heated water when floating or picking up sections The user gets hurt by hot water Be careful of the hot water during operation Warning The user accidentally gets contact with heat...

Страница 12: ...ns 3 1 Overview 3 1 1 Instrument components Fig 1 1 3 2 4 1 Water bath 3 Control panel 2 Water tray 4 Slide dryer ordered separately 3 1 2 Rear view Fig 2 1 3 2 4 5 6 1 Mains power inlet 4 LED illumin...

Страница 13: ...ment Accessory to HistoCore Water Bath No need for power socket get power supply via HistoCore Water bath Dimension 200 mm x 280 mm x 98 mm Heating temperature up to 75 C 3 3 Technical data Equipment...

Страница 14: ...t storage 20 85 Minimum distance to walls mm 10 cm BTU J s 4094 BTU h Emissions and boundary conditions Overvoltage category to IEC 61010 1 II Pollution degree to IEC 61010 1 2 Means of protection to...

Страница 15: ...tension cable must not be used The substrate must be largely vibration free and have sufficient load capacity and rigidity for the weight of the instrument Avoid impacts bright direct light and excess...

Страница 16: ...esive tape and open the carton Fig 3 2 Remove the accessories and carefully lift the instrument out of the carton Fig 4 3 Remove the plastic cover Note The transport carton and included retaining elem...

Страница 17: ...ht side Fig 7 The slide dryer is connected at the left side Fig 8 The slide dryer is connected at the rear end Fig 9 Two slide dryers are connected at the right side in parallel Fig 10 Two slide dryer...

Страница 18: ...devices Connect the cables together Fig 14 1 You will hear a click sound and feel the connectors fitting into each other If two slide dryers are to be installed in parallel at the same side of the wat...

Страница 19: ...ching the instrument on fill the water bath with a sufficient quantity of distilled water 2 Switch on the instrument with the main switch at the front right corner of the instrument The run stop butto...

Страница 20: ...strument or accessories which may lead to tissue damage Be careful when lifting devices Warning Move the water bath with the slide dryer connected Connection cable is damaged and the slide dryer falls...

Страница 21: ...Buttons Description 3 Downwards Turning page Touch the button and the icon of the present module toggles between the water bath and the slide dryer s Decreasing target temperature Touch and hold the b...

Страница 22: ...the instrument to the latest stored target value To adjust to the desired temperature do the following steps 1 Touch either of the upwards or downwards button till the target module incon occurs 2 Tou...

Страница 23: ...ed surface of the water bath base hurts the user Be careful of the hot surface of the water bath base during exchange of water 5 3 Power on off the slide dryer The heatings to the water bath and slide...

Страница 24: ...of persons Turn the instrument off with the power switch and disconnect the power plug from the mains before replacing the fuses Empty the water tray Caution Using the wrong fuses which are not with t...

Страница 25: ...teps contact customer service Red light is always on the heating stops 1 If water temperature is higher than the target temperature wait till water cools down 2 Switch off the instrument and wait for...

Страница 26: ...rsion 1 0 Revision A Ordering information 8 8 Ordering information Part description Order No HistoCore Slide Dryer 14 0607 010C0 Extension cable accessories 14 0607 03001 Removable water tray 14 0607...

Страница 27: ...product menu This template must be used to enter all required data If a product is returned a copy of the completed and signed decontamination certificate must either be enclosed or handed over to a...

Страница 28: ...s organization or the organization from which you have purchased the contractual product shall apply exclusively Service information If you require technical service please contact your Leica sales of...

Страница 29: ......

Страница 30: ...LeicaBiosystems com Version 1 0 Revision A 09 2022 Leica Biosystems Nussloch GmbH Heidelberger Strasse 17 19 69226 Nussloch Germany Tel 49 0 6224 143 0 Fax 49 0 6224 143 268 Web www LeicaBiosystems c...

Отзывы: