background image


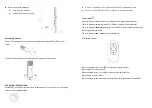
Accessori


Rif.


Nome


Qtà


Viti ad espansione 

Chiave inglese 

Controllo remoto 

Viti M4*14 


ISTRUZIONI PER L'INSTALLAZIONE 

A. 

Il riscaldatore deve essere installato da un elettricista qualificato. 

B. 

Posizionare il riscaldatore su una superficie solida e piana di un pavimento; 

installazione del riscaldatore su un supporto rigido e robusto (come travi di legno 

o rotaie metalliche, ecc.). 

C. 

Collegare il riscaldatore da esterno ad una presa di corrente 220-240V 50-60Hz 

13A con messa a terra. 


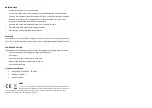
Distanze minime richieste: 

a) 

50 cm dalla parete laterale 

b) 

Almeno 50 cm dal soffitto 


Montaggio 

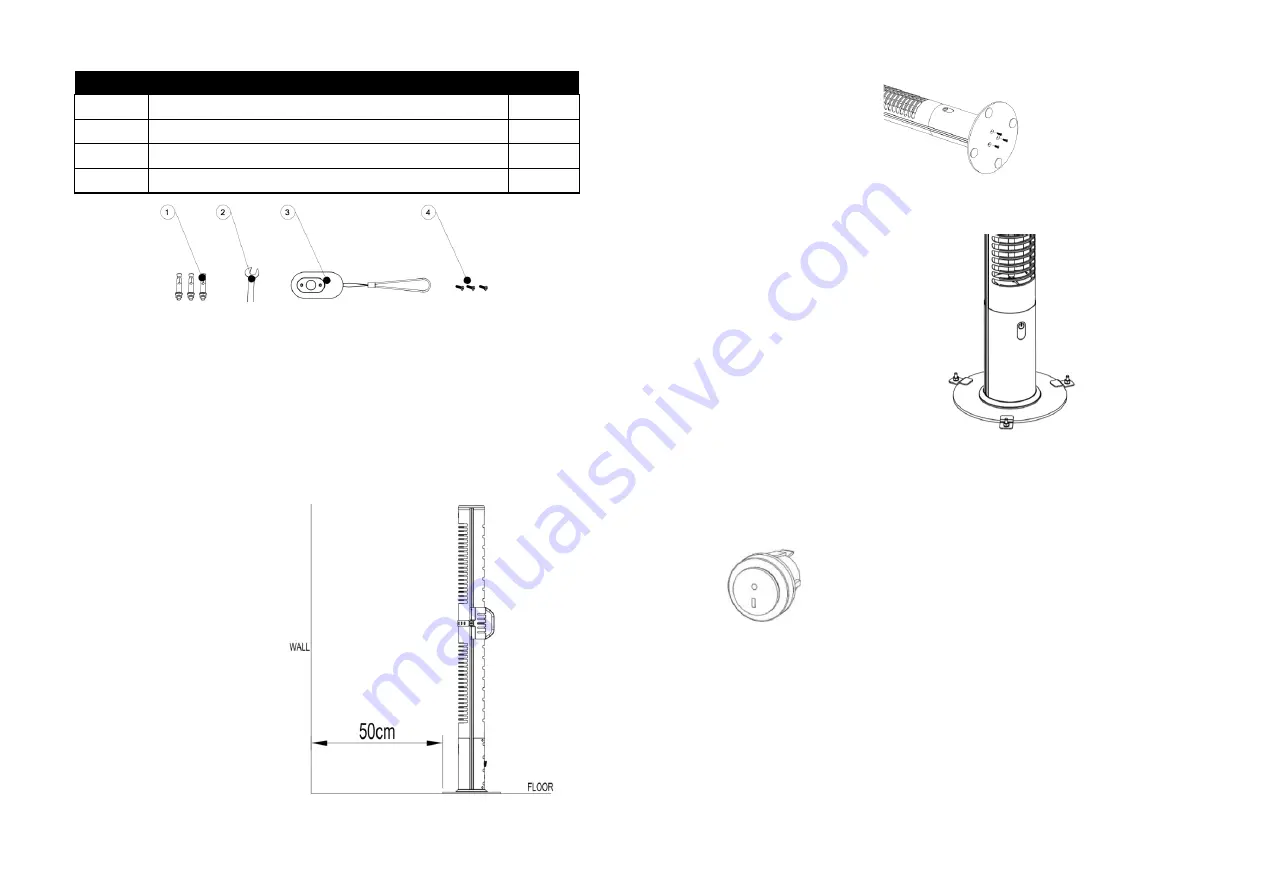
Fase 1: fissare l'asta del riscaldatore sulla base utilizzando le 3 viti M4*14mm in 

dotazione.   


Fase 2: fissare la base utilizzando le viti di ancoraggio e le piastrine di fissaggio della 

base. 


ISTRUZIONI PER L'USO 


AVVERTENZA: Il riscaldatore deve essere installato correttamente prima di essere 

utilizzato. Questa unità è dotata di un'impostazione di calore 

On I Off

.


Collegare il riscaldatore da esterno ad una presa di corrente 220-240 V 50-60 Hz con 

messa a terra. 


Premere l'interruttore On/Off sulla posizione "I" per attivare il riscaldatore. 


Содержание 58 916 26

Страница 1: ... Sie das Netzkabel des Halogenstrahlers nicht in die Steckdose ein wenn Teile des Netzkabels beschädigt sind Dieser Elektro Terrassenstrahler kann auch von Kindern ab 8 Jahren und Menschen mit eingeschränkten physischen sensorischen oder mentalen Fähigkeiten verwendet werden oder Menschen denen die entsprechende Erfahrung und das Wissen fehlt sofern sie den Strahler unter Aufsicht einsetzen oder A...

Страница 2: ...erem die folgenden Massnahmen umfassen 1 Lesen Sie die Anweisungen durch bevor Sie den Strahler in Betrieb nehmen 2 Befestigen Sie den Strahler im Freien oder innerhalb einer grossen offenen Fläche und entfernt von Behinderungen wie z B Zweigen oder wenn sich der Strahler in der Nähe von Gegenständen befindet die durch Wärme beeinträchtigt werden können wie z B Möbel Vorhänge oder andere entzündli...

Страница 3: ...ler darf nicht auf weichen Flächen wie z B einem Bett eingesetzt werden sofern die Öffnungen dadurch blockiert werden könnten 18 Der Strahler verfügt in seinem Innenbereich über heisse und funkensprühende Teile Er darf nicht in Bereichen betrieben werden in denen sich Benzin Farbe explosive und oder entzündliche Flüssigkeiten befinden oder gelagert werden Der Strahler ist entfernt von erwärmten Ob...

Страница 4: ...ine geerdete Steckdose mit 220 240 V 50 60 Hz 13 A ein Erforderliche Mindestabstände a 50 cm von der Seitenwand b Mindestens 50 cm von der Decke Montage Schritt 1 Fixieren Sie den Strahler mittels der mitgelieferten 3 Schrauben des Typs M4 14 mm am Standfuss Schritt 2 Zur fixen Befestigung mit Halteplatten verschrauben Sie Dübel Schrauben im Boden WARNHINWEIS Der Strahler ist vor der Verwendung vo...

Страница 5: ...Sie den Strahler vollständig abkühlen Das Aussengehäuse kann mit einem weichen feuchten Tuch abgewischt werden Sie können bei Bedarf ein mildes Reinigungsmittel verwenden Verwenden Sie keinen Alkohol Benzin Scheuerpulver Möbelpolitur oder raue Bürsten um den Strahler zu reinigen da es die Oberfläche des Strahlers beschädigen kann Der Strahler darf NICHT in Wasser eingetaucht werden Obwohl der Stra...

Страница 6: ...ancher l appareil de chauffage halogène à l alimentation électrique si l un des composants ou le cordon d alimentation est endommagé de quelque façon que ce soit Cet appareil ne peut pas être utilisé par des enfants à partir de 8 ans ou des personnes ayant des capacités physiques sensorielles ou mentales réduites ou un manque d expérience et de connaissances s ils ne sont pas sous surveillance ou ...

Страница 7: ...le risque d incendie d électrocution et de blessures physiques y compris ce qui suit 1 Lire TOUTES les instructions avant d utiliser cet appareil 2 Monter l appareil de chauffage à l extérieur ou dans un grand espace dégagé et bien à l écart de tout obstacle comme les branches ou à proximité d objets pouvant être affectés par la chaleur comme les meubles les rideaux ou autres objets inflammables d...

Страница 8: ...ertures peuvent se boucher 18 Un chauffage renferme des parties chaudes et qui produisent des arcs ou des étincelles électriques NE PAS utiliser dans des endroits où sont utilisés ou rangés de l essence de la peinture et ou des liquides inflammables Tenir l appareil à l écart des surfaces chauffées et des flammes nues 19 Éviter l utilisation de rallonges parce qu une rallonge peut surchauffer et p...

Страница 9: ...13A mise à la terre Distances minimales requises a 50 cm du mur latéral b Au moins 50 cm du plafond Processus d assemblage Étape 1 Fixer le poteau de chauffage sur sa base à l aide des 3 vis M4 14mm fournies Étape 2 Fixer la base à l aide des vis expansives et de la plaque de retenue de la base AVERTISSEMENT L appareil de chauffage doit être correctement installé avant de l utiliser Cet appareil e...

Страница 10: ...que ce chauffage soit approuvé pour l extérieur ne pas l immerger dans l eau pour votre sécurité La source lumineuse de ce luminaire n est pas remplaçable lorsque la source lumineuse atteint sa fin de vie le luminaire entier doit être remplacé Attendre que l appareil soit complètement sec avant de l utiliser RANGEMENT S il n est pas prévu d employer l appareil pendant une longue période le ranger ...

Страница 11: ...letato Non collegare il riscaldatore alogeno all alimentazione elettrica se uno dei componenti o il cavo di alimentazione sono danneggiati in qualche modo Questo apparecchio non deve essere usato da bambini a partire da 8 anni o da persone con ridotte capacità fisiche sensoriali o mentali o con mancanza di esperienza e conoscenza se non hanno ricevuto supervisione o istruzioni sull uso sicuro del ...

Страница 12: ...urezza di base per ridurre il rischio di incendi scosse elettriche e lesioni alle persone comprese le seguenti 1 Leggere TUTTE le istruzioni prima di usare questo apparecchio 2 Montare il riscaldatore all esterno o in una grande area aperta e ben lontano da qualsiasi ostacolo come rami o da luoghi in cui il riscaldatore sia vicino a oggetti che possono essere influenzati dal calore come mobili ten...

Страница 13: ...ure potrebbero bloccarsi 18 Un riscaldatore ha al suo interno parti calde e parti in cui si formano archi o scintille NON utilizzare il riscaldatore in aree in cui vengono utilizzati o conservati benzina vernice liquidi esplosivi e o infiammabili Tenere il riscaldatore lontano da superfici riscaldate e da fiamme aperte 19 Evitare l uso di una prolunga perché la prolunga potrebbe surriscaldarsi e c...

Страница 14: ...V 50 60Hz 13A con messa a terra Distanze minime richieste a 50 cm dalla parete laterale b Almeno 50 cm dal soffitto Montaggio Fase 1 fissare l asta del riscaldatore sulla base utilizzando le 3 viti M4 14mm in dotazione Fase 2 fissare la base utilizzando le viti di ancoraggio e le piastrine di fissaggio della base ISTRUZIONI PER L USO AVVERTENZA Il riscaldatore deve essere installato correttamente ...

Страница 15: ...no morbido NON usare alcool benzina polveri abrasive lucido per mobili o spazzole ruvide per pulire il riscaldatore Questo può causare danni o il deterioramento della superficie del riscaldatore Anche se il presente riscaldatore è approvato per l uso all esterno per motivi di sicurezza NON immergere il riscaldatore in acqua La sorgente luminosa di questo apparecchio non è sostituibile quando la so...

Страница 16: ...s complete Do not connect the halogen heater to the electrical supply if any of the components or the power cord is damaged in any way This appliance shall not be used by children aged from 8 years and above or persons with reduced physical sensory or mental capabilities or lack of experience and knowledge if they haven t been given supervision or instruction concerning use of the appliance in a s...

Страница 17: ...l away from any obstructions such as branches or where the heater is near any objects that can be affected by heat such as furniture curtains or other inflammable objects minimum distance 1 meter 3 DO NOTR position immediately above in front or below an electrical socket 4 The unit must be placed with the clearance of 50 cm to the next wall and min 50cm to the ceiling 5 When the power supply cord ...

Страница 18: ...of fire However if you have to use an extension cord the cord shall be 2 5mm2 minimum size 20 To avoid fire or shock hazard plug the unit directly into a 220 240V and 13A electrical socket outlet 21 To disconnect heater turn controls to OFF then remove plug from outlet Pull firmly on plug DO NOT unplug by pulling on the cord 22 Always unplug the unit before moving cleaning or the heater is not in ...

Страница 19: ...s on the On Off switch to the I position to activate the heater Touch switch Touch on the panel once Switch on for 1000W of the upper heating element Touch on the panel twice Switch on for 1000W of the lower heating element Touch on the panel three times Switch on for 2000W means both heating elements are running at the same time Touch on the panel four times to turn the heater off The remote cont...

Страница 20: ...o prevent dust and dirt build up use the original packaging to repack the unit TROUBLE SHOOTING If the heater will not operate please check the following before seeking repair of service Check if the power cord is plugged into an electrical outlet if not plug in Check if electricity to the main fuse is working Make certain the power switches are turned on If not choose a setting Technical specific...

Отзывы: