


Chapter 6: Using the Web Interface
217
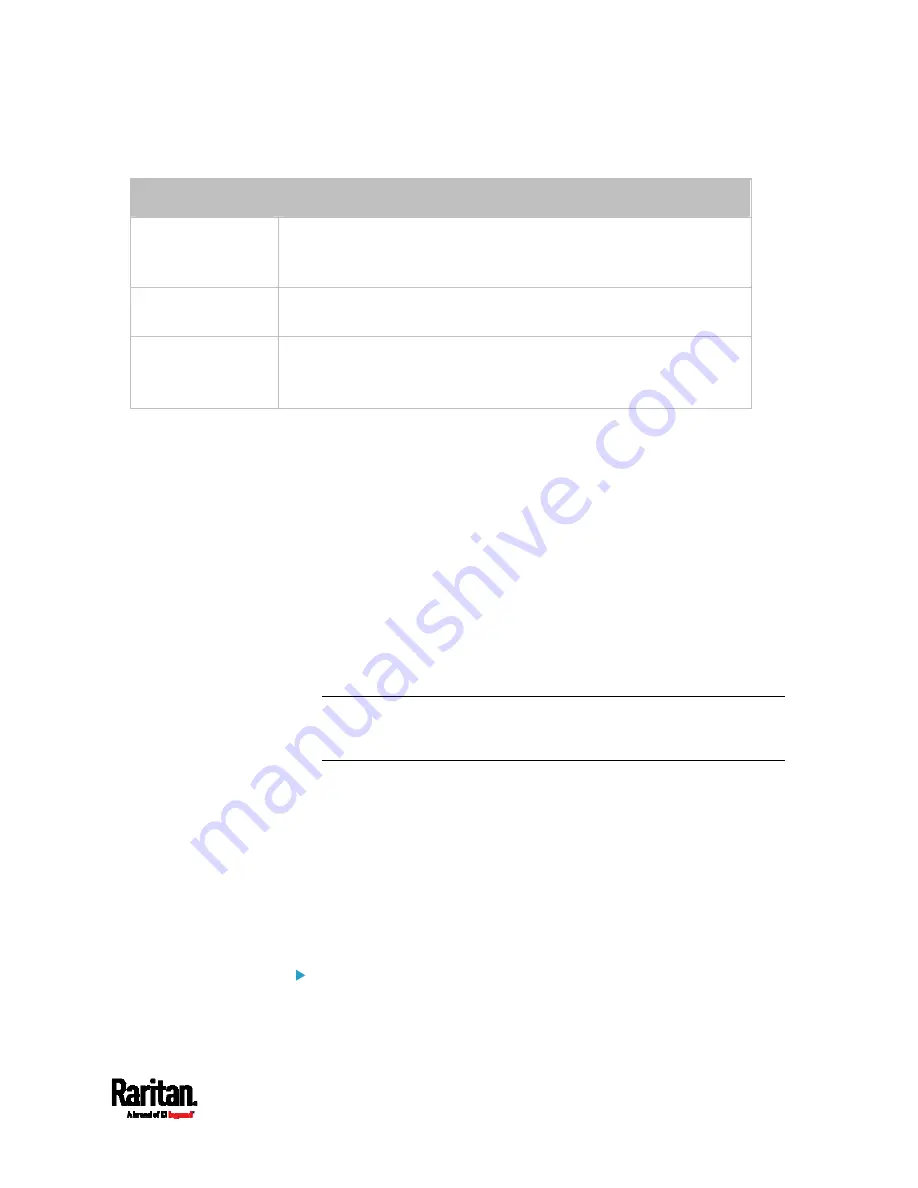
Key Creation Parameters:
Field
Do this
Key length
Select an available key length (bits). A larger key length enhances the
security, but slows down the response of SRC.
Only 2048 is available now.
Self-sign
For requesting a certificate signed by the CA, ensure this
checkbox is NOT selected.
Challenge,
Confirm challenge
Type a password. The password is used to protect the certificate or
CSR. This information is optional.
The value should be 4 to 64 characters long. Case sensitive.
3.
Click Create New TLS Key to create both the CSR and private key.
This may take several minutes to complete.
4.
Click Download Certificate Signing Request to download the CSR to
your computer.
a.
You are prompted to open or save the file. Click Save to save it
onto your computer.
b.
Submit it to a CA to obtain the digital certificate.
c.
If the CSR contains incorrect data, click Delete Certificate
Signing Request to remove it, and then repeat the above steps to
re-create it.
5.
To store the newly-created private key on your computer, click
Download Key in the New TLS Certificate section.
Note: The Download Key button in the Active TLS Certificate section
is for downloading the private key of the currently-installed
certificate rather than the newly-created one.
You are prompted to open or save the file. Click Save to save it
onto your computer.
6.
After getting the CA-signed certificate, install it. See
Installing a
CA-Signed Certificate
(on page 217).
Installing a CA-Signed Certificate
To get a certificate from a certificate authority (CA), first create a CSR
and send it to the CA. See
Creating a CSR
(on page 216).
After receiving the CA-signed certificate, install it onto the SRC.
To install the CA-signed certificate:
1.
Choose Device Settings > Security > TLS Certificate.
Содержание Raritan SRC-0100
Страница 42: ...Chapter 3 Initial Installation and Configuration 30 Number Device role Master device Slave 1 Slave 2 Slave 3...
Страница 113: ...Chapter 6 Using the Web Interface 101 4 To return to the main menu and the Dashboard page click on the top left corner...
Страница 114: ...Chapter 6 Using the Web Interface 102...
Страница 128: ...Chapter 6 Using the Web Interface 116 Go to an individual sensor s or actuator s data setup page by clicking its name...
Страница 290: ...Chapter 6 Using the Web Interface 278 If wanted you can customize the subject and content of this email in this action...
Страница 291: ...Chapter 6 Using the Web Interface 279...
Страница 301: ...Chapter 6 Using the Web Interface 289 6 Click Create to finish the creation...
Страница 311: ...Chapter 6 Using the Web Interface 299...
Страница 312: ...Chapter 6 Using the Web Interface 300 Continued...
Страница 625: ...Appendix H RADIUS Configuration Illustration 613 Note If your SRC uses PAP then select PAP...
Страница 626: ...Appendix H RADIUS Configuration Illustration 614 10 Select Standard to the left of the dialog and then click Add...
Страница 627: ...Appendix H RADIUS Configuration Illustration 615 11 Select Filter Id from the list of attributes and click Add...
Страница 630: ...Appendix H RADIUS Configuration Illustration 618 14 The new attribute is added Click OK...
Страница 631: ...Appendix H RADIUS Configuration Illustration 619 15 Click Next to continue...
Страница 661: ...Appendix I Additional SRC Information 649...


