


Chapter 3: Initial Installation and Configuration
25
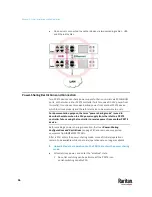
2.
Connect the other end to your computer's RS-232 port (COM).
3.
Perform
Initial Network Configuration via CLI
(on page 851).
Serial connection for "RJ-45" RS-232 connector:
1.
Connect the RJ-45 end of the RJ45-to-DB9 adapter cable to the RJ-45 port
labeled CONSOLE / MODEM on PX3TS.
▪
See
RJ45-to-DB9 Cable Requirements for Computer Connections
(on
page 25).
2.
Connect the DB9 end to your computer's RS-232 port (COM).
See
RJ45-to-DB9 Cable Requirements for Computer Connections
(on page
25).
3.
Perform
Initial Network Configuration via CLI
(on page 851).
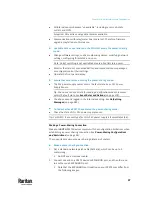
RJ45-to-DB9 Cable Requirements for Computer Connections
An RJ45-to-DB9 adapter/cable is required for connecting the
PX3TS
to a
computer, if the use of a USB cable is not wanted.
A third party RJ45-to-DB9 adapter/cable needs to meet the following
requirements.
•
RJ-45 to "DB9 female"
•
RX/TX and according control pins are CROSSED
The widespread blue Cisco RJ-45 to DB9 adapter cable is highly recommended,
which has the following pin assignments:
DB9 pin signal
DB9 pin No.
RJ-45 pin No.
RJ-45 pin signal
CTS
8
1
RTS
DSR
6
2
DTR
RxD
2
3
TxD
GND
5
4
GND
GND
5
5
GND
TxD
3
6
RxD
DTR
4
7
DSR
RTS
7
8
CTS
DCD
1 (Not connected)
N/A
RI
9 (Not connected)
Note: The blue Cisco RJ-45 to DB9 adapter cable CANNOT be used for
connecting a modem. See
RJ45-to-DB9 Cable Requirements for Modem
Connections
(on page 830).
Содержание Raritan PX3TS
Страница 4: ......
Страница 6: ......
Страница 20: ......
Страница 52: ...Chapter 3 Initial Installation and Configuration 32 Number Device role Master device Slave 1 Slave 2 Slave 3...
Страница 80: ...Chapter 4 Connecting External Equipment Optional 60...
Страница 109: ...Chapter 5 PDU Linking 89...
Страница 117: ...Chapter 5 PDU Linking 97...
Страница 440: ...Chapter 7 Using the Web Interface 420 If wanted you can customize the subject and content of this email in this action...
Страница 441: ...Chapter 7 Using the Web Interface 421...
Страница 464: ...Chapter 7 Using the Web Interface 444...
Страница 465: ...Chapter 7 Using the Web Interface 445 Continued...
Страница 746: ...Appendix A Specifications 726...
Страница 823: ...Appendix I RADIUS Configuration Illustration 803 Note If your PX3TS uses PAP then select PAP...
Страница 824: ...Appendix I RADIUS Configuration Illustration 804 10 Select Standard to the left of the dialog and then click Add...
Страница 825: ...Appendix I RADIUS Configuration Illustration 805 11 Select Filter Id from the list of attributes and click Add...
Страница 828: ...Appendix I RADIUS Configuration Illustration 808 14 The new attribute is added Click OK...
Страница 829: ...Appendix I RADIUS Configuration Illustration 809 15 Click Next to continue...
Страница 860: ...Appendix J Additional PX3TS Information 840...
Страница 890: ...Appendix K Integration 870 3 Click OK...
Страница 900: ......


