background image

1

2

3

4

5

6

7

8

S

qu

ee

ze

H

er

e

ADJUSTMENTS

Sensor Adjustment

Your OS300S has been preset for optimum performance at the factory. It is
designed with SmartSet technology for “Install and Forget” functionality. If you
need to change the settings follow the directions below.
All major adjustments to the OS300S must be made with the wall plate
removed. To access DIP switches, remove the button cap by squeezing the top
sides of the button and pull it gently away from the unit.
When the adjustments are completed, replace the button by inserting its hinges
into the LED light bar and then squeeze the top of the button while pressing it
into the unit. Reinstall the cover plate.

Light Level Adjustment

To set, or reset, the threshold to match a current ambient light level, put the
sensor into TEST mode. Press and hold the button for 3 seconds, until a beep is
heard, then step away from the sensor. After 25 seconds another short beep will
sound, indicating that the threshold level has been set. This threshold will be
retained, even if power is lost, or Light Level Control is temporarily disabled,
until it is re-programmed in this manner.

Automatic Reset

Holding the On/Off button for ten seconds will cause the OS300S to reset to
default settings. This includes resetting the light level threshold to maximum
(i.e. even the brightest ambient light will not hold the light OFF). The sensor
occupancy history is also reset.

Auto On/Off Button

DIP Switches

LED

Lens

OS300S Diagram

Содержание Pass & Seymour OS300S

Страница 1: ...its 120VAC 0 800W tungsten or ballast 277VAC 0 1200W ballast Load Type Compatibility incandescent fluorescent magnetic or electronic ballast Time Delay Adjustment 5 to 30 minutes user selectable or au...

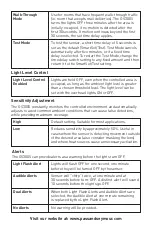
Страница 2: ...elay period There is a 30 second reset delay If motion is detected during this time the sensor will turn the lights back ON automatically After the reset delay time has elapsed the Auto ON OFF button...

Страница 3: ...tomatically adjusts to avoid common ambient conditions that can cause false detections while providing maximum coverage Light Level Control Lights are held OFF even when the controlled area is Enabled...

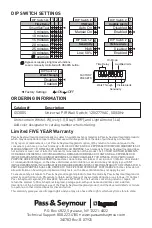
Страница 4: ...To verify proper operation place the unit in any Fixed time delay any of switches 1 2 or 3 in the ON position then select Automatic time delay switches 1 2 and 3 in the OFF position to temporarily re...

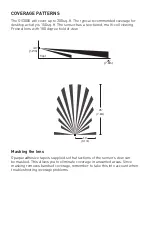
Страница 5: ...viewing Fresnel lens with 180 degree field of view 4 0 1 2m 25 7 6m floor Masking the lens Opaque adhesive tape is supplied so that sections of the sensor s view can be masked This allows you to elimi...

Страница 6: ...e wall box by inserting screws into the two wide holes on the top and bottom of the attached metal bracket Match them up with the holes in the wall box and tighten 4 Turn circuit breaker ON Wait one m...

Страница 7: ...nto the unit Reinstall the cover plate Light Level Adjustment To set or reset the threshold to match a current ambient light level put the sensor into TEST mode Press and hold the button for 3 seconds...

Страница 8: ...for removal or reinstallation of the product ALL OTHER FURTHER ELEMENTS OF DAMAGE INCIDENTAL OR CONSEQUENTIAL DAMAGES FOR BREACH OF ANY AND ALL EXPRESSED OR IMPLIED WARRANTIES INCLUDING WARRANTIES OF...

Отзывы: