background image


01.2009 v 3.00 


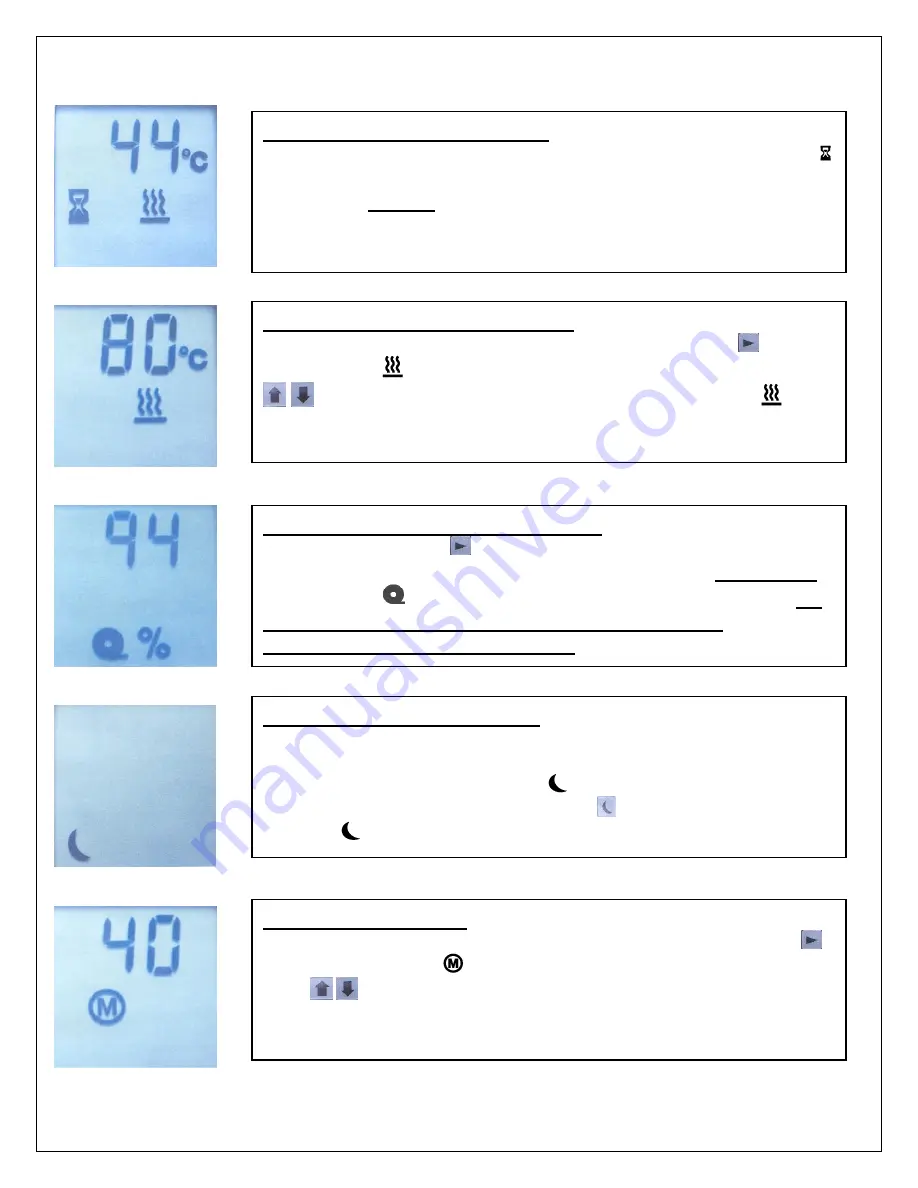
Ready/Set Temperature Screen 

To set the desired temperature, push the Mode key 

 until 

heat symbol 

 appears and flashes. Then use the arrow keys 


 to set desired temperature. Steady heat symbol 


indicates that the machine has reached set temperature and 
is ready to laminate. The rolls will now operate.


Current Temperature Screen


Reads the current temperature of the rollers. The hourglass   
indicates that the machine is not at machine set temperature. 
The rollers will not run until reaches the set temperature.


Sleep Modes On/Off Screen 

Indicates the machine is off but is still connected to power. 
Automatically goes to standby (sleep) mode after 30 minutes 
and maintains 130° F (flashing 

). After an additional 30 

minutes or by pushing sleep button  , machine turns off 
(steady  

).


Laminate Supply Indicator Screen


Press the mode key 

 until the film symbol appears. The 

screen displays percent of remaining film on the bottom roll.  
Film symbol 

 will flash when film supply is under 10%.  Do 

not allow machine to run completely out of film or 
wraparound condition may occur.


Motor Speed Screen 

Indicates motor speed. To change speed, press mode key 


until motor symbol 

 appears and flashes, then use arrow 

keys


to adjust speed. Speed can be adjusted while the 

machine is running by pressing the up and down arrows.


The 

indicator displays the percentage of maximum motor speed. 


Содержание Compass

Страница 1: ...01 2009 v 3 00 READ ALL PRECAUTIONS INSTRUCTIONS CAREFULLY BEFORE OPERATING LAMINATOR Setup Instruction Operation Lamination Maintenance Compass Hot Roll Laminator Operation Manual ...

Страница 2: ...s au pastel dont les couleurs baver et se mélanger surtout si la couche de pastel est épaisse Les pastels en couche mince peuvent ne pas réagir mais en cas de doute il est préférable de faire un essai avec un échantillon perdu Ne pas plastifier les documents importants dont il n existe qu un seul exemplaire à moins de bien malitriser la technique de plastification Ne pas plastifier non plus les ar...

Страница 3: ...NVENTORY 3 PRODUCT ILLUSTRATIONS AND NAMES OF PARTS 3 1 Display 3 2 Threading diagram 3 3 Film loading procedure 4 SAFETY PRECAUTIONS 5 SETUP AND OPERATION 5 1 Setup and operation 5 2 Laminating 5 3 Recommended temperature settings 5 4 Laminating 5 5 Preventing and solving problems hot 6 CLEANING AND MAINTENANCE 6 1 Cleaning and maintenance 6 2 Cleaning the rubber rollers 6 3 Lubrication ...

Страница 4: ...al before using the laminator keep the manual with the machine and periodically review the instructions The manual also contains warranty and parts information Thank you for selecting the LEDCO Compass hot roll laminator We are committed to your satisfaction As you unpack your new laminator please complete the following information Always have this information ready when calling Purchased From____...

Страница 5: ...ld MISE EN GARDE Ne pas utiliser la machine à plastifier sans son écran protecteur en plexiglass ADVERTENCIA No utilice el plastificado sin tener el protector de plexiglass en su lugar LEDCO Inc 4265 North Main Street Hemlock NY 14466 USA Phone 1 585 367 2392 Fax 1 585 367 2978 www ledcoinc com ...

Страница 6: ...Above Lab35 2 General Danger Lab52 3 Arm Entanglement Lab51 4 Cutting of Fingers or Hand Straight Blade Lab54 5 Hand Entanglement Chain Drive Lab36 6 International Hot Warning Lab100 7 Electrical Hazard Lab 43 8 CE European Electrical Lab06 9 International Ground Lab79 ...

Страница 7: ...ilm tension is controlled at the idler roller instead of on the mandrels like most laminators It requires virtually no adjustment and makes loading new film rolls simple Ease of maintenance The Compass is made to last However some items on a laminator do wear out Even the high quality silicone rubber used in the rollers will lose flexibility over time Extensive use may wear out the rollers or an o...

Страница 8: ...ons 40 L x 24 W x 17 D 101cm L x 61cm W x 41 cm D Weight shipping weight 85 lbs 40kg 105 lbs 51kg Motor 1 30 HP D C Electrical single phase 100 120 VAC 12A 200 240 VAC 6A 50 60 Hz Electrical connector IEC C14 back panel mates with IEC C 13 cord connector Heaters 2 X 750 watts 1500 watts total Maximum film capacity with 1 5 mil 1200 ft 365 m with 3 mil 700 ft 214 m NOTE The Compass relies on your b...

Страница 9: ...y done at too low a temperature Check the instructions that may have come with your laminating film and or the lamination temperature chart in section 5 3 Please note that when doing an X test on glossy coated paper a good X test will pull up ink only The film should not come up easily When laminating material that is not glossy uncoated the paper is often more fibrous and a good X test will yield...

Страница 10: ...combinations In the US laminating trade the generally accepted practice is to describe two sided lamination or encapsulation by the thickness of one layer of film For example 3 mil lamination should refer to lamination with two layers of 3 mil film If you are buying or selling laminating film or lamination services please make sure both parties understand the film descriptions being used There is ...

Страница 11: ...old heat well 1 5 mil film can be the most difficult gauge of film to use A standard 1 5 mil film will run at about 250 F 121 C while a 3 mil film with the same adhesive type will run at 240 F 115 C Even when applied at 250 F 121 C the 1 5 mil film will not adhere as consistently as the 3 mil film applied at 240 F 115 C or a 5 mil applied at 225 F 107 C For many applications 5 mil film does a much...

Страница 12: ...visual inspection to determine whether an onsite service call will be needed Notice of the defect should be submitted in writing or by phone to LEDCO before any steps are taken to repair or return the machine Phone 1 800 937 9293 or 1 585 937 2392 Fax 1 585 367 2978 Email info ledcoinc com If the machine is returned it must be accompanied by Customer name address and phone number Written descripti...

Страница 13: ...ier then assumes full responsibility for the shipment 1 Notify LEDCO IMMEDIATELY 2 Hold damaged goods with container and packing for inspection by the examining agent LEDCO will arrange the inspection 3 DO NOT RETURN ANY GOODS PRIOR TO AUTHORIZATION BY LEDCO 4 Submit a copy of the inspector s report to LEDCO LEDCO will file the claim with the carrier and replace your machine if necessary You will ...

Страница 14: ...ntenance procedures described in this manual The Compass control display forward and reverse motor controls speed and temperature controls and mode controls are on a single integrated panel which is pictured below Front panel view Control Display Forward Motor Control Sleep Mode Reverse Motor Control Speed Temperature Up Speed Temperature Down Mode Control Current Temperature Film Supply Set Tempe...

Страница 15: ...is still connected to power Automatically goes to standby sleep mode after 30 minutes and maintains 130 F flashing After an additional 30 minutes or by pushing sleep button machine turns off steady Laminate Supply Indicator Screen Press the mode key until the film symbol appears The screen displays percent of remaining film on the bottom roll Film symbol will flash when film supply is under 10 Do ...

Страница 16: ...v 3 00 3 2 THREADING DIAGRAM Important Only the shiny side of the film can contact the roller Check the film carefully each time the film is reloaded Failure to thread the film properly will cause roller damage ...

Страница 17: ...01 2009 v 3 00 3 3 LOADING FILM Push latches to center to release tray 1 Remove feed tray by releasing latches and pulling table back and up Feed table latch Feed table latch Feed table ...

Страница 18: ...sition 3 Load film onto supply rolls Center the film and lock it into place using the supply roll retainers 4 Place the film rolls in the slots in the side panels of the machine CAUTION Be sure the shiny side of the film is against the rolls or damage may occur ...

Страница 19: ...of film from the bottom roll and drape over the rollers 6 Pull a length of film from the top roll Drape it over the top idler bar and across the rollers 7 Tape the two pieces of film together with cellophane or masking tape This is just to hold the rolls of film together during the threading process ...

Страница 20: ...ay screen 9 Set the desired laminating temperature and allow the machine to heat up When the hourglass symbol goes out the machine is ready to laminate Place the feed card on the feed table and push in firmly while pressing the forward motor control button Feed the card all the way through the machine NOTE After initial threading it will be necessary to run 2 3 feet of film through the machine bef...

Страница 21: ...ining parts can remain hot enough to burn you 8 Never attempt to clean the heated areas laminating rollers or pull rollers while the power is on 9 Never remove the machine housing or attempt any kind of maintenance without disconnecting power to the unit 10 Always be sure all persons are clear of the machine before advancing or reversing the pressure rollers especially when multiple operators or o...

Страница 22: ...unobstructed level surface perform the following 1 Remove all packing straps rubber bands tape and plastic ties from the machine Remove the protective paper from the safety shield 2 Plug the machine into a proper 100 120V 15 amp or 200 240V 10 amp single phase outlet ...

Страница 23: ... cleaning and rethreading of the machine MISE EN GARDE Ne jamais laisser la température dépasser 310 F 154 C lorsque le film est chargéet que la machine n est pas utilsée car le film risque de fondre auquel cas il faudrait nettoyer la machine et procéder à nouveau au chargement du film ADVERTENCIA No permite que la temperatura exceda los 310 F 154 C mientras el plástico está cargado y el plasatifi...

Страница 24: ... Excessive waterfalling or wrinkling anywhere on the heated roller The film is not perfectly smooth and tight across the surfaces of both rollers See the next section on adjusting film tension Some minor wrinkling as the film first contacts the hot roller is normal Adjusting Film Tension If the film curls up as it leaves the machine loosen the top idler roll turn counterclockwise and or tighten th...

Страница 25: ...ize the curling effect in the finished lamination by providing balanced power to the laminating and pull rollers 9 The laminator is designed to operate with the operator directly facing the control panels and feed tray assembly For operator safety the upper heat roll guard an integral component of the feed table assembly MUST BE IN ITS DESIGNATED POSITION when the temperature of the heated rollers...

Страница 26: ...ut the film that you are using 2 This chart is to serve as a general guide when better data is not available 3 If your film vendor cannot provide this and other information about the film you are using it may be difficult to achieve good results 4 When laminating heavy posters or other thick items with 1 5 to 1 8 mil films some additional heat may be required to get a permanent bond Never exceed 3...

Страница 27: ...ck to the kinds of images you ll be protecting and enhancing Temperatures may exceed 310º F 154 C when laminating poster board or other thick items with 1 5 mil film on a continuous basis however when the machine is stopped turn the heat off if the setting is more than 310º F 154 C Never set the heat above 320º F 160 C with film in the laminator Temperatures over 300º F 149 C are not needed except...

Страница 28: ...ontact the film If there is no waviness in the film at all there is too much film tension Loosen both knobs a small amount and check again If the waviness or wrinkling extends into the laminating rollers tension needs to be increased Always keep the amount of tension the same on both top and bottom film Waviness that extends across 10 to 30 percent of the heat rolls indicates acceptable film tensi...

Страница 29: ...lm are called heat wrinkles Heat wrinkles are formed when the film has not cooled enough before coming out the back of the machine For the best results film should be cooled below melt temperature while it is pulled tight and perfectly flat between the laminating rollers and the pull rollers If the film exits the back of the machine while still at or above melt temperature heat wrinkles can form T...

Страница 30: ...nce Because the rollers are being held apart by the paper or cardboard they cannot pull equally on the plastic around the paper This creates wrinkles that tend to look like the bow waves of a boat radiating out through the clear part of the web from the sheet of material PROBLEM When two pieces of material are laminated side by side the plastic adheres to one piece but not the other SOLUTION To ge...

Страница 31: ...ton Allow the laminator to back out the film that is wrapped around the rolls Pull the film off the roller WARNING Keeping the machine in reverse may cause a reverse wrap around if the film is not getting pulled off the roller You may need to pull on the film with a lot of force while stopping and starting the drive MISE EN GARDE Si l on appuie trop longtemps sur l interrupteur de marche arriére l...

Страница 32: ... avant que la colle durcisse Procéder de la facon indiquée ci dessus pour régler le problème ADVERTENCIA Si el plástico de uno de los rollos de abastecimiento pasa por el plastificador sin ser igualado por una pelicula de plastico del rollo opuesto el adhesivo expuesto a los rodillos de goma adherirá a los rodillos de laminación y causará un bucle monumental Este tipo de bucle es muy dificil de de...

Страница 33: ...rom the film over the heat rollers can form droplets if material is put in immediately This excess adhesive saturates an area of paper creating what looks like an oily spot The solution as mentioned above is just to let a few inches of film go through before feeding in your work Anytime you are laminating unfamiliar or costly items it is a good idea to start with an expendable sample or test piece...

Страница 34: ...thicker film it may be that the film is being run too fast and is not getting enough time on the heat rollers PROBLEM Bubbles in the center of the web and or film not sticking to the center of an item SOLUTION This problem can be caused by excessive laminating roll pressure Putting too much pressure on the laminating rollers actually decreases pressure in the center of the web The other likely cau...

Страница 35: ...nt chaudes longtemps après que le courant a été coupé Tenir les doigts et les objets loin des roulequx de caoutchouc Ne jamais faire tourner les rouleaux pendant l entretien de la machine Ne jamais porter de vetements amples de cravate ou de bijoux etc ces articles peuvent etra happés par les engrenages ou les roulequx de caoutchouc ADVERTENCIA Sea extremadamente cuidadoso siempre que realice tare...

Страница 36: ...erials and damage the laminator Unplug the power cord while cleaning the rollers or performing other maintenance on the machine Turn the rollers by hand MISE EN GARDE Ne jamais nettoyer les rouleaux pendant qu ils tournent afin d éviter de se blesser et d empecher que le produit de nettoyage n endommage l intérieur de la machine Débrancher le cordon d alimentation avant le nettoyage ou tout autre ...

Отзывы: