Leckey Squiggles Early Скачать руководство пользователя страница 15

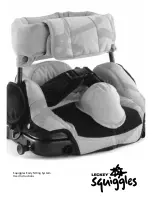
To attach the seat cushion place the seat 

shell onto a flat work surface. Drape the 

side panels over the shell and then align the 

hooky with the receiving fluffy on the seat 

base. Secure the two top front fasteners first, 

then turn upside down and secure the two 

fasteners underneath the seat shell. Line up 

all remaining external fasteners to secure the 

cover in place. 

Once the cover is secured feed the two 

female buckles through the slits at either side 

to allow attachment of the four point pelvic 

harness. Ensure the buckles are protected by 

the cushion at all times to prevent irritation to 

the user.

Always ensure the side flaps conceal 

the adjustments and metalwork away 

from children.

The Pelvic Harness contains four attachment 

points, two at the front (A) and two at the 

back (B). Clip the two front buckles into their 

receivers on either side of the seat base. Then 

attach the remaining two rear buckles into 

their receivers at the rear of the seat base.

8

8.1 Seat cushion 

attachment

8.2 Four point pelvic 

harness attachment

A

B

Содержание Squiggles Early

Страница 1: ...Squiggles Early Sitting System User Instructions...

Страница 2: ......

Страница 3: ...of this product fully Contents 01 Intended use 02 Declaration of conformity 03 Terms of warranty 04 Product history record 05 Product training record 06 Safety information 07 How to unpack and assemb...

Страница 4: ...ral terms of sale delivery and payment A two year warranty is provided on all Leckey manufactured products and components 4 Product History Record Your Leckey product is classified as a Class 1 Medica...

Страница 5: ...with the user in the product 6 8 Lifting and handling guidelines should be followed at all times We do not recommend that users are moved while using the product All due care and attention should be t...

Страница 6: ...roducts comply with fire safety regulations in accordance with EN12182 However the product contains plastic components and therefore should be kept away from all direct sources of heat including naked...

Страница 7: ...How to unpack and assemble the Early Sitting System 7...

Страница 8: ...ags with each one clearly labelled Carefully remove them from the boxes and check you have all the parts you have ordered Safety First Keep polythene bags away from children Once you have checked you...

Страница 9: ...support and any additional components you have ordered in separate packaging 7 1 Seat Assembly To attach the dynamic trunk support to the seat base sleeve the plastic rods into the receiving tubes on...

Страница 10: ...it s maximum extension 7 3 Attaching the leg support to the seat If you have ordered the prone bar remove it from its packaging This component should only be used with the seat assembled together with...

Страница 11: ...e same height 7 5 Tray assembly To attach the spacer pads first remove the dynamic trunk support from the seat assembly and lay it down flat on a work surface Wrap the spacer pad s around the cushion...

Страница 12: ...attach it to the seat cover Position the roll in the desired location ensuring the hooky attaches securely to the loop panel of the seat cover 7 8 Abduction pommel Position the support in the desired...

Страница 13: ...other activities at table height One strap should be attached around the seat base of the dining chair and the other should be secured around the back rest To attach the straps to the seat base feed...

Страница 14: ...Fitting the cushions 8...

Страница 15: ...buckles through the slits at either side to allow attachment of the four point pelvic harness Ensure the buckles are protected by the cushion at all times to prevent irritation to the user Always ensu...

Страница 16: ...mbly into the pocket in the cushion Then sleeve the other end of the inner into the opposite end of the cushion Once in position snap the fasteners together around the plastic rods and the one fastene...

Страница 17: ...y position the cushion in the recess and push down firmly to locate in position The positioning strap is attached by looping the strap underneath the plastic base and securing the Velcro panel to the...

Страница 18: ...9 The clinical setup of the product should be completed by a technically and clinically competent person who has been trained in the use of the product Leckey recommend a written record is maintained...

Страница 19: ...designed as a mid thoracic support to allow movement The height can be adjusted while the child is in the seat to provide more or less support depending on the child s abilities To height adjust loose...

Страница 20: ...els as a guide to ensure both sides are set to the same angle To width adjust the trunk support open the flap at the front and pull the tensioning strap to the desired position The flap is attached wi...

Страница 21: ...ide the prone bar into the receiving tubes at the back of the seat The bar is secure when the poppers engage in the holes in the receiving tubes To remove reverse the process Place the seat with prone...

Страница 22: ...traps through the plastic slide and tension the straps as desired By removing the leg support and placing the flexion roll under the knees a more flexed sitting position can be provided for the child...

Страница 23: ...tability offered by abducting and externally rotating the femurs The abduction pommel is attached by Velcro and can be positioned on the seat base cushion so that it provides optimum support for abduc...

Страница 24: ...justed by pushing the tray closer to the child However to prevent an active child from pushing the tray away it can be secured to the seat base with the additional attachment straps D provided To secu...

Страница 25: ...make frequent adjustments and made aware of the safety checks in Section 6 by a technically and clinically competent person who has been trained in the use of the product Leckey recommend that a writt...

Страница 26: ...on the dynamic trunk support and pelvic harness are released and out of the way to facilitate transfer Open the cushioned support by first unfastening the front panel and unclipping the plastic buckle...

Страница 27: ...d postural management Loosen all the straps to their maximum before placing the child in the seat First secure the plastic buckle C in the middle To adjust the depth adjust straps A on both sides and...

Страница 28: ...es trunk support as part of their postural support programme it may need to be repositioned depending on the activity To change the width of the trunk support unfasten the front panel adjust the strap...

Страница 29: ...y closer to the child However to prevent an active child from pushing the tray away it can be secured to the seat base with the additional attachment straps D provided 10 4 Padded activity tray To sec...

Страница 30: ...the area being cleaned off is washed with soap and water immediately afterwards A half cup of household bleach to 5 litres of water can also be used as a useful disinfectant 10 Chlorine based cleanin...

Страница 31: ...tion at least once a year and every time the product is reissued for use This inspection should be carried out by a technically competent person who has been trained in the use of the product and shou...

Страница 32: ...manual is supplied with the product A copy can be downloaded from our website www leckey com Leckey recommend that a written record is maintained of all product inspections carried out during the rei...

Страница 33: ...7 4 inches Depth 300mm 11 8 inches Seat width Min 200mm 7 9 inches Max 250mm 9 8 inches Support Roll small Width 60mm 2 4 inches Length 600mm 23 6 inches Support Roll medium Diameter 80mm 3 2 inches...

Страница 34: ...Code Description 119 600 Seat Shell 119 673 Leg Support 119 627 Activity Tray 119 669 Abduction pommel 119 670 Flexion roll 119 672 Spacer Pads 119 062 Prone bar...

Страница 35: ......

Страница 36: ...Leckey 19A Ballinderry Road Lisburn BT28 2SA Northern Ireland United Kingdom T 028 9060 2277 F 028 9060 0796 E info leckey com W www leckey com LS183 02...

Отзывы: