


8
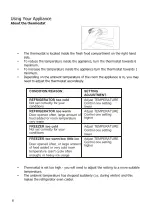
Using Your Appliance
Defrosting your appliance
The refrigerator defrosting process is carried out automatically every time the compressor
stops. The defrost water drains from the cabinet into a tray at the rear of the unit where it
evaporates.
Defrosting the freezer
When? For the most efficient operation and minimum energy consumption, defrost the
appliance compartment when the frost on the appliance walls is excessive or 1/4 inch
thick.
CAUTION
Do not use boiling water because it may damage the plastic parts. In addition,
never use a sharp or metallic instrument to remove frost as it may damage the
cooling coils and will void the warranty. We recommend using the plastic scraper.
How?
A few hours before defrosting set the thermostat to position 6, so foods are well
frozen.
Reset the thermostat to off position and disconnect the power supply.
Remove the frozen food from the appliance and place it in a cooler to protect the
food.
Leave the door open for a while so that you can easy scrape off the frost.
Use a plastic scraper but be careful not to damage the inner surfaces of the
freezer.
Wipe up the scraped frost and ice before it is completely defrosted.
In the event of a power cut
If the power failure is 3 hours or less, food can remain
inside the appliance. Keep the door closed to maintain the temperature inside. If the
power cut is longer than 3 hours, remove all food, wrap well and store in a cool dry place.
Important:
Be aware that the storage life of the food will have been reduced. Use up
this food as soon as possible or discard. Do not re-freeze food which has thawed,
either consume or cook and re-freeze if appropriate.
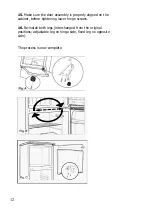
The drainage channel
The drainage channel collects water on the back wall of the refrigerator and
ensures that it is drained away into a drip tray at the rear of the appliance
Содержание T50084B
Страница 1: ...USER GUIDE T50084W W S B...
Страница 5: ...2...
Страница 9: ...6...
Страница 17: ...Note Figures in the user manual are only for reference The actual product may differ slightly 14...
Страница 18: ...15...