Lec L50263W Скачать руководство пользователя страница 16


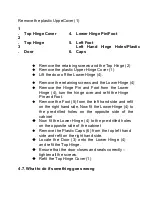
Remove the plastic UppeCover (1) 


Remove the retaining screws and the Top Hinge (2) 


Remove the plastic Upper Hinge Cover (1)


Lift the door off the Lower Hinge (4). 


Remove the retaining screws and the Lower Hinge (4) 


Remove  the  Hinge  Pin  and  Foot  from  the  Lower 
Hinge  (4),  turn  the  hinge  over  and  refit  the  Hinge 
Pin and Foot. 


Remove the Foot (5) from the left hand side and refit 
on the right hand side. Now fit the Lower Hinge (4) to 
the  pre-drilled  holes  on  the  opposite  side  of  the 
cabinet 


  Now fit the Lower Hinge (4) to the pre-drilled holes 

on the opposite side of  the cabinet 


Remove the Plastic Caps (6) from the top left hand 
side and refit on the right hand side. 


  Locate  the  Door  (3)  onto  the  Lower  Hinge  (4) 

and refit the Top Hinge. 


  Ensure that the door closes and seals correctly – 

tighten all the screws. 


  Refit the Top Hinge Cover (1)  


4.7. What to do if something goes wrong  
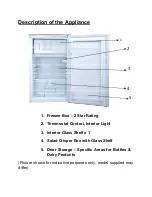
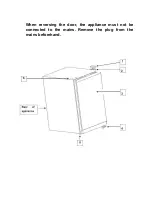
 

1
.


Top Hinge Cover


4.


Lower Hinge Pin/Foot


2
.


Top Hinge


5.


Left Foot


3
.


Door


6.


Left  Hand  Hinge  Holes/Plastic 
Caps


Содержание L50263W

Страница 1: ...LEC R50263W User Manual...

Страница 2: ...a recorded message and be given a number of options This indicates that your call has been accepted and is being held in a queue Calls are answered in strict rotation as our Customer Care Representati...

Страница 3: ...Specification of the appliance Voltage 220V 240V Frequency 50Hz Refrigerant R600a Rated Current 0 6A Lamp Power 10W Insulation Blowing Agent Cyclopentane...

Страница 4: ...er Box 2 Star Rating 2 Thermostat Control Interior Light 3 Interior Glass Shelf x 1 4 Salad Crisper Box with Glass Shelf 5 Door Storage Specific Areas for Bottles Dairy Products Picture shown for indi...

Страница 5: ...CONTENTS Section 1 Installation Section 2 Safety Advice Section 3 Operating the Appliance Section 4 Maintenance Section 5 Warning...

Страница 6: ...l amount of bicarbonate soda 5ml to 0 5 litres of water Position the appliance in a dry atmosphere and out of direct sunlight Do not position next to a cooker or other sources of heat i e radiator If...

Страница 7: ...t be level Adjust the level by screwing the adjustable feet up or down use your fingers or a suitable spanner Ensure that the appliance is upright and both feet are in firm contact with the floor so t...

Страница 8: ...instructions This appliance may contain the refrigerant isobutene R600a This is a natural gas with a high level of environmental compatibility however caution is required as isobutene is a flammable g...

Страница 9: ...ly cord is damaged it must be replaced by the manufacturer it s service agent or similarly qualified persons in order to avoid a hazard Section 3 Operating the Appliance 3 1 Switching on the Appliance...

Страница 10: ...at a slightly higher temperature than a fridge with an ice box Setting 0 Unit Off Setting 1 Unit On Warmest Temperature Setting 3 to 4 Normal Operation adequate for most situations Setting 5 Coldest T...

Страница 11: ...p to 2 months Fresh Fish up to 6 months Fruit and Vegetables up to 12 months Bread and Cakes up to 6 months 3 4 Normal Operating Sounds You may hear faint gurgling or bubbling sounds when the refriger...

Страница 12: ...th a short shelf life such as cooked meats in the coldest part of the fridge The Salad Crisper Box is the warmest part of your fridge and should be used for vegetables salads and fruits etc see Descri...

Страница 13: ...e products There may be sharp edges on the underside of the product so care should be taken when cleaning Once or twice a year dust the rear of the appliance and the compressor at the back of the appl...

Страница 14: ...r Light Bulb Switch off the power supply to the appliance Remove the screw from the light cover and remove the cover Unscrew the bulb from the rear of the light unit Replace the bulb with a suitable r...

Страница 15: ...When reversing the door the appliance must not be connected to the mains Remove the plug from the mains beforehand...

Страница 16: ...side Now fit the Lower Hinge 4 to the pre drilled holes on the opposite side of the cabinet Now fit the Lower Hinge 4 to the pre drilled holes on the opposite side of the cabinet Remove the Plastic C...

Страница 17: ...low the interior temperature to recover Has the appliance door been opened frequently if yes allow the interior temperature to recover There is excessive frost ice build up Ensure that the door has be...

Страница 18: ...this appliance may not be treated as household waste Instead it shall be handed over to the applicable collection point for the recycling of electrical and electronic equipment Disposal must be carrie...

Страница 19: ...ng use of the appliance by a person responsible for their safety 4 Do not store plosive substances such as aerosol cans with a flammable propellant in the appliance 5 This appliance is intended to be...

Страница 20: ...the appliance unless they are of the type recommended by the manufacturer Correct Disposal of this product This marking indicates that this product should not be disposed with other household wastes...

Отзывы: