
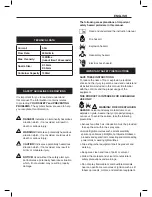

ENGLISH
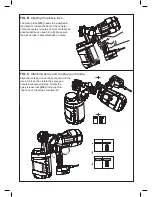
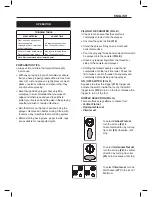
FLOW CONTROL KNOB (FIG. A1)
The flow control knob (#11) regulates the amount
of liquid that can be sprayed. Turning the flow knob
clockwise increases the flow of liquid. Turning the
knob counter anti-clockwise decreases the flow of
liquid.
Tip: Always test the spray pattern on scrap
cardboard or similar material first. Begin with flow
control knob on the highest flow setting. If less flow is
desired, dial the flow control knob anti- clockwise to
decrease the flow of liquid. Heavier, thicker materials
should be sprayed with the flow control knob on high
flow setting. Thinner materials should be sprayed
with the flow control knob on low flow setting.
> Practice spraying on a piece of scrap material
such as cardboard to test your spray pattern and
become familiar with the flow control feature of the
sprayer.
> Ensure surface to be sprayed is free of dust, dirt,
and grease.
> Ensure spray area is clean and free of dust that
could be blown onto newly sprayed surfaces.
> Cover any areas not intended to be sprayed.
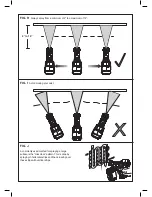
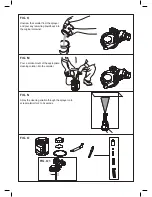
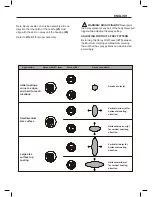
> Always spray from a minimum of 2 in to a maximum
of 12 in (FIG. H).
> A commonly used method for spraying a large
surface is the “crisscross” pattern. This is done by
spraying in horizontal strips and then crossing over
these strips with vertical strips (FIG. J).
> To get an even spray distribution, always keep your
arm at the same distance (FIG. H) from the surface
you are spraying and avoid moving your wrist
(FIG. I).
> Maintain smooth and consistent speed which will
help avoid inconsistencies. Begin spraying after
the pass has begun and release trigger before
stopping the pass.
> Avoid spraying too heavily in any one area. Several
lighter coats are better than one heavy coat which
can lead to running and dripping. Remember that
the flow control knob regulates the amount of
liquid that can be sprayed. Turning the flow knob
clockwise increases the flow of liquid. Turning the
knob counterclockwise decreases the flow of liquid.
If runs or drips do occur, have a dry paint brush on
hand to smooth them out.
> Turn the power unit off and unlpug the cord when
not spraying for any length of time.
WARNING! Be sure to use appropriate
protective gear.
> Do not use materials with a flashpoint higher than
60°C (140°F) . Flashpoint is the temperature that
a fluid can produce enough vapors to ignite (see
coating supplier).
> Make sure clean up area is well ventilated and free
of flammable vapors.
> Always spray outdoors when spraying cleaning
solution through sprayer.
> Do not submerse power unit.
> Use drop cloths during pouring, mixing, and
viscosity testing of materials to be sprayed to
protect your floors and anything else in the
spraying area that you wish to remain untouched.
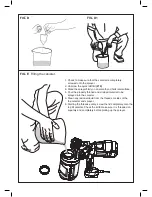
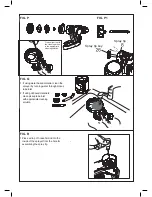
TO BEGIN CLEANING:
> Turn the power unit off, unplug the cord and
disconnect air hose from sprayer.
> Unscrew the canister from the sprayer and
pour any remaining liquid back into the original
container (FIG. K).
> Pour a small amount of the appropriate cleaning
solution into the canister (FIG. M). - Warm soapy
water for water based materials - Manufacturers
recommended cleaning solution for oil based
materials.
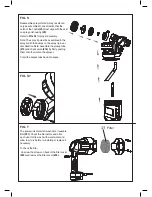
> Screw on the canister back to the sprayer securely
and vigorously shake the sprayer.
> Unscrew the canister and properly dispose of
cleaning solution.
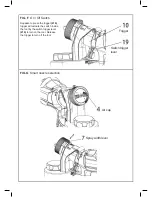
> Refill the canister with a small amount of new
cleaning solution. Screw on the canister back the
sprayer. Reattach the spray gun unit to the power
unit, plug in the cord and turn on the power unit.
> Spray the cleaning solution through the sprayer
onto scrap material for 2 to 3 seconds (FIG. N).
> Turn the power unit off, and unplug the cord.
> Unscrew the canister from the sprayer.
DEVELOPING THE PROPER
SPRAYING TECHNIQUE
CLEANING