background image

EM522-CAN Field bus Stepper Drive User Manual V1.0

9

4.3.2 Connections of 6-lead Motor

Like 8 lead stepping motors, 6 lead motors have two configurations available for high speed or high torque operations. The
higher speed configuration, or half coil, is described, because it uses one half of the motor’s inductor windings. The higher
torque configuration, or full coil, uses the full coil windings.

(1) Half Coil Configuration

As previously stated, the half coil configuration uses 50% of the motor phase windings. This gives lower inductance, hence,
lower torque output. Like the parallel connection of 8 lead motor, the torque output will be more stable at higher speeds. This
configuration is also referred to as half chopper. In setting the drive output current multiply the specified per phase (or
unipolar) current rating by 1.4 to determine the peak output current.

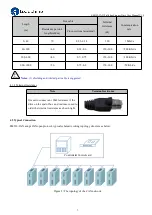
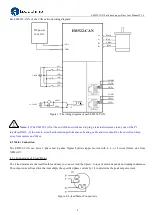
Figure 5: 6-lead motor half coil (higher speed) connections

(2) Full Coil Configuration

The full coil configuration on a six lead motor should be used in applications where higher torque at lower speed is desired.
This configuration is also referred to as full copper. In full coil mode, the motors should be run at only 70% of their rated
current to prevent overheating.

Figure 6: 6-lead motor full coil (higher torque) connections

4.3.3 Connections of 8-lead Motor

8 lead motors offer a high degree of flexibility to the system designer in that they may be connected in series or parallel, thus
satisfying a wide range of applications.

(1) Series Connection

A series motor configuration would typically be used in applications where a higher torque at lower speed is required.
Because this configuration has the most inductance, the performance will start to degrade at higher speed. In series mode, the
motors should also be run at only 70% of their rated current to prevent overheating.

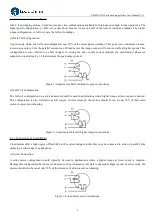
Figure 7: 8-lead motor series connections

Содержание EM522-CAN

Страница 1: ...evision 1 0 2016 China Leadshine Technology Co Ltd Address Floor 11 Block A3 Nanshan iPark Xueyuan Avenue 1001 Shenzhen Guangdong 518055 China Tel 86 755 26409254 Fax 86 755 26402718 Web www leadshine com Sales sales leadshine com Support tech leadshine com ...

Страница 2: ...g or otherwise without approval from Leadshine While every precaution has been taken in the preparation of the book Leadshine assumes no responsibility for errors or omissions Neither is any liability assumed for damages resulting from the use of the information contained herein This document is proprietary information of Leadshine that is furnished for customer use ONLY Information in this docume...

Страница 3: ...lly before operation Manual content may change due to product improvement please forgive without prior notice Leadshine will not undertake any responsibility in case of user s unauthorized product changes product warranty will be invalid Please pay attention to the following reminders CAUTION Only the technical personnel to install debug or maintain the product To ensure correct wiring before powe...

Страница 4: ...ction Pin Assignment 2 3 1 1 Connector P1 2 3 1 2 Connector P2 3 3 1 3 Connector P3 3 3 2 DIP Switch 3 3 2 1 CAN ID Setup 4 3 2 2 CAN Baud Rate Setup 5 3 3 LED Light Indication 6 4 Getting Started 6 4 1 Wiring Instruction 6 4 1 1 Power supply motor cable 6 4 1 2 I O signal cable 6 4 1 3 CAN communication cable 6 4 1 4 Terminal resistance 7 4 2 Typical Connection 7 4 3 Motor Connection 8 4 3 1 Conn...

Страница 5: ... 6 Parameters Configuration via Leadshine CANopen Software 17 4 6 1 Installing software 17 4 6 2 Connecting Leadshine CANopen software 17 5 CANopen Communication Overview 22 5 1 EM522 CAN Communication Standard 22 5 2 Explanation of Nouns 23 5 2 1 Object dictionary 23 5 2 2 Process data objects PDO 23 5 2 3 Service data object SDO 24 5 2 4 Homing mode 25 6 Trouble Shooting 28 7 Warranty 30 8 Conta...

Страница 6: ... opto isolation differential digital inputs max frequency 20KHz and wide input voltage 5 24VDC 1 opto isolation differential digital output max current 100mA largest external pull up voltage 24VDC Protections for over voltage and over current etc 1 3 Application Suitable for all kinds of multi axis linkage control of small and medium sized automation equipment and instrumentation such as manipulat...

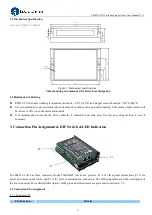
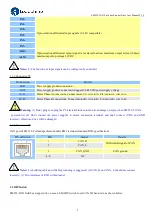
Страница 7: ... motor at standstill It is recommended to mount the drive vertically to maximize heat sink area Use forced cooling method to cool if necessary 3 Connection Pin Assignment DIP Switch LED Indication The EM522 CAN has three connector blocks P1 P2 P3 see above picture P1 is for IO signals connections P2 is for power and motor connections and P3 is for CAN communication connection The following tables ...
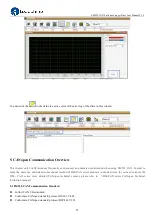
Страница 8: ...connections Connect motor B wire to B Pin motor B wire to B Warning Warning 1 Don t plug or unplug the P2 terminal block to avoid drive damage or injury when EM522 CAN is powered on 2 Don t connect the power supplier to motor connection terminal and don t connect VDC and GND inversely otherwise drive will be damaged 3 1 3 Connector P3 CAN port of EM522 CAN adopt shield doublet RJ45 terminal standa...

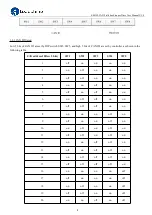
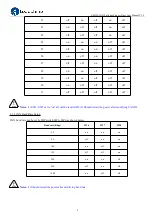
Страница 9: ...w 5 bits SW1 SW2 SW3 SW4 SW5 1 off on on on on 2 on off on on on 3 off off on on on 4 on on off on on 5 off on off on on 6 on off off on on 7 off off off on on 8 on on on off on 9 off on on off on 10 on off on off on 11 off off on off on 12 on on off off on 13 off on off off on 14 on off off off on 15 off off off off on 16 on on on on off 17 off on on on off 18 on off on on off 19 off off on on of...

Страница 10: ...off off 30 on off off off off 31 off off off off off Notice Notes 1 SW1 SW5 set to on all will be invalid ID 2 Should restart the power after modifying CAN ID 3 2 2 CAN Baud Rate Setup CAN baud rate can be set by DIP switch SW6 SW8 as shown below Baud rate Kbps SW6 SW7 SW8 20 on on on 50 off on on 100 on off on 125 off off on 250 on on off 500 off on off 1000 on off off Notice Notes 1 Should resta...

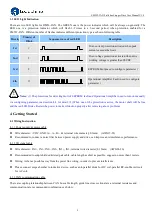
Страница 11: ...r read section 4 4 for detail 2 When one of the protection is active the motor shaft will be free and the red LED blinks Restart the power to make it function properly after removing above problems 4 Getting Started 4 1 Wiring Instruction 4 1 1 Power supply motor cable Wire diameter VDC GND A A B B terminal wire diameter 0 3mm2 AWG15 22 Recommend to connect a noise filter between power supply and ...

Страница 12: ...00 Kbit s 600 1000 26 0 75 0 8 150 300 50 Kbit s Notice Notes 1 shielding and twisted pair cable is suggested 4 1 4 Terminal resistance Note Terminal resistance It must to connect an 120Ω resistance if the drive on the end of bus and customer need to order the terminal resistance as shown right 4 2 Typical Connection EM522 CAN adopt CANopen protocol typical schematic wiring topology structure as b...

Страница 13: ...rives 4 3 Motor Connection The EM522 CAN can drive 2 phase and 4 pahse bipolar hybrid stepper motors with 4 6 or 8 wires frame size from NEMA17 4 3 1 Connections of 4 lead Motor The 4 lead motors are the least flexible and easy to connect And the Speed torque of motor depends on winding inductance The output current from drive that is multiply the specified phase current by 1 4 to determine the pe...

Страница 14: ...he peak output current Figure 5 6 lead motor half coil higher speed connections 2 Full Coil Configuration The full coil configuration on a six lead motor should be used in applications where higher torque at lower speed is desired This configuration is also referred to as full copper In full coil mode the motors should be run at only 70 of their rated current to prevent overheating Figure 6 6 lead...

Страница 15: ...n the case when only normal switching power supplies are available it is important to use OVERSIZE high current output rating power supplies for example using a 4A power supply for 3A stepper motor to avoid problems such as current clamp On the other hand if unregulated supply is used one may use a power supply of lower current rating than that of motor typically 50 70 of motor current The reason ...

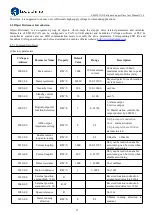
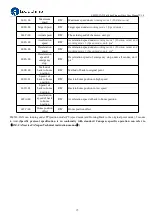
Страница 16: ...le of motor 2002 00 Stand by time R W S 500 100 10000 unit ms 2003 00 Standby current percentage R W S 50 0 100 unit 2005 01 Digital output IO function Selection R W S 1 0 32768 1 Alarm output 4 Arrive output 16 Master station controls the output port set by 60FEH 2008 00 ALM output impedance setting R W S 0 0 1 0 Optocoupler conduction when alarm activated 1 Optocoupler shut off when alarm activa...

Страница 17: ...values R W S 0 0 100 Second low speed resonance point inhibition amplitude values 2064 00 Second anti vibration phase A R W S 0 0 255 Second low speed resonance point inhibition phase A 2065 00 Second anti vibration phase B R W S 0 0 255 Second low speed resonance point inhibition phase B 2066 00 Third anti vibration amplitude values R W S 0 0 100 Third low speed resonance point inhibition amplitu...

Страница 18: ...ital input IN3 function selection R W S 4 0 32768 1 Home signal 2 Positive limit 4 Negative limit 32768 Emergency stop 2153 01 Digital input IN1 filter time R W S 1000 50 60000 unit us 2153 02 Digital input IN2 filter time R W S 1000 50 60000 unit us 2153 03 Digital input IN3 filter time R W S 1000 50 60000 unit us 2154 00 Level polarity of digital inputs IN1 IN2 IN3 R W S 0 0 7 0 Low level Optoco...

Страница 19: ... port 1010 01 Save configuration R W Write 1702257011 0x65766173 to save configuration 1011 01 Reset to factory R W Write 1684107116 0x64616F6C to reset to factory 2093 00 Eliminate malfunction records R W Write 1 to eliminate alarm records Notice Notes 1 R W S means the parameter can be read wrote saved 4 5 2 Model and control CANopen Address Name property Description 6040 00 Control word R W Con...

Страница 20: ...emergency stop R W Deceleration speed of emergency stop under all modes unit p s2 6098 00 Method of back to home position R W Method of back to original point 6099 01 Speed1 of back to home position R W Back to home position in high speed 6099 02 Speed1 of back to home position R W Back to home position in low speed 609A 00 Acceleration speed of back to home position R W Acceleration speed of back...

Страница 21: ...EM522 CAN Field bus Stepper Drive User Manual V1 0 16 ...

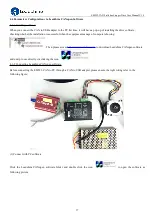
Страница 22: ...uccessful when the equipment manage of computer showing Then please access http www leadshine com to download Leadshine CANopen software and unzip to use directly via clicking the icon 4 6 2 Connecting Leadshine CANopen software Before connecting the EM522 CAN to PC through a CAN to USB adapter please ensure the right wiring refer to the following figure 1 Connect with PC software Click the Leadsh...

Страница 23: ...d CAN Index on the adapter and the design of Leadshine CANopen software is based on the USB_ CAN2 device After setting the step in the above picture then clicking the button of Connect Open another interface as following picture please select the correct CAN ID setting by SW1 SW5 when showing the step character string it means that the EM522 CAN connect with PC software successfully ...

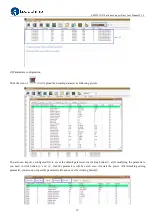
Страница 24: ...r as following picture You also can import a configured file to cover the default parameter via clicking button after modifying the parameters you need to click button and then the parameters will be saved even if restart the power After finishing setting parameter you also can export the parameters file and save it by clicking button ...

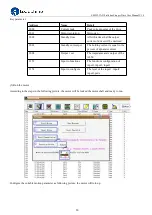
Страница 25: ...nt per The holding current is equal to the percent of dynamic current 2008 Output 1 set The impedance state output of the ALM 2152 Input io functions The functions configuration of input1 input2 input3 2154 Input io configure The level of the input1 input2 input3 ports 3 Run the motor According to the steps in the following picture the motor will be locked the motor shaft and ready to run Configur...

Страница 26: ...uto tuning the motor to output its optimal performance but if you prefer to tuning the Kp and Ki of current loop through manual operation please set the 2013H to 0 and click the Click icon to open this window You can monitor the current wave in this window to check the performance ...

Страница 27: ...rs need attention when using EM522 CAN In order to make the users can understand conventional method of DM CAN series products in shortest time If you need to know the DM CAN series more detailed CANopen technical content please refer to DM CAN series CANopen Technical instruction manual 5 1 EM522 CAN Communication Standard Follow CAN 2 0A standard Conform to CANopen standard protocol DS 301 V4 02...

Страница 28: ...is shown as follow Communication object dictionary such as 1000H 1400H 1A00H etc Please refer to DM CAN series CANopen technical instruction manual for detailed specification The drive manufacturers custom object dictionary such as 2000H 2130H please refer to chapter 4 for relevant information of parameters Part of CIA DSP402 object dictionary 5 2 2 Process data objects PDO 1 Definition PDO Can be...

Страница 29: ... time position data So you need to configure a prohibit time the changing data can be updated in some time setting by prohibit time not transmitting repeatedly to reduce network load Recommended to adopt synchronous PDO mode in case of the real time data is necessary but in the case of that he real time request is necessary to adopt asynchronous PDO mode and set suitable prohibit time to protect t...

Страница 30: ... of data transmission less than 4 bytes can transmit SDO data without segment this kind of transmission mode is suitable for most of the objects If the data is more than 4 bytes must adopt segmented transmission mode For a long packet it has low efficiency if adopting segmented transmission but block transmission has a better efficiency 4 The definitions of client and server SDO Visitors are refer...

Страница 31: ...EM522 CAN Field bus Stepper Drive User Manual V1 0 26 21 22 23 26 27 30 ...

Страница 32: ...ree segments according to the different initial position Initial position 1 between home switch and positive limit Sliding block move from the right of the home switch to the left after meeting the home switch a Under No 28 homing mode the sliding block will stop immediately b Under No 27 homing mode the sliding block will slow down to 0 then turn right to stop immediately when meeting the home sw...

Страница 33: ...g mode the block will slow down to 0 then turn left to stop immediately when meeting home switch again The rest of the various tracks of homing mode please refer to definition of CANopen DSP 402 standard protocol The mode of comprehending is similar with above figures 6 Trouble Shooting Description Likely cause Recommended Actions Motor is not rotating Wrong wiring Check power motor and communicat...

Страница 34: ...upply voltage or output current setting is too small Appropriately increase voltage or current Fail to connect with master station Communication error Refer to the manual of master station alarm and processing Check the communication cable is normal or not and remember plug a terminal resistance in the end node of the network ...

Страница 35: ...cation or misuse or operation beyond the electrical specifications of the product and or operation beyond environmental specifications for the product Obtaining Warranty Service To obtain warranty service please contact your seller to obtain a returned material authorization number RMA before returning product for service Shipping Failed Products If your product fail during the warranty period ple...

Страница 36: ... All 86 755 2641 7674 for Asia Australia Africa areas 86 755 2640 9254 for Europe America areas Fax 86 755 2640 2718 Email sales leadshine com Technical Support Tel 86 755 2641 8447 and 86 755 2647 1129 Fax 86 755 2640 2718 Email tech leadshine com Leadshine U S A Address 26050 Towne Centre Dr Foothill Ranch CA 926 USA Tel 1 949 608 7270 Fax 1 949 608 7298 Web http www leadshineusa com Email sales...

Отзывы: