Leader Half Pint Скачать руководство пользователя страница 17

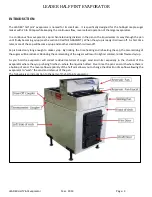
LEADER HALF PINT EVAPORATOR 


LEADER Half Pint Evaporator 

Year:  2014 

Page:  17 

HYDROMETER FUNCTION 

A hydrometer works based on the density of the maple syrup.  There are two scales on the hydrometer; Brix and Baume.  
The Brix scale indicates the percentage of sugar in the maple syrup.  The Baume scale is a measure of how dense the 
maple syrup is related to the density of water.  The correct density for maple syrup is a minimum of 66% sugar 
(66°Brix/35.6°Baume).  You will need to verify your state’s rules and adjust your readings as necessary.  The hydrometers 
supplied by LEADER EVAPORATOR have been calibrated at two temperatures; 60°F Cold Test (66.9°Brix/36°Baume) and 
211°F Hot Test (59.1°Brix/32.1°Baume).  The maple syrup is expected to be at the upper temperature when it is 
measured immediately after being drawn off the evaporator.   

NOTE:  Hydrometers from Leader Evaporator by law are calibrated by the State of Vermont.  .  The HOT and COLD test 
lines should be considered guidelines.  Hydrometers should only be used by reading temperature and Brix/Baume 
readings. 

USE OF A HYDROMETER 

NOTE:  Hydrometers are very fragile.  Two most susceptible points of damage during use are the bottom and where the 
stem meets the body.  Take extreme care when handling a hydrometer. 

As hydrometers are susceptible to damage it is recommended the sugar house have a spare.   

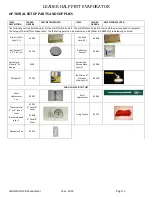
PREPARING A NEW HYDROMETER FOR USE: 

1.


Unpack the hydrometer from its tube or box. 

2.


Carefully inspect the hydrometer for any breakage.  If you 
suspect any cracks, fill your test cup with hot water and 
immerse the hydrometer.  If it leaks then it is damaged and 
can’t be used. 

3.


Place the hydrometer in its original container seated in the 
packaging and mark the container where the bottom of the 
hydrometer aligns. 

4.


Mark the container at the same lines as the HOT and COLD 
test lines in the hydrometer.  When using the hydrometer in 
the future these lines are a check to ensure the scale inside 
the hydrometer has not moved. 

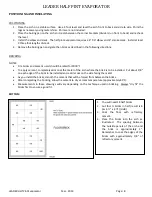
USING THE HYDROMETER 

1.


Prior to using the hydrometer for the day, place it into its original container and check the hydrometer lines 
against the lines you marked on the container.  If they do not match then replace the hydrometer. 

2.


Ensure the hydrometer is clean prior to every use.  Accumulated material on the hydrometer will cause the 
hydrometer readings to be incorrect as it will have extra weight and not float as easily. 

3.


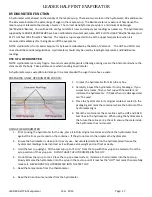
Hold the test cup upright.  Fill the test cup up to ½” to ¾” from the top with the syrup to be tested or from the 
syrup section of the syrup pan.   DO NOT HAVE THE HYDROMETER IN THE CUP. 

4.


Do not allow the syrup to cool.  Place the cup on a level surface.  Immerse a thermometer into the test cup.  
Slowly immerse the hydrometer into the syrup in the test cup until it reaches the “HOT” test mark then carefully 
release it.  NEVER DROP THE HYDROMETER INTO THE TEST CUP. 

5.


Read the temperature from the thermometer. 


6.


Read the Brix or Baume number from the hydrometer. 

Содержание Half Pint

Страница 1: ...Leader Evaporator Co Inc 49 Jonergin Drive Swanton Vermont 05488 802 868 5444 www leaderevaporator com Leader Half Pint Evaporator...

Страница 2: ...ING AND INSULATING 8 POSITIONING 8 BRICKING 8 SETTING THE PANS 11 INSTALLING THE DRAW OFF VALVES 11 First Boil 12 OPERATION OF THE HALF PINT EVAPORATOR 13 THEORY OF OPERATION 13 GRADIENT 13 MAKING SYR...

Страница 3: ...ll become syrup and another small batch is drawn off Sap is boiled only long enough to make syrup By limiting the time heating and reheating the sap the caramelizing of the sugars will be reduced Redu...

Страница 4: ...IPTION PHOTO Front 1 Back 1 Left 1 Right 1 Bottom 1 G Grate Rail 2 Draft Latch Bolt and Nut 10 24X 1 1 Draft Latch 1 I Corner Bracket 2 J Corner Bracket 2 J 3 Holed Steel Legs 4 H Grate Assembly 1 Mac...

Страница 5: ...e Half Pint Evaporator The following parts can be ordered as a kit Order 302435 of individually as listed Fire Brick Full qty 32 65003 Fire Brick qty 63 65006 Rail Gasket X 2 x 25 roll 65154 Refractor...

Страница 6: ...holes are only in the bottom flange b Flanges on the bottom of the sides are mounted under bottom panel c Mount bolts in only the two middle holes of each side 2 Raise and support the arch up approxi...

Страница 7: ...ets with 20X bolts and matching nuts with the bolt heads on the outside of the arch a Bracket I to the front right and the back left b Bracket J to the front left and the back right Brackets must be i...

Страница 8: ...ould be rated for 3000 F To apply cement completely skim coat the metal of the arch where the brick is to be installed Put about 1 8 on each edge of the brick to be installed and a skim coat on the si...

Страница 9: ...the arch as illustrated Remember to coat the edges of the bricks with approximately 1 8 of refractory cement 5 The end bricks of the bottom row should slide behind the bottom end full bricks on each...

Страница 10: ...the bolts If the bricks still do not fit trim the length of the brick 7 The first row of bricks toward the arch front should be up against the bolts in the side of the arch FRONT 1 You will need 2 fu...

Страница 11: ...n tape 4 Screw the supplied brass lead free ball valve onto one end of the stainless steel nipple The assembly is referred to as the reservoir pan faucet INSTALLING THE DRAW OFF VALVES It is recommend...

Страница 12: ...first boil is done to remove any residual materials from the pans and to season the bricking and insulation 1 Prepare 15 gallons of a baking soda and water mix in proportion as follows a 1 1 4 ounce o...

Страница 13: ...orator so the less concentrated liquid sap will push its way toward the more concentrated liquid In an evaporator you will be concentrating the percent of sugar from the incoming sap approximately 2 t...

Страница 14: ...ood When Fire consistently with small amounts of wood to maintain the level of heat Use a timer to stay on schedule for the firings 6 to 10 minutes depending on wood quality size and desired intensity...

Страница 15: ...t Therefore the following is the recommended method for determining the draw off temperature a The sap will turn an amber or darker amber color b The temperature of the sap will reach 7 0 to 7 5o F ab...

Страница 16: ...2 Empty the reservoir pan into a container 3 Turn the reservoir pan 180 and move to 6 from the rear of the boiling pan 4 Refill the reservoir pan level to 2 3 to 5 Fill the boiling pan to the operati...

Страница 17: ...FOR USE 1 Unpack the hydrometer from its tube or box 2 Carefully inspect the hydrometer for any breakage If you suspect any cracks fill your test cup with hot water and immerse the hydrometer If it le...

Страница 18: ...yrup when measured immediately after draw off from the evaporator When checking syrup at 211 F the syrup is at the proper concentration when the reading line is at the Hot Test line If the Hot Test Li...

Страница 19: ...table the syrup is light and will need to be boiled more 8 After reading the hydrometer remove it from the test cup and rinse it with either hot water or hot sap to ensure it is clean Dump the conten...

Страница 20: ...otective gloves brush the loose scale f If scale is removed flush the pan with unsoftened non chlorinated well or spring water If the scale is thick you may need to continue soaking the solution in th...

Отзывы: