LCT Eyegaze Edge Скачать руководство пользователя страница 32


32

MANUAL CONTROLS FOR EYEGAZE 

 
NOTE: In Section 5, “you” is understood to be the person assisting the user.  
 
The keyboard is used mostly for editing programs or for client vvaluations.


4.1 

ESC (Escape) 

 
From the Main Menu, touching the words “Main Menu” at the top of the screen will escape back to the 
desktop.  

 
4.2 

Function Key Manual Controls 

 
In the Eyegaze programs, the Function Keys on the manual keyboard have specific Eyegaze functions. 
The functions are labeled on the keyboard. 


Note: new keyboards require you to press the” fn” key along with the function key in order to 
make a selection

 
F1 

Re-Calibrate 

Pressing the F1 function key from an Eyegaze menu screen causes the System to return to the 
calibration procedure. Manually using the F1 key has exactly the same effect as visually pressing the 
“Re-calibrate” key from the Main Menu. After the re-calibration procedure is complete, the Eyegaze 
System returns to the same screen from which the F1 key was pressed.  
 
F2 

Skip Calibration Point 

Pressing the F2 function key during the calibration procedure causes the calibration program to skip the 
present point. Pressing F2 is particularly useful if the System does not respond when the user looks 
down at the camera to begin the calibration procedure.  
 
F3 

Accept Calibration 

If the user did not get a sufficiently accurate calibration to be accepted automatically, (.25 inches 
[.63cm] or less) you can manually accept the calibration by pressing the F3 function key. It can be 
pressed during the calibration point re-takes or while the screen displays its message to restart the 
calibration. The Eyegaze Edge then accepts that calibration and moves into the Main Menu. Using the 
F3 key enables users with limited eye control to get into the Eyegaze Edge. Using the “looser” 
calibration, however, decreases the accuracy of the System’s response, and will make programs with 
smaller keys, such as the Keyboard program, difficult of the user to operate. (See Section 1.3.14 
“Accepting Calibrations.”) 
 
F4 

Retrieve Saved Calibration 

The F4 function key can be pressed at the beginning of the calibration procedure to recall the 
calibration that was previously saved. The F4 key, in combination with the F5 key (Save Calibration), 
makes it possible to bring back a stored calibration for use. Remember, however, that 

the camera 

angle and focus right must be adjusted to match the position and focus setting used when the 
calibration was originally saved.

 For more information on setting the focus right and camera position, 

see Section 1.3.16 “Saving a Calibration for Later Retrieval.” 
 
F5 

Save Calibration 

Pressing the F5 function key during the operation of any Eyegaze program saves the current calibration 
for later recall. As discussed in Section 1.3.16 “Saving a Calibration for Later Retrieval,” it is necessary 
when saving a calibration to note the camera angle and focus setting so these can be restored when 

Содержание Eyegaze Edge

Страница 1: ...s 12 2 3 Keyboard 12 2 3 1 Special Features in the Keyboard Program 14 2 3 2 Keyboard Control Screen 15 2 4 Eyegaze Edge Links for Computer Access option 16 2 4 1 Mouse Control in the Computer Access...

Страница 2: ...rnea The bright corneal reflection is often referred to as the glint spot Sophisticated image processing software in the system continually tracks the center of the pupil and the center of the glint s...

Страница 3: ...be positioned between 18 30 inches from the screen typically about 24 inches depending on his personal preference The screen should always be parallel to his face with the top edge typically at aroun...

Страница 4: ...n when the image of the eye is centered and the tracking indicator dots are present 1 3 3 Adjusting the Camera The camera angle and the focus range must be adjusted so a clear close up image of the us...

Страница 5: ...n Procedure It is important to notice which eye the camera is focused on since the Eyegaze Edge will not be able to predict accurately if the user switches eyes without recalibrating The eye image dis...

Страница 6: ...e center of the icon when it appears on the screen then follows it as it moves to a new location He may relax and take his time The calibration icon will not move until the user has looked at it in it...

Страница 7: ...n vs Standard Calibration Simple Calibration Standard Calibration 5 Point 9 Points Larger points Smaller points Must fix gaze for 1 4 second on each point Must fix gaze for half a second on each point...

Страница 8: ...nd F2 on the manual keyboard The icon will move to its next location and calibration may continue Skipping 2 locations should not overly affect the accuracy assuming the user can successfully fix his...

Страница 9: ...oing well it can be restarted at any time by pressing the Re calibrate key F1 on the manual keyboard 1 4 9 Terminating the Calibration Procedure The calibration procedure can be terminated at anytime...

Страница 10: ...he camera focus or angle was inadvertently changed recalibrate 1 4 12 Bringing up the Calibration Program from Other Screens If the System is in an Eyegaze program press the Re Calibrate key F1 on the...

Страница 11: ...5 2 Eye World Grid user feedback In Grid programs there are several options for user feedback but not all of them are ideal when using your eyes Your system will arrive set with a reasonable choice Fo...

Страница 12: ...screens use a simple large key format with 14 phrases and two control keys on each screen Looking at a key causes its phrase to be verbalized The Pause key temporarily deactivated the Phrases keys to...

Страница 13: ...eyboard key dimensions are 1 1 4 inch by 1 1 2 inch The Qwerty keyboard has a key layout that is familiar to anyone who has used a standard typewriter or computer keyboard Its visual keys are 1 inch s...

Страница 14: ...ft Deleting Characters To delete characters in the text use the following keys Backspace BACK Deletes the character prior to the cursor Delete DEL Deletes the character at the cursor Paragraph Control...

Страница 15: ...file name If you wish to save the new text in a different file type in the new file name and then activate the Save key To exit the Save File screen look at the Out key You can exit the screen without...

Страница 16: ...ing Up the Keyboards Type Key Looking at the Type key will bring the selected keyboard up on the screen Print Key If you have a printed connected to your Eyegaze Edge activating the Print key will pri...

Страница 17: ...activating the Mou key on any one of the Eyegaze keyboards in the Computer Access program Positioning the Cursor The cursor on your computer s monitor is put into motion by selecting one of the eight...

Страница 18: ...ct he wants to move presses a mouse button moves the cursor while holding the button down and releases the button when the cursor is at the location where he wishes to drop the object The Eyegaze Syst...

Страница 19: ...a start in one of the Eyegaze keyboard screens b set the keyboard shift state by visually activating the shift or shift lock key the shift key lights up c go into the Mouse Control screen and d activa...

Страница 20: ...ly not necessary to update your Grid software 3 2 Email account Settings Grid 3 allows you to send and receive email using your existing email account Click on the Menu bar then Settings Accounts and...

Страница 21: ...ps toggle is on You may also need to enable IMAP on your account You can find this toggle on your Gmail settings page 3 2 2 Yahoo specific settings To use a Yahoo email account you may need to allow l...

Страница 22: ...me information from your email provider which can normally be found in the Support section of their web site look for email settings or setting up your email client You may also need to enable IMAP fo...

Страница 23: ...ing mail server SMTP smtp aol com Port 587 or 465 Use SSL On Use authentication On Use incoming username and password On 3 2 6 Firewall settings for email Domains and ports are shown when configuring...

Страница 24: ...w you how to connect your phone manage contacts highlight grid sets that you can use and answer some common questions What can you do when you connect a smartphone to Grid Send and receive calls via G...

Страница 25: ...e must support Bluetooth Phones supported We have tested with a wide range of smartphones both old and new to make sure that the phone feature works as expected however there are many different device...

Страница 26: ...26 HOW TO CONNECT YOUR PHONE Step 1 Check you have Bluetooth switched on both on your phone and your communication aid Step 2 Open Grid select the menu and select Settings Phone...

Страница 27: ...nnect next to your chosen phone s name to begin pairing Your phone will display a notification to confirm often with a pin code Select Confirm or Yes to continue pairing Tip Your communication aid may...

Страница 28: ...r device like headphones or a Bluetooth speaker Microphone Choose where you want to send audio from Your device will often have a microphone built in and you can also select any connected headsets No...

Страница 29: ...a name image phone number and email address Where can I add or remove contacts Contacts are accessed in Menu Settings Contacts Here you can select Add to make a new contact or highlight an existing c...

Страница 30: ...needed If you previously used CallCenter and JustRemotePhone and you do not use them for anything outside of Grid you can remove them What versions of Windows are supported Versions of Windows 8 1 an...

Страница 31: ...g as your phone supports Android 6 or iOS13 you should be fine I use Grid for iPad can I use this feature No this is only available for Grid on Windows My phone is neither Android or iOS will it work...

Страница 32: ...cepted automatically 25 inches 63cm or less you can manually accept the calibration by pressing the F3 function key It can be pressed during the calibration point re takes or while the screen displays...

Страница 33: ...hey are looking at inactive regions of the screen but does appear when their eye position is about to initiate an Eyegaze action With the locator dot always on you can see where the user is looking wh...

Страница 34: ...5 USING THE EYEGAZE EDGE SETTINGS PROGRAM Note The Settings program is currently for use by the person assisting the user Open the Eyegaze Edge Settings program with the icon on the Eyegaze Edge Deskt...

Страница 35: ...o see the screen clearly 6 2 Select a Site for the Eyegaze Edge 1 Choose a site away from uncovered windows and sources of bright incandescent light 2 Choose a sturdy table desk or over bed table to p...

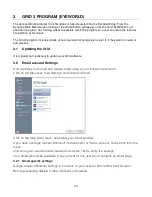
Страница 36: ...36 6 4 Assembling Eyegaze Edge Tablet...

Страница 37: ...ny product that has been transferred and no longer own by the Customer Any materials provided by Customer from a third party vendor or as customer furnished materials are excluded from this warranty a...

Отзывы: