LCT Eyegaze Edge Скачать руководство пользователя страница 17


17

to control.  When you type on a Computer Access keyboard, the characters you type will appear at the 
top of the Eyegaze keyboard screen 

as well as 

into your selected program on the computer you are 

interfacing.  As you are writing a document it is not necessary to continuously look at your computer’s 
monitor to review the text. The last 8 to 10 lines you have typed will appear above the keyboard display 
on the Eyegaze control screen.  
 
In the Computer Access program, the various special keys (Function, Control, Alt, Command, etc.) on 
the Eyegaze keyboard will take on the meanings defined by the application program you are running on 
your computer. 
 
Looking at the “Out” key brings up the Keyboard Control screen, which allows you to select alternative 
keyboards, adjust the gaze duration for faster or slower key activation, print, clear the screen of text or 
exit back to the Main Menu. The Keyboard Control screens on the Computer Access program are 
operated the same as those in the Keyboard program. (See Section 2.3.2 “Keyboard Control Screen”.) 
The “Clear” key will clear the text off of the Eyegaze screen, but not off of the screen on your computer. 
The “Print” key will print the text as it appears on the Eyegaze screen, not as it appears on your 
computer. (Use the print command for the program you are running on your PC or Mac to print its text).  
 

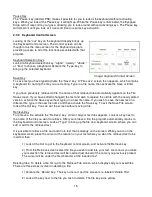
2.4.1  Mouse Control in the Computer Access Program 

 
Visual mouse control of your PC or Mac is done through the 
Mouse Control screen. The user brings up the Mouse Control 
screen by activating the “Mou” key on any one of the Eyegaze 
keyboards in the Computer Access program. 


Positioning the Cursor 

The cursor on 

your c

omputer’s monitor is put into motion by selecting one of the eight arrow keys 

labeled “Move Mouse” on the 

Eyegaze

 system’s Mouse Control screen. The direction the cursor will 

move (up, down, right, left, and four diagonals, which are not labeled) is determined by which key you 
activate.  
 
There are two ways to control the cursor motion: the Speed and the Step modes. A user switches 
between the Speed and Step modes by activating the Mode key on the Mouse Control screen. 
Activating the mode key toggles the mode between Speed and Step modes. The name of the mode 
that is active at any time is displayed above the Mode key. 
 
Speed Mode 
To put your computer’s cursor in motion, look at the Move Mouse key that corresponds to the direction 
you want the cursor on your computer to go. When the directional key is activated it will turn blue. 
When it turns blue, look over at your computer’s monitor and watch the cursor until it gets to a point 
where you want it to stop. Immediately look back at the Eyegaze screen to stop the cursor. The entire 
Eyegaze screen has become a giant STOP button. The cursor will not move again until you activate 
another arrow key. 
 
To adjust the speed of the mouse cursor, select one of the six keys labeled “Cursor Speed / Step Size.” 
Key 1 gives the slowest speed, allowing the cursor positioning to a single pixel. Key 6 gives the fasters 
speed, allowing the cursor to traverse the entire screen in little more than a second. After selecting the 
cursor speed, the value for the speed remains the same until you change it by selecting another Cursor 

Image: Mouse Control Screen 

Содержание Eyegaze Edge

Страница 1: ...s 12 2 3 Keyboard 12 2 3 1 Special Features in the Keyboard Program 14 2 3 2 Keyboard Control Screen 15 2 4 Eyegaze Edge Links for Computer Access option 16 2 4 1 Mouse Control in the Computer Access...

Страница 2: ...rnea The bright corneal reflection is often referred to as the glint spot Sophisticated image processing software in the system continually tracks the center of the pupil and the center of the glint s...

Страница 3: ...be positioned between 18 30 inches from the screen typically about 24 inches depending on his personal preference The screen should always be parallel to his face with the top edge typically at aroun...

Страница 4: ...n when the image of the eye is centered and the tracking indicator dots are present 1 3 3 Adjusting the Camera The camera angle and the focus range must be adjusted so a clear close up image of the us...

Страница 5: ...n Procedure It is important to notice which eye the camera is focused on since the Eyegaze Edge will not be able to predict accurately if the user switches eyes without recalibrating The eye image dis...

Страница 6: ...e center of the icon when it appears on the screen then follows it as it moves to a new location He may relax and take his time The calibration icon will not move until the user has looked at it in it...

Страница 7: ...n vs Standard Calibration Simple Calibration Standard Calibration 5 Point 9 Points Larger points Smaller points Must fix gaze for 1 4 second on each point Must fix gaze for half a second on each point...

Страница 8: ...nd F2 on the manual keyboard The icon will move to its next location and calibration may continue Skipping 2 locations should not overly affect the accuracy assuming the user can successfully fix his...

Страница 9: ...oing well it can be restarted at any time by pressing the Re calibrate key F1 on the manual keyboard 1 4 9 Terminating the Calibration Procedure The calibration procedure can be terminated at anytime...

Страница 10: ...he camera focus or angle was inadvertently changed recalibrate 1 4 12 Bringing up the Calibration Program from Other Screens If the System is in an Eyegaze program press the Re Calibrate key F1 on the...

Страница 11: ...5 2 Eye World Grid user feedback In Grid programs there are several options for user feedback but not all of them are ideal when using your eyes Your system will arrive set with a reasonable choice Fo...

Страница 12: ...screens use a simple large key format with 14 phrases and two control keys on each screen Looking at a key causes its phrase to be verbalized The Pause key temporarily deactivated the Phrases keys to...

Страница 13: ...eyboard key dimensions are 1 1 4 inch by 1 1 2 inch The Qwerty keyboard has a key layout that is familiar to anyone who has used a standard typewriter or computer keyboard Its visual keys are 1 inch s...

Страница 14: ...ft Deleting Characters To delete characters in the text use the following keys Backspace BACK Deletes the character prior to the cursor Delete DEL Deletes the character at the cursor Paragraph Control...

Страница 15: ...file name If you wish to save the new text in a different file type in the new file name and then activate the Save key To exit the Save File screen look at the Out key You can exit the screen without...

Страница 16: ...ing Up the Keyboards Type Key Looking at the Type key will bring the selected keyboard up on the screen Print Key If you have a printed connected to your Eyegaze Edge activating the Print key will pri...

Страница 17: ...activating the Mou key on any one of the Eyegaze keyboards in the Computer Access program Positioning the Cursor The cursor on your computer s monitor is put into motion by selecting one of the eight...

Страница 18: ...ct he wants to move presses a mouse button moves the cursor while holding the button down and releases the button when the cursor is at the location where he wishes to drop the object The Eyegaze Syst...

Страница 19: ...a start in one of the Eyegaze keyboard screens b set the keyboard shift state by visually activating the shift or shift lock key the shift key lights up c go into the Mouse Control screen and d activa...

Страница 20: ...ly not necessary to update your Grid software 3 2 Email account Settings Grid 3 allows you to send and receive email using your existing email account Click on the Menu bar then Settings Accounts and...

Страница 21: ...ps toggle is on You may also need to enable IMAP on your account You can find this toggle on your Gmail settings page 3 2 2 Yahoo specific settings To use a Yahoo email account you may need to allow l...

Страница 22: ...me information from your email provider which can normally be found in the Support section of their web site look for email settings or setting up your email client You may also need to enable IMAP fo...

Страница 23: ...ing mail server SMTP smtp aol com Port 587 or 465 Use SSL On Use authentication On Use incoming username and password On 3 2 6 Firewall settings for email Domains and ports are shown when configuring...

Страница 24: ...w you how to connect your phone manage contacts highlight grid sets that you can use and answer some common questions What can you do when you connect a smartphone to Grid Send and receive calls via G...

Страница 25: ...e must support Bluetooth Phones supported We have tested with a wide range of smartphones both old and new to make sure that the phone feature works as expected however there are many different device...

Страница 26: ...26 HOW TO CONNECT YOUR PHONE Step 1 Check you have Bluetooth switched on both on your phone and your communication aid Step 2 Open Grid select the menu and select Settings Phone...

Страница 27: ...nnect next to your chosen phone s name to begin pairing Your phone will display a notification to confirm often with a pin code Select Confirm or Yes to continue pairing Tip Your communication aid may...

Страница 28: ...r device like headphones or a Bluetooth speaker Microphone Choose where you want to send audio from Your device will often have a microphone built in and you can also select any connected headsets No...

Страница 29: ...a name image phone number and email address Where can I add or remove contacts Contacts are accessed in Menu Settings Contacts Here you can select Add to make a new contact or highlight an existing c...

Страница 30: ...needed If you previously used CallCenter and JustRemotePhone and you do not use them for anything outside of Grid you can remove them What versions of Windows are supported Versions of Windows 8 1 an...

Страница 31: ...g as your phone supports Android 6 or iOS13 you should be fine I use Grid for iPad can I use this feature No this is only available for Grid on Windows My phone is neither Android or iOS will it work...

Страница 32: ...cepted automatically 25 inches 63cm or less you can manually accept the calibration by pressing the F3 function key It can be pressed during the calibration point re takes or while the screen displays...

Страница 33: ...hey are looking at inactive regions of the screen but does appear when their eye position is about to initiate an Eyegaze action With the locator dot always on you can see where the user is looking wh...

Страница 34: ...5 USING THE EYEGAZE EDGE SETTINGS PROGRAM Note The Settings program is currently for use by the person assisting the user Open the Eyegaze Edge Settings program with the icon on the Eyegaze Edge Deskt...

Страница 35: ...o see the screen clearly 6 2 Select a Site for the Eyegaze Edge 1 Choose a site away from uncovered windows and sources of bright incandescent light 2 Choose a sturdy table desk or over bed table to p...

Страница 36: ...36 6 4 Assembling Eyegaze Edge Tablet...

Страница 37: ...ny product that has been transferred and no longer own by the Customer Any materials provided by Customer from a third party vendor or as customer furnished materials are excluded from this warranty a...

Отзывы: