background image

LEAD PACK 14

(

LCG-B314IP)-User Manual


5


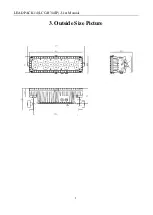
3.


Outside Size Picture   


Содержание LCG-B314IP

Страница 1: ...www lc group ca 1 USER MANUAL LEAD PACK 14 LCG B314IP 14x3W RGB 3 in 1 ...

Страница 2: ...side Size Picture 5 4 Main Function 6 5 DMX Control Function 7 6 Display Operation instruction 8 7 Infrared keyboard operation 13 8 Operating Control Instruction 14 9 XLR cable connecting 14 10 Trouble Shooting 15 Please read over this manual before operating the light ...

Страница 3: ...arance shows It adopts high power 3 in 1 LED which refers to single LED is made of R G B 3 IN 1 LED And long life span low consumption good color mixing effect and high brightness are the most prominent features Each kind of LED can be independently dimmed The built in program includes dimming strobe eotic gradual change fading and so on It uses power switch performs low weight and consumption sta...

Страница 4: ...re the use of voltage is in the range of the request technical parameter Before the installation please check the light s fasteners and mechanical structure have been received in good condition and appear no damage This light is designed for indoor use working temperature is lower than 40 degree The fixtures maybe mounted in any position provided there is adequate room for ventilation Make sure th...

Страница 5: ...LEAD PACK 14 LCG B314IP User Manual 5 3 Outside Size Picture ...

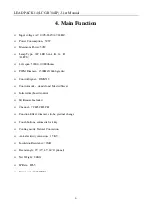
Страница 6: ...mmer 1500HZ 16666 grades Control Signal DMX512 Control mode stand alone Master Slaver Infrared keyboard control IR Remote Included Channel 7CH 5CH 3CH Function Effect dimmer strobe gradual change Touch buttons automatic lock key Cooling mode Natural Convection Anti electricity intension 1 5KV Insulation Resistance 2MΩ Beam Angle 25 15 45 60 Optional Net Weight 2 4KG IP Rate IP65 Dimension 30 8 9CM...

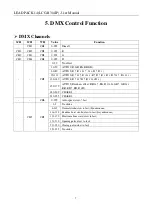
Страница 7: ... G B B 90 119 AUTO 3 R G R G R B R B B G B G 120 149 AUTO 4 R G B R G B 150 179 AUTO 5 Rainbow effect B BG BG B G G GR GR G R R RB RB R B 180 209 CHASE1 210 255 CHASE2 CH6 0 255 Auto speed slow fast CH5 CH7 0 5 No strobe 6 115 Normal strobe slow to fast Synchronous 116 130 Random burst strobe slow to fast Asynchronous 131 170 Electronic Sine wave slow to fast 171 210 Opening pulse slow to fast 211...

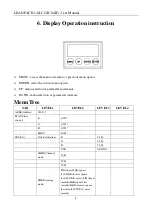
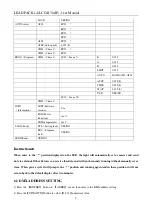
Страница 8: ...enu selection or parameters decrease Menu Tree TAB LEVEL1 LEVEL2 LEVEL3 LEVEL4 ADDR Address 001 512 STAT Static control R 0 255 G 0 255 B 0 255 SHUT 0 255 SET Set CAL Calibration R 0 255 G 0 255 B 0 255 USE YES NO CHMD Channel mode 7CH 5CH 3CH DIM Dimming mode LIN linear SQR square law ISQR inverse square law SCUR S curve LIN linear smooth SQR square law smooth ISQR inverse square law smooth SCUR ...

Страница 9: ...AD Load ST L Setting load YES NO PR L Program load YES NO SEND Send YES NO Instructions When enter to the position displayed on the LED the light will automatically set as master and send data to external Other fixtures can receive this data and will synchronously running without manually set as slave When power cycle it will jump to the position and running again And in these position it will not...

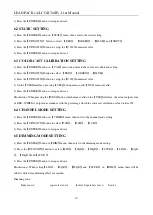
Страница 10: ... ENTER button to escape and save Illustrations When pressing the YES button which means valid on the USE interface the actual output value of RED WHITE is output in accordance with the percentage which the color cast calibration value divides 255 6 4 CHANNEL MODE SETTING 1 Press the ENTER button in CHMD menu then enter to the channel mode setting 2 Press the UP DOWN button to select 7CH 5CH 3CH 3 ...

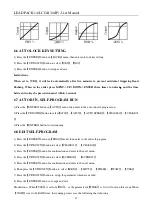
Страница 11: ...UP DOWN button to select AT01 AT05 AUTO SPEED CHASE01 CHASE02 3 Press the ENTER button to start running 6 8 EDIT SELF PROGRAM 1 Press the ENTER button in PROG menu then enter to the edit self program 2 Press the UP DOWN button to select CHASE01 CHASE02 3 Press the ENTER button for confirmation and enter to the next menu 4 Press the UP DOWN button to select SCENE01 SCENE25 5 Press the ENTER button ...

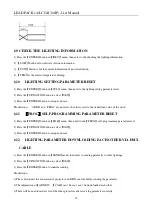
Страница 12: ...hers reset to the underlined value of the word 6 11 PROG SELF PROGRAMMING PARAMETER RESET 1 Press the ENTER button in PR L menu then enter to the PROG self programming parameter reset 2 Press the UP DOWN button to select YES 3 Press the ENTER button to escape and save 6 12 LIGHTING PARAMETER DOWNLOADING EACH OTHER VIA DMX CABLE 1 Press the ENTER button in SEND menu then enter to sending parameter ...

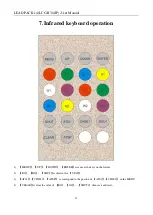
Страница 13: ...ared keyboard operation 1 MENU UP DOWN ENTER is same as the keys on the fixture 2 R1 B1 SHUT is shortcut for STAT 3 AT01 CHS01 ATSP is correspond to the positon of AT01 CHS01 in the MENU 4 CLEAR is clear the value of R1 G1 SHUT then save and reset ...

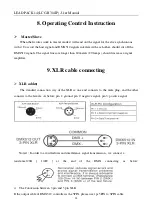
Страница 14: ... 20 lamps should increase a signal amplifier 9 XLR cable connecting XLR cable The standard connection way of the XLR is one end connects to the male plug and the other connects to the female As below pin 1 ground pin 2 negative signal pin 3 positive signal Noted In order to avoid failures and interference signal transmission we connect a resistance120Ω 1 4W at the end of the DMX connecting as belo...

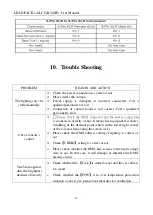
Страница 15: ...cted correctly or not It means having signal if it shows twinkling of the decimal point which in the lower right corner of the screen when exiting the screen saver Please check the DMX address setting of lighting is correct or not Check CHMD setting is correct or not Please check whether the DMX line is near to the high voltage wire or not In that case it will damage or interfere the DMX electric ...

Отзывы: