


55
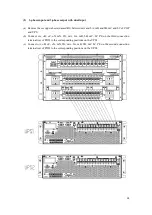
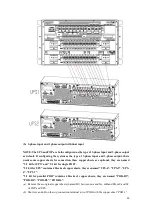
(f) Short oN, mN, and bN on the UPS connection terminal row with the copper sheet “UPS-7”.
(g) Short mA, bA, bB and bC on the UPS connection terminal row with the copper sheet “UPS-6”.
(h) Connect oA and oB on the bottom connection terminal row of POD to the copper sheet “UPS-
4” with cables.
(i) Connect
oC
, oN, mN, and bN on the bottom connection terminal row of POD to the copper
sheet “UPS-7” with cables.
(j) Connect mA, bA, bB and bC on the bottom connection terminal row of POD to the copper sheet
“UPS-6” with cables.
(k) Connect mB, mC and PE on the bottom connection terminal row of POD to the corresponding
positions on the UPS.
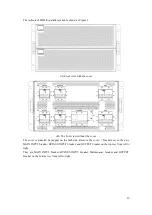
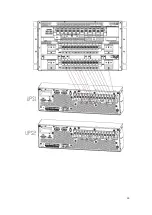
(4) 3-phase input and 1 phase output with dual input
NOTE: The UPS and COP are both configured as the type of 3-phase input and 3-phase output
as default. If configuring the system as the type of 3-phase input and 3-phase output, there
needs some copper sheets for connection, these copper sheets are optional, they are named
“3/1 kit for UPS” and “3/1 kit for single POD”.
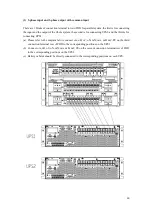
“3/1 kit for UPS” contains 4 blocks of copper sheets, they are named “UPS-4”, “UPS-5”, “UPS-
6”, “UPS-7”.
“3/1 kit for single POD” contains 4 blocks of copper sheets, they are named “POD-3”, “POD-
4”, “POD-5”, “POD-6”.
(a) Remove these original copper sheets (named B1) between mA and bA, mB and bB, mC and bC
of COP and UPS.
(b) Short oA and oB on the top connection terminal row of POD with the copper sheet “POD-3”.
Содержание DRAGON POWER PLUS 15
Страница 1: ...DRAGON POWER PLUS 15 15 KVA 60 KVA UPS USER MANUAL...
Страница 51: ...50 Interface Standard RS232 RS485 Dry Contact Option SNMP Parallel USB...
Страница 66: ...65...
Страница 67: ...www lbspower com Espa ol English...


