background image

24

OPERATION

The intelligent charger measures the charge level of the battery pack and charges the battery 
accordingly with the required current and voltage, based on battery temperature and voltage, this 
ensures maximum battery life. Charge the battery fully before storage.

A flashing red LED light on the charger indicates that the battery temperature is not within the 
charging temperature range of 4°C - 40°C. As soon as the permitted temperature is reached, the 

battery charger will automatically switch to charging.

If the temperature range is correct and flashing red LED light continues, then remove and reinstall 
the battery pack. If the LED status repeats a second time, try to charge another identical battery. 
If the battery charges normally, dispose of the defective battery pack (see Recycling and Disposal 
section).
If the flashing red light continues after installing the second battery (ensure the battery temperature 
is normal), the charger may be defective. Replace with a new one.

After continuous or repeated charging cycles without interruption, the charger may warm up. This 
is normal and does not indicate a technical defect of the battery charger.

Tensioning the Saw Chain 

(See Figs. 10-11)

Always check the saw chain tension before use, after first cuts and regularly during use, approx. 
every five cuts.

After initial operation, new chains can lengthen considerably. This is normal during the break-in 
period and the interval between future adjustments will lengthen quickly.

If a chain is TOO LOOSE or TOO TIGHT, the guide bar and saw bearings will wear more rapidly. A 

correctly tightened chain provides the best cutting characteristics and prolonged working life. The 

chain life mainly depends upon sufficient lubrication and correct tensioning.

■  Pull the chain brake handle up against the front handle to ensure that the chain brake has been 

released (Fig. 10).

■  Loosen the locking knob before adjusting the chain tension.
■  Tighten the saw chain by turning the chain adjustment ring clockwise. 

    To loosen the tension, turn the chain adjustment ring anti-clockwise (Fig. 10).

Always switch the product off and remove the battery pack before adjusting the saw chain tension. 
The cutting edges of the saw chain are sharp! Always wear protective gloves when handling saw 
chain.

WARNING

WARNING

With a new saw chain, you must readjust the chain tension after at least 5 cutting operations.

Содержание CLCS2425

Страница 1: ...safety instructions carefully before assembling and operating this machine Ensure the machine has been assembled correctly and safely Keep the instructions safe and pass them on to any subsequent use...

Страница 2: ......

Страница 3: ...1 7 10 17 3 4 2 5 22 6 8 9 15 13 14 11 12 16 20 19 18 24 25 23 26 21...

Страница 4: ...4 TABLE OF CONTENTS Section Page Symbols Safety Information In the Box Assembly Operation Maintenance Troubleshooting Technical Data Recycling and Disposal 5 7 8 18 19 20 21 22 29 30 32 33 34 35 36...

Страница 5: ...s use the chain saw with both hands Do not use one hand when operating the product Caution Kickback Tip contact may cause the guide bar to move suddenly upward and backwards what may cause serious inj...

Страница 6: ...with the supplied charger indoors Fuse Electrical appliances must not be disposed of with the domestic waste Batteries contain Lithium ion Do not dispose of batteries in household waste Do not dispos...

Страница 7: ...y do not attempt to use this product until you read thoroughly and understand completely the instruction manual If you do not understand the warnings and instructions in the instruction manual do not...

Страница 8: ...tools Unmodified plugs and matching outlets will reduce risk of electric shock Avoid body contact with earthed or grounded surfaces such as pipes radiators ranges and refrigerators There is an increas...

Страница 9: ...s hard hat or hearing protection used for appropriate conditions will reduce personal injuries Prevent unintentional starting Ensure the switch is in the off position before connecting to power source...

Страница 10: ...ated circulatory disorders in the hands However the length of use can be extended by using suitable gloves or taking regular breaks Note that a personal tendency for poor circulation low outdoor tempe...

Страница 11: ...Properly maintained cutting tools with sharp cutting edges are less Iikely to bind and are easier to control Use the power tool accessories and tool bits etc in accordance with these instructions tak...

Страница 12: ...cord Sawing chains contacting a live wire may make exposed metal parts of the chain saw live and could give the operator an electric shock Wear eye protection Further protective equipment for hearing...

Страница 13: ...purposes not intended For example do not use the chain saw for cutting plastic masonry or non wood building materials Use of the chain saw for operations different than intended could result in a haz...

Страница 14: ...hain saw handles with both hands on the saw and position your body and arm to allow you to resist kickback forces Kickback forces can be controlled by the operator if proper precautions are taken Do n...

Страница 15: ...plosion Properly dispose of a dropped or damaged battery immediately Batteries can explode in the presence of a source of ignition such as a pilot light To reduce the risk of serious personal injury n...

Страница 16: ...d remove the battery pack from the charger Keep the battery pack dry clean and free from oil and grease Always use a dry cloth when cleaning Never use brake fluids gasoline petroleum based products or...

Страница 17: ...shock or electrocution Protect the charger against moisture and wet conditions There is a danger of electric shock Operate the charger only with the appropriate original batteries Charging other batte...

Страница 18: ...ay use the chain saw under supervision only The manufacturer is not liable for damages which were caused through use in applications for which it was not designed or incorrect operation This product i...

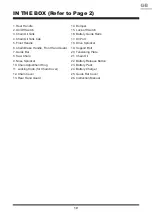
Страница 19: ...e Bar 8 Saw Chain 9 Nose Sprocket 10 Chain Adjustment Ring 11 Locking Knob for Chain Cover 12 Chain Cover 13 Rear Hand Guard 14 Bumper 15 Lock off Switch 16 Battery Guide Rails 17 Oil Port 18 Drive Sp...

Страница 20: ...in order to be able to guide the saw chain more easily onto the drive sprocket It is normal for the saw chain to sag Pre tension the saw chain by turning the tensioning plate in a clockwise direction...

Страница 21: ...ack Align the guide rails with the battery pack and then insert the battery pack into the guide rails Fig 6 Push the battery pack until you hear a click Fig 7 NOTE Make sure that battery pack firmly s...

Страница 22: ...ocedure does not affect the battery Battery LED Indicators The battery is equipped with a charge level indicator panel which indicates its charge condition This charge level indicator panel consists o...

Страница 23: ...e OPERATION Indicator Lights button green orange red LED Indicators on Battery Continuous lighting Battery Capacity 4 LEDs inc 2 green Fully charged 3 LEDs inc 1 green 50 2 LEDs orange red 25 1 LED re...

Страница 24: ...ormal and does not indicate a technical defect of the battery charger Tensioning the Saw Chain See Figs 10 11 Always check the saw chain tension before use after first cuts and regularly during use ap...

Страница 25: ...mark during operation Wipe off any spilled oil with a soft cloth and refit the chain oil tank cap NOTE Always dispose of lubricant used oil and objects contaminated with them in accordance with local...

Страница 26: ...in lubrication before each use NOTE This product is equipped with an automatic oiling system The oiling system automatically delivers the proper amount of oil to the bar and chain Checking the lubrica...

Страница 27: ...oduct firmly with both hands Always keep your left hand on the front handle and your right hand on the rear handle so that your body is to the left of the chain line The fingers should encircle the ha...

Страница 28: ...e the contact pressure at the end of the cut without releasing the firm grip on the chain saw handles Once cutting is complete wait for the saw chain to come to a standstill before removing the chain...

Страница 29: ...ches from a felled tree Leave the larger support limbs under the tree to keep the tree off the ground while cutting Do not remove support limbs until after the log is bucked cut into lengths Support l...

Страница 30: ...ide bar Oil the chain after cleaning after 10 hours of use or at least once weekly depending on which comes first Before oiling the guide bar must be cleaned thoroughly in particular the teeth of the...

Страница 31: ...ide of the bar To flip over the guide bar Locate the fixing screw connecting the guide bar and the tensioning plate on the other side of the guide bar Fig 21 Release the fixing screw with a Phillips s...

Страница 32: ...direct sunlight Store the battery only within a temperature range between 0 C and 25 C and do not subject or store the battery pack to direct sunlight It is recommended to store the lithium ion batter...

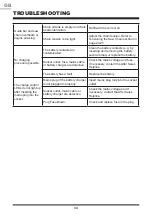
Страница 33: ...oo tight Adjust the chain tension Refer to Tensioning the Saw Chain section on page 24 25 Chain oil tank is empty Refill with the correct oil Guide bar or saw chain is damaged Contact the After Sales...

Страница 34: ...eral times or replace the battery Socket outlet fuse mains cable or battery charger are defective Check the mains voltage and fuse If necessary contact the After Sales Helpline The battery has a fault...

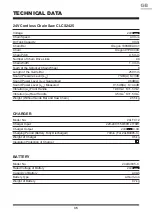
Страница 35: ...Vibration ah Rear Handle Weight Without Guide Bar and Saw Chain Model No Charger Input Charger Output Charging Period Battery Fully Discharged Weight of Charger Insulation Protection of Charger Model...

Страница 36: ...d damage during transportation The packaging and the machine itself are manufactured from recyclable materials and should be disposed of accordingly This appliance contains Lithium ion battery Do not...

Страница 37: ......

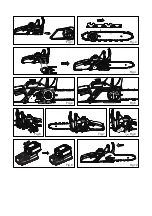
Страница 38: ...Fig 3 Fig 4 Fig 5 Fig 6 Fig 1 Fig 2 Fig 8 Fig 7 Fig 9 Fig 10...

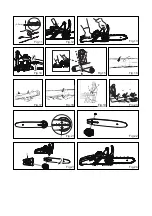
Страница 39: ...Fig 20 Fig 21 Fig 22 Fig 23 Fig 17 Fig 18 Fig 24 Fig 19 Fig 14 Fig 15 Fig 16 Fig 11 Fig 13 Fig 12 2 4 mm...

Страница 40: ...CLCS2425 Suzhou Cleva Electric Appliance Co Ltd No 8 Ting Rong Street Suzhou Industrial Park Suzhou Jiangsu Province China www cleva europe com Made in P R C...

Отзывы: