background image

LAUNCH 


X-431 V+ User’s Manual — Knowledge of X-431 V+


Œ

  In On mode, press it to turn off 

the LCD if the LCD lights up. 

/- key 

Used to adjust the volume. 

Microphone  


Rear camera 


Card slot 


Earphone jack 


USB port /Charging 
slot 


10 

Speakers  

1.3.3 X-431 V+ protection sleeve 

Dismantling X-431 V+ protection sleeve 

To remove protection sleeve from X-431 V+ main unit, follow the steps described 
as below to proceed:   

1. Pull the black sleeve outwards from the right margin of X-431 V+, and then 

remove it completely.   

2. Reverse the upper enclosure and then use the screwdriver to loosen all 

screws.  

3. Take out the lower enclosure from the upper enclosure.   
4. Finally remove X-431 V+ Tablet PC from the upper enclosure.   

Note: Reverse the above-mentioned steps to install X-431 V+ protection sleeve. 
While mounting it, please pay more attention to the installation direction.   

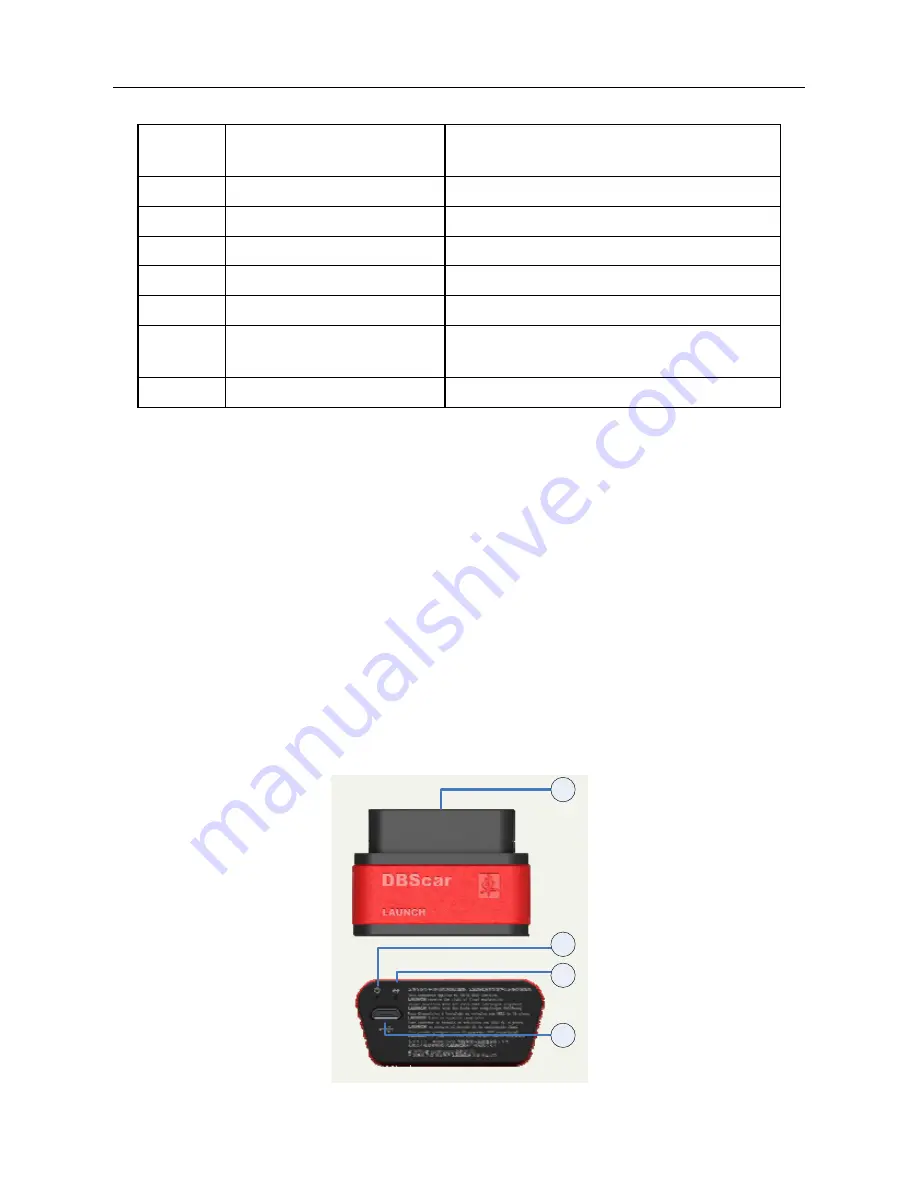
1.3.4 DBScar diagnostic connector (using with X-431 V+) 

1

2

4

3


Содержание X-431 V+

Страница 1: ......

Страница 2: ...Version V1 00 000 Revised date 2013 10 25 ...

Страница 3: ...ts by LAUNCH Trademark Information LAUNCH is a registered trademark of LAUNCH TECH CO LTD also called LAUNCH for short in China and other countries All other LAUNCH trademarks service marks domain names logos and company names referred to in this manual are either trademarks registered trademarks service marks domain names logos company names of or are otherwise the property of LAUNCH or its affil...

Страница 4: ... V out of reach of children and do not allow children to use it unsupervised Please use the included battery and charger Otherwise explosion may happen Do not disconnect power abruptly when X 431 V is being formatted or in process of uploading or downloading Or else it may result in program error Precautions on Using X 431 V z The ignition switch should be OFF while plugging or unplugging the DBSc...

Страница 5: ...m magnetic object z Do cut off the power supply of ECU system before welding on the vehicle z Pay more attention to the ECU and the sensors when the operation is next to them z Ground yourself when you disassemble PROM otherwise ECU and sensors will be damaged by static electricity z Do connect ECU harness connector firmly otherwise electronic elements such as IC inside ECU will be damaged ...

Страница 6: ... POWER ON POWER OFF X 431 V 7 2 3 1 Power on 7 2 3 2 Power off 7 2 4 TIPS ON FINGER OPERATIONS 8 2 5 LOCK UNLOCK THE SCREEN 8 2 5 1 Lock the screen 8 2 5 2 Unlock the screen 8 2 6 SCREEN LAYOUT 9 2 7 STATUS BAR 9 2 8 NOTICE BAR 10 2 9 CUSTOMIZE YOUR DESKTOP 10 2 9 1 Move items on the desktop 10 2 9 2 Create a widget on the desktop 11 2 9 3 Delete items from the desktop 11 2 9 4 Change your wallpap...

Страница 7: ...stic Report 31 4 8 2 Operation record 34 4 9 WHAT S NEW 34 4 10 CUSTOMER MANAGEMENT 34 4 11 ONE KEY UPGRADE 35 4 12 CIRCLE 35 4 13 USER MANAGEMENT 37 4 13 1 Connector registration 37 4 13 2 Modify Personal Information 37 4 13 3 Change Password 38 4 13 4 Setup Security Question 38 4 13 5 Forget Password 38 4 13 6 Theme 38 4 13 7 Select Serial Number 38 4 13 8 Connector firmware upgrade file downloa...

Страница 8: ...luetooth 44 5 4 CAMERA 44 5 4 1 How to take a picture 44 5 4 2 How to record a video 45 5 5 GALLERY 46 5 5 1 Open gallery 46 5 5 2 View pictures or videos 47 5 5 3 Edit photos 47 5 6 MUSIC 48 5 7 CALENDAR 49 5 8 ALARMS 49 5 8 1 Add an alarm 49 5 8 2 Delete an alarm 49 5 8 3 Turn on off alarm 49 5 9 FILE MANAGER 49 5 10 APPLICATIONS 49 5 10 1 Install applications 49 5 10 2 View installed applicatio...

Страница 9: ...ade Circle etc X 431 V adopts a higher performance price ratio tablet computer which is equipped with Android 4 0 operating system 1 2GHz four core CPU and 10 1 HD IPS screen display 1 2 Features 1 Diagnose Can diagnose the electronic control system of prevailing vehicle models covering Asian European American and Chinese Diagnosis functions include Read DTCs Clear DTCs Read datastream Special fun...

Страница 10: ... 8 Applications Other android based applications can be customized to install or uninstall 1 3 Knowledge of X 431 V 1 3 1 X 431 V Whole Set X 431 V is composed of an X 431 V Tablet PC a protection sleeve and a diagnostic connector in red black Fig 1 1 X 431 V whole set A X 431 V Tablet PC See Chapter 1 3 2 B Protection sleeve See Chapter 1 3 3 C Diagnostic connector in red black See Chapter 1 3 4 ...

Страница 11: ...ledge of X 431 V 3 1 3 2 X 431 V Tablet PC Fig 1 2 X 431 V Tablet PC No Name Notes 1 Light intensity sensor 2 Front camera 3 POWER key In Off mode press it to turn on X 431 V In On mode press it to activate the LCD if the LCD is blank ...

Страница 12: ...ain unit follow the steps described as below to proceed 1 Pull the black sleeve outwards from the right margin of X 431 V and then remove it completely 2 Reverse the upper enclosure and then use the screwdriver to loosen all screws 3 Take out the lower enclosure from the upper enclosure 4 Finally remove X 431 V Tablet PC from the upper enclosure Note Reverse the above mentioned steps to install X ...

Страница 13: ...lied for personal car owners Fig 1 7 GOLO diagnostic connector optional The GOLO diagnostic connector shown in Fig 1 7 provides same indicators and ports as the DBScar diagnostic connector in red black Please refer to Chapter 1 3 4 However it is designed for personal car owners and mainly applied with smart phone based on Android OS Before using this connector users need to download and install th...

Страница 14: ...d Working temperature 10 55 14 F to 131 F Storage temperature 20 70 4 F to 158 F Weight about 0 64Kg Outline dimension 257 4 175 9 9 9mm DBScar Connectors Working voltage 9 15V Average working current about 35mA Standby current about 25mA Working temperature 20 to 55 4 F to 131 F Storage temperature 30 to 70 22 F to 158 F Storage humidity 80 Working humidity 60 Net weight about 26g 1 5 Package Lis...

Страница 15: ...ot be turned on while being charged Please charge it for a period and then turn it on To prolong the service life of the battery avoid charging too frequently The charging time of battery varies with temperature condition and battery consumption status While X 431 V has low battery a beep will sound If it is very low X 431 V will be switched off automatically 2 3 Power on power off X 431 V 2 3 1 P...

Страница 16: ... together To zoom in manually place two fingers on the screen and then spread them apart To zoom out place two fingers apart on the screen and then pinch them together 2 5 Lock unlock the screen Many screen lock modes are available on X 431 V Take the preset screen lock mode as example for demonstration 2 5 1 Lock the screen When X 431 V is ON press POWER key once to lock the screen The system wil...

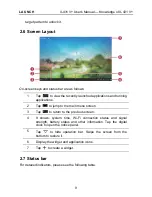
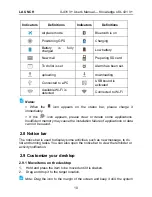
Страница 17: ...mp to the main menu screen 3 Tap to return to the previous screen 4 It shows system time Wi Fi connection status and signal strength battery status and other information Tap the digital clock to open the notice panel 5 Tap to hide operation bar Swipe the screen from the bottom to restore it 6 Display the widget and application icons 7 Tap to create a widget 2 7 Status bar For detailed indicators p...

Страница 18: ...please charge it immediately If this icon appears please clear or delete some applications Insufficient memory may cause the installation failure of applications or data can not be saved 2 8 Notice bar The notice bar is used to display some activities such as new message to do list and running tasks You can also open the notice bar to view the reminder or activity notification 2 9 Customize your d...

Страница 19: ... as wallpaper Live Wallpapers Open it to choose one of the preset live wallpapers as wallpaper Gallery Set the pictures you captured as wallpaper 2 9 5 Adjust brightness X 431 V is equipped with a built in light intensity sensor It can adjust the screen brightness according to the ambient light intensity automatically Alternatively you can also adjust it manually Tips Reducing the brightness of th...

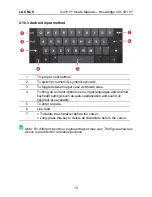
Страница 20: ... you can also press the volume keys to control the volume of the current application 2 10 Input method 2 10 1 Activate Hide on screen keyboard Several preset input methods are available on X 431 V To input text tap the input box and the on screen keyboard will be activated automatically After inputting tap to hide the keyboard Note In some applications the on screen keyboard may appear over some i...

Страница 21: ...To bring up an input options menu Input languages and Android keyboard settings such as auto capitalization and sound on keypress are available 5 To enter a space 6 Line feed 7 To delete the character before the cursor Long press this key to delete all characters before the cursor Note For different input box keyboard layout may vary The figure shown as above is provided for reference purpose ...

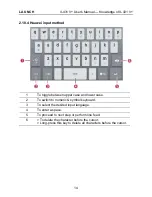
Страница 22: ...ggle between upper case and lower case 2 To switch to numeric symbol keyboard 3 To select the desired input language 4 To enter a space 5 To proceed to next step or perform line feed 6 To delete the character before the cursor Long press this key to delete all characters before the cursor ...

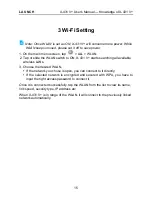
Страница 23: ... starts searching all available wireless LANs 3 Choose the desired WLAN If the network you chose is open you can connect to it directly If the selected network is encrypted and secured with WPA you have to input the right access password to connect it Once it is connected successfully tap the WLAN from the list to view its name link speed security type IP address etc When X 431 V is in range of th...

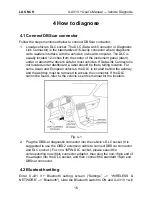
Страница 24: ...uld be there telling location For some Asian and European vehicles the DLC is located behind the ashtray and the ashtray must be removed to access the connector If the DLC cannot be found refer to the vehicle s service manual for the location Fig 4 1 2 Plug the DBScar diagnostic connector into the vehicle s DLC socket It is suggested to use the OBD 2 extension cable to connect DBScar connector and...

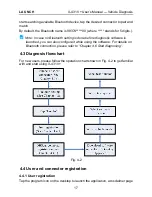
Страница 25: ...fore diagnostic software is launched you can also configure it while using the software For details on Bluetooth connection please refer to Chapter 4 6 Start diagnosing 4 3 Diagnosis flowchart For new users please follow the operation chart shown in Fig 4 2 to get familiar with and start using X 431 V Fig 4 2 4 4 User and connector registration 4 4 1 User registration Tap the program icon on the d...

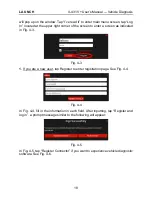
Страница 26: ... enter a screen as indicated in Fig 4 3 Fig 4 3 1 If you are a new user tap Register to enter registration page See Fig 4 4 Fig 4 4 In Fig 4 4 fill in the information in each field After inputting tap Register and log in a prompt message similar to the following will appear Fig 4 5 In Fig 4 5 tap Register Connector if you want to experience vehicle diagnostic software See Fig 4 6 ...

Страница 27: ...ig 4 7 Fig 4 7 To exit and register it later tap No connector Alternatively you can also register your connector by tapping Register Connector in Account For details please refer to Chapter 4 13 1 DBScar connector registration 2 If you have registered to be a member input your name CC and password in Fig 4 3 and then tap the Log In button to enter the main menu screen directly Product SN Verificat...

Страница 28: ...ort and operation log What s New to view the Launch s latest information and product trends Customer Management to manage customer s information including add new customer and remote diagnosis etc One Key Upgrade It enables you to perform online software update Account To maintain and manage your personal information More To view software version and user s manual While accessing other menus tap s...

Страница 29: ...icle Diagnosis 21 diagnosis software In Fig 4 8 tap on the desired vehicle to enter a screen similar to the following Fig 4 9 Tap the serial number to proceed to Fig 4 10 Fig 4 10 Tap Check download to enter download page See Fig 4 11 ...

Страница 30: ...the following will be shown on the screen Fig 4 12 Tap Return to the main menu screen The icon disappears from the lower right corner of the vehicle name logo See Fig 4 13 Alternatively you can also tap and choose One Key Upgrade from the context menu to download your software For details please refer to Chapter 4 11 One Key Upgrade ...

Страница 31: ...lection page Take Demo as an example to demonstrate how to diagnose a vehicle Tap Demo the system will prompt you to make Bluetooth pair firstly if no Bluetooth pair is made in Settings Not Connected and Not Paired will be displayed next to the Bluetooth device If Bluetooth pair has been done Not Connected but Paired will appear on the screen See Fig 4 14 ...

Страница 32: ...iagnosis 24 Fig 4 14 Tap the desired connector to start connecting If successful a pop up message Connected to 98374 00 will be shown After Bluetooth is properly connected the system will enter software version selection screen See Fig 4 15 ...

Страница 33: ...eck Latest Version If a newer version is detected it will start downloading the latest version Tap the desired version to start initializing After initializing is complete the screen will display as below Fig 4 16 Tap Demo to enter system selection interface See Fig 4 17 Tap to return to the function selection screen ...

Страница 34: ...ad trouble code in function menu the screen will display the diagnostic result Generate Current Text Reports to save the current data in text format Generate Screenshot Reports to save the current data in screenshot form Tap to return to the function selection screen 4 6 2 Clear trouble code Tap Clear trouble code function menu the system will automatically delete the currently existing trouble co...

Страница 35: ...3 Read data stream Tap Read data stream in function menu the system will display datastream items Fig 4 19 Check the box before the desired item and then tap Confirm To select all tap Select all To deselect all tap it again To return to the previous screen tap After communication is complete dynamic data of the selected datastream will ...

Страница 36: ...nosis 28 appear on the screen See Fig 4 20 Fig 4 20 Tap one item the system will display data changes in waveform To stop reading tap Tap to resume On datastream reading page the following operations can be done On screen buttons descriptions ...

Страница 37: ...on playback operations please refer to Chapter 3 7 1 Diagnosis Report Generate Current Text Reports to save the current data in text format Generate Screenshot Reports to save the current data in screenshot form To stop reading the datastream tap Tap the certain item to view its waveform Tap to return to the function selection screen Fig 4 21 4 6 4 Special function This option allows you to detect...

Страница 38: ...cle online Note To access service information successfully please make sure X 431 V is properly connected to internet Tap Maintenance Database to enter Tap on the bottom of the screen to unfold the browse window Fig 4 22 Select one option to enter Here we take Repair Case as an example Tap Repair Case to enter vehicle selection interface choose the desired one to enter To return to the previous sc...

Страница 39: ...downloaded file you have to download and install a PDF reader firstly 4 8 My Data There are 2 options available in My Data diagnostic report and history 4 8 1 Diagnostic Report This option is used to view the diagnostic report generated in process of vehicle diagnosis Additionally delete send operations are also supported Tap Diagnostic Report a list of diagnostic report will appear below the tab ...

Страница 40: ...iagnosis 32 Note Diagnosis playback will appear on the screen if you chose to record while reading datastream In Diagnosis report tap certain report to view it See Fig 4 24 Fig 4 24 Button definitions To revise the diagnosis report filename ...

Страница 41: ...31 V User s Manual Vehicle Diagnosis 33 To delete the selected report To send the report via Bluetooth email or messaging In Diagnosis playback tap certain file to view it See Fig 4 25 Fig 4 25 Button definitions ...

Страница 42: ...t s New and the system will display the relevant information title Tap the desired title to view the details 4 10 Customer Management This function enables you manage your customer information Tap Customer Management to enter Fig 4 26 Fig 4 26 Add Customer to create customer s data Customer s Info to view and modify the customer s information Where Serial No and Password described in Basic Info in...

Страница 43: ...d to download To select all just tap Select All then tap the Next Step to enter download page Tap Download to start downloading Note While downloading a single vehicle software the system may detect whether the current version is the latest version or not If yes it is not necessary for users to download it In case of using one key upgrade the system will ignore the detection step and directly down...

Страница 44: ...sis 36 Fig 4 28 The following options are available Message Tap the desired friend to view the details if there are historical messages otherwise the screen will appear blank Friends displays all friends list To add a new friend tap on the right ...

Страница 45: ...st tap Mine this option lets you to view your profile and make some preference settings 4 13 User Management This function allows you to register DBScar connector change password type password hint and take back password etc 4 13 1 Connector registration Tap Register Connector to enter a screen similar to Fig 4 29 Input Serial Number and Verification Code and then tap Register to complete registra...

Страница 46: ...3 5 Forget Password Tap Forgot password to enter Input the correct user name and tap Next Step If you set the security question before the screen will enter the Answer the security question interface Key in your answer and tap Confirm the system will feedback your new password If you have not set the security question ever a message box prompting you of you haven t set the security question will a...

Страница 47: ...file download It is designed to upgrade the connector firmware If a newer firmware version is available tap it to start downloading 4 13 9 Log Out Tap it to return to the login interface 4 14 More This option is used to view software information quick start guide and user s manual etc ...

Страница 48: ...rovider for detailed parameter setting 4 Follow the on screen instructions to proceed until the system prompts you that the account setup has been finished 5 1 2 Send a email 1 Enter main menu screen and tap to enter account screen If several email accounts are configured choose the desired one 2 Tap to enter new mail writing interface Input the receiver address in To field and a title in Subject ...

Страница 49: ... has been removed successfully 5 1 5 Revise a account setting 1 Enter main menu screen and tap to enter account screen 2 Tap Settings 3 Choose the desired Email account from the account list 4 Follow the instructions on the screen to make general settings and notification settings Note Never change the default settings of the server otherwise email failure may occur 5 1 6 Delete an email account O...

Страница 50: ...ookmark list 8 View more options 5 2 2 Download files Files pictures and applications can be downloaded from the website in browser For example Tap and press a picture then choose Save image from pop up menu to download it To download a link tap and press it and then choose Save link To protect your X 431 V and personal data please download applications from trusted sources To configure it tap All...

Страница 51: ...ended to clear your browser navigation history 1 Enter main menu screen tap to launch the browser 2 Tap Settings Privacy security 3 Tap Clear history 5 3 Using Bluetooth Bluetooth connection is supported on X 431 V Using it you can connect X 431 V to other compatible devices for data transmission Note Please note Bluetooth connection is likely to be disturbed by other objects such as walls or othe...

Страница 52: ...ired one from the search result to pair it with X 431 V 5 3 4 Send file via Bluetooth You can send pictures video audio files or test reports to others for sharing and review via Bluetooth To transfer files via Bluetooth please proceed following the steps described below 1 Enter main menu screen and tap File Manager 2 Access the corresponding folder and choose the desired picture video or audio fi...

Страница 53: ...t or left to zoom in out the screen 5 Slide it to open settings menu the following settings are available To select a desired photographing mode To select a filter To set white balance Set some photographing parameters such as Review ISO etc 6 Tap to toggle between front camera and rear camera 5 4 2 How to record a video In camera mode drag the slider to camrecorder mode ...

Страница 54: ... out the screen 5 Slide it to open settings menu the following settings are available To select a video size To set white balance To make some video settings including Review Preferred save location 6 Tap to toggle between front camera and rear camera 5 5 Gallery This option is used to manage pictures and video files 5 5 1 Open gallery Enter the main menu screen tap to open gallery the system star...

Страница 55: ... Featuring gravity sensor X 431 V will adjust the orientation of the pictures automatically if it is rotated The following operations can be also done while browsing gallery To hide fragmentary albums To play back pictures in the current folder To launch camera To share pictures or videos To view more options 5 5 3 Edit photos Without installing third party photo processing software X 431 V provid...

Страница 56: ...nd tap to enter Music files are stored into 4 categories Artists Albums Folders and Playlist 1 Tap the desired music type Open music file list 2 Tap the desired audio files to start playing 1 To switch between different play modes 2 To add it to my favorite playlist 3 Progress bar 4 To play resume 5 To adjust volume 6 To set Dolby digital plus mode 7 To open the current playlist 8 To view more opt...

Страница 57: ...the desired alarm 2 Choose Delete alarm from the pull down list then tap OK in the confirmation dialog box to delete it 5 8 3 Turn on off alarm On alarm list screen tick off the desired alarm to activate it To disable it just deselect the check box 5 9 File Manager This option enables you to manage your files Tap File Manager and then choose the desired folder to perform corresponding operations 5...

Страница 58: ...unused applications 1 Tap ALL Manage apps 2 Swipe the screen from right to left until ALL tab appears 3 Tap the desired one to enter 4 Tap Uninstall and then tap OK in the dialog box to start uninstalling 5 11 Set date time X 431 V is preset to use the network provided date time zone and time Note If Automatic date time is set as Use network provided time date time and time zone will not be define...

Страница 59: ...User s Manual Others 51 5 13 Clear cache If insufficient memory occurs please clear cache to spare more storage space 1 Tap ALL Manage apps 2 Swipe the screen from right to left until ALL tab appears 3 Tap Clear cache ...

Страница 60: ...ng may cause data loss Before use please make sure important data has been backed up 3 How to do if the system runs slowly In this case please do the followings Check all running applications stop the unnecessary applications Check all installed applications remove the unnecessary applications If all steps mentioned above are finished the system still works slowly Please try to close the system an...

Страница 61: ...other browsers to watch it or install other Flash player 7 The data and time of X 431 V can not be set It is because Automatic date time is set on your X 431 V Tap ALL enter Date time deselect Automatic date time and then set the time and date manually 8 How to distinguish between PIN and password in screen lock The difference between PIN and password is as follows PIN Generally it is composed of ...

Страница 62: ...irmation representation or warranty concerning LAUNCH automotive meters except as stated herein Disclaimer The above warranty is in lieu of any other warranty expressed or implied including any warranty of merchantability or fitness for a particular purpose Purchase Order Replaceable and optional parts can be ordered directly from your LAUNCH authorized tool supplier Your order should include the ...

Страница 63: ...t may differ a little from the descriptions in the manual in physical appearance color and configuration We have tried our best to make the descriptions and illustrations in the manual as accurate as possible and defects are inevitable if you have any question please contact local dealer or after sale service center of LAUNCH LAUNCH does not bear any responsibility arising from misunderstandings ...

Отзывы: