1
Getting Started
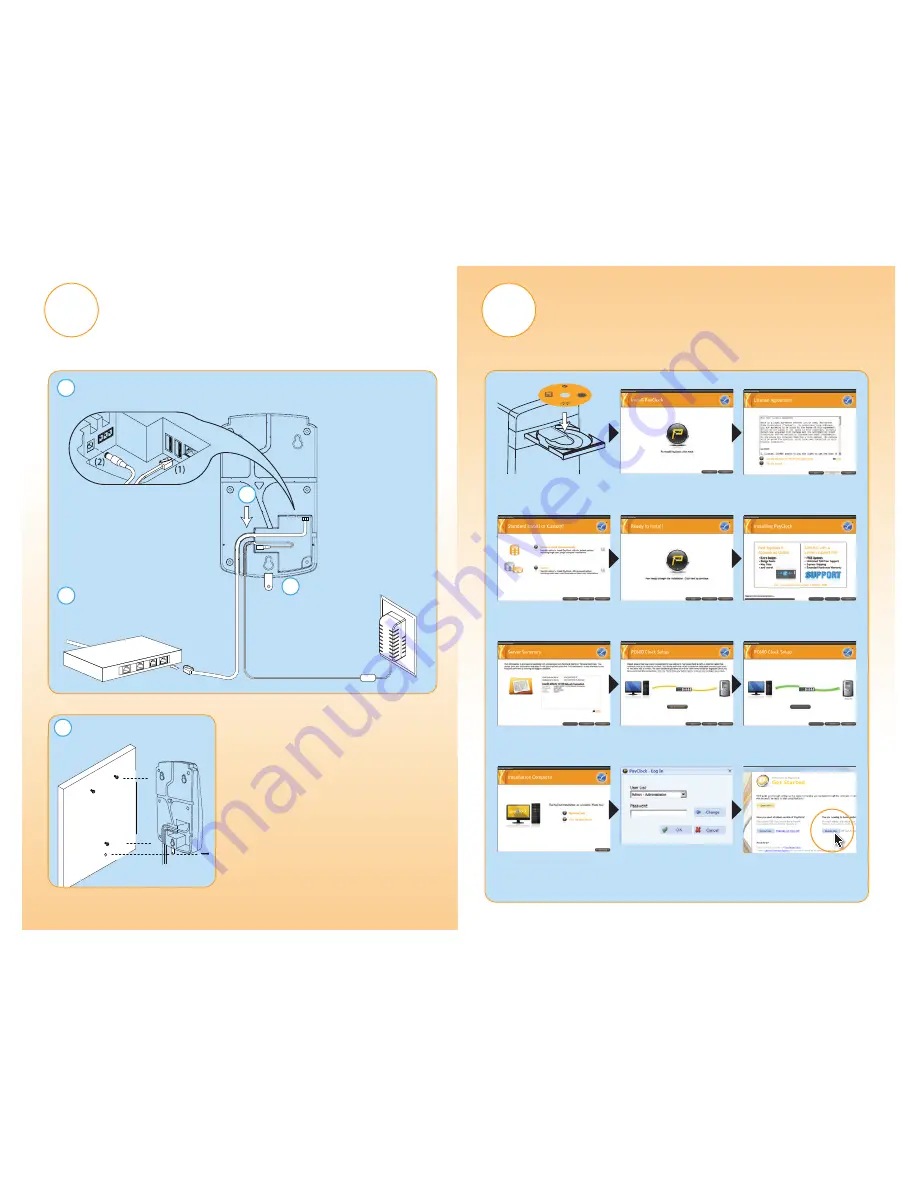
The following steps will show you how to connect the terminal,
mount the terminal, install the system software, register the software
and add employees.
•
Use masking tape to hold the included mounting
template onto the wall.
•
The bottom of the terminal should be about
45 inches from the floor.
• Drill the holes using the template as a guide.
• Remove the template and install the mounting
screws, using the plastic wall anchors if needed.
Leave about 3/16”of the screw exposed.
• Hang terminal on wall, lowering onto screw heads.
• Insert screw into security bracket to lock terminal
to wall.
•
Remove the clear label
from the lens on the front
of the PC600 Terminal.
e
Mount Terminal
c
b
d
NOTE: The power cord is
6 ft. long so take that into
consideration before
mounting.
b.
Plug the other end of the
network cable into an available
network jack, router or switch.
c.
Route the cabling
through the available
channels to best suit
your installation.
d.
Insert “L” shaped
security bracket into
terminal as shown.
a.
Plug the RJ45 network cable (1)
into the Ethernet port and the
Power Adapter plug (2) into the
Power Adapter port which is
located in the compartment on
back of the terminal.
a
Connect the Power and Ethernet Cables
(before Installing Software)
2
Install PayClock Software
Go to the computer where you want to install the PayClock Software.
Make sure your screen saver is not showing before inserting the installation CD.
See User’s Guide for detailed instructions.
a.
Insert the PayClock CD into
the CD-ROM drive.
b.
At the screen shown above
click “Next”.
c.
Choose “I accept” and
click “Next”.
d.
Choose “Standard Install”
and click “Next”.
e.
At the screen shown above
click “Next”.
f.
PayClock will now install
and progress to the next screen
when complete.
g.
If the information on the
Server Summary screen is
correct, click “Next”.
h.
At the PC600 Setup screen
click “Start Discovery”.
i.
When the discovery is
complete the orange line will
glow green. Click “Next”.
j.
PayClock defaults to open
both the software and Help
Manual. Click “Finished”.
k.
PayClock has one default
user: the Administrator. The
default password is “lathem”.
l.
Click “Register Now”.
Complete all of the registration
screens to continue setup.
VERSION
6.0.3.0
PayClock Software
For use with Lathem PC600 Terminal
P/N: PCW-CDPC6
Copyrig
ht © 201
0 Lathem Time Corporation. All rig
hts re
serve
d.
200 Seli
g Dr. S.W. A
tlanta, GA 30336 1.80
0.241
.4990
lathem


