Lasertec CX2G Скачать руководство пользователя страница 6

6

LASER OVERVIEW: CONTROL PANEL

• Power
• Pulse mode (press and hold for 3 seconds)

Содержание CX2G

Страница 1: ...I N S T R U C T I O N M A N U A L C X 2 G C R O S S L I N E L A S E R...

Страница 2: ...d for your model Tool service must be performed only by qualified repair personnel Repairs service or maintenance performed by unqualified personnel will void the warranty Only approved and authorised...

Страница 3: ...height Do not let children come in contact with the laser Do not set up the tool at a position where the laser beam can cross any person at head height Do not let children come in contact with the la...

Страница 4: ...s ITEM CHECKLIST Please ensure the following items are included with your laser level If anything is missing please contact your retailer Lasertec CX2G Carry pouch Magnetic mount Laser target INCHES C...

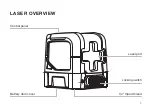
Страница 5: ...5 LASER OVERVIEW Laser port Locking switch 1 4 tripod thread Battery door cover Control panel...

Страница 6: ...6 LASER OVERVIEW CONTROL PANEL Power Pulse mode press and hold for 3 seconds...

Страница 7: ...7 MAGNETIC MOUNT OVERVIEW 1 4 thumb screw 1 4 thread Magnet Magnet...

Страница 8: ...ch as a bench or mount To mount the instrument onto the supplied magnetic mount follow the instructions on page 11 POWER SUPPLY The instrument is powered by two AA alkaline batteries Battery Replaceme...

Страница 9: ...site OPERATION Powering on self levelling To turn the instrument on slide the locking switch to the unlocked position Self levelling will commence and all beams will activate If the instrument is out...

Страница 10: ...beams will flash approximately every 5 seconds to alert the user that the instrument is in manual mode When in tilt lock function manual mode the instrument will not self level and correct for vibrati...

Страница 11: ...the mount using the thumb screw Attach the mount to a metal surface ensuring that the mount has a strong hold before releasing your hands To rotate the instrument on the mount loosen the thumb screw p...

Страница 12: ...o the path of the laser beam Hold the detector upright for horizontal beams Rotate the detector 90 for vertical beams The LED direction indicators will indicate the position of the laser beam The cent...

Страница 13: ...r signs of damage Ensure they are clean and not bent Laser does not remain on for long periods of use Check the batteries Check the battery compartment for signs of damage Ensure they are clean and no...

Страница 14: ...strument in a dry shady location Calibration of the instrument is recommended every six months if ongoing accurate levelling is required or an impact has occurred The operator should check the accurac...

Страница 15: ...WARRANTY 1 The extended warranty is available on selected tools only 2 You may extend the warranty period for your tool to 7 years from the date of purchase This excludes batteries battery packs and c...

Страница 16: ...or compensation for any other reasonably foreseeable loss or damage You are also entitled to have the goods repaired or replaced if the goods fail to be of acceptable quality and the failure does not...

Страница 17: ...17 To assist you with any queries or technical questions please contact customer support Australia 1300 658 338 New Zealand 0800 367 527 United Kingdom 0808 189 1152 CUSTOMER SUPPORT...

Страница 18: ...details CX2G Product code 91135 Battery type 2x 1 5v AA Warranty 7 Years Vertical lines 1 Accuracy 2mm at 10m Horizontal lines 1 Operating range 40m with optional detector IP rating 54 Levelling range...

Страница 19: ...19 NOTES...

Страница 20: ...www spoton com au...

Отзывы: