background image

Launching and Basic Safety on the Water

19

C

A

S

C

A

IS

F

U

N

R

IG

G

IN

G

M

A

N

U

A

L

Before You Go Sailing

Check you are wearing suitable clothing and safety equipment for the conditions and time of year.

Always wear a buoyancy aid or life jacket.

Make sure a third party knows where you are sailing and how many of you are sailing.

Check the weather forecast.

Check the time of high and low tides if applicable.

Seek advice on local conditions if sailing in a new area.

Always check the condition of your craft before setting off.

Check for overhead cables when rigging, launching and recovering.

Launching

Raise the rig with the boat facing into the wind.

Launch the boat using the appropriate launching trolley/dolly

Take the boat into the water with the bow facing into the wind

Ensure that there is enough water to float the boat of the trolley/dolly

When there is enough water below you, lower the daggerboard and rudder fully

Cleat the rudder downhaul in the cleat on the tiler

The rudder and the daggerboard should be raised before coming ashore

On The Water

Conform to the sailing rules of the road.

Look out for changing weather conditions

Never sail beyond your ability or that of your crew

Understand and be competent in sailing skills and righting techniques

Содержание Cascais Fun

Страница 1: ......

Страница 2: ...own in description color and specification LaserPerformance reserves the right to change specifications without prior notification Before rigging your boat read and familiarize yourself with the rigging manual Failure to adhere to these guidelines could invalidate your warranty Cascais Fun V1 Rigging Manual REV 01 July 2021 Laserperformance com Rigging manual C A S C A I S F U N ...

Страница 3: ... rudder used to hold the rudder Gunwale The outermost edge of the boat Halyard A rope or wire used to lower or hoist sails Head Top corner of sail Jib Front sail Leach Rear edge of the sail Luff Forward edge of the sail Mast Main vertical spar supporting the rig sails Mast Heel Fitting on the bottom edge foot of the mast Mast step Fitting on the boat where the mast heel foot of the mast is located...

Страница 4: ...g the Main Sail 9 Fitting the jib 10 Rigging the Vang 11 Fitting the main sheet 11 Reefing the main sail 12 Rigging the gennaker 13 Fitting the gennaker sheet 16 Fitting the Daggerboard 17 Stowing your Cascais 18 Launching and Basic Safety on the Water 19 Care Maintenance and Service of your LaserPerformance Product 20 Owner Information 21 ...

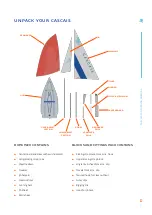
Страница 5: ...am Jib Sheet Mainsheet Blocks and fittings pack contains Kicking strap lower block inc hook Upper kicking strap block Single mainsheet block inc clip Traveler block inc clip Twisted hook for clew outhaul Sister clips Rigging link Hook for jib tack Mainsail Rudder Tiller extension Daggerboard Gennaker Sock Gennaker Pole Boom Upper Mast Section Lower Mast Section Tiller Jib Gennaker Hull ...

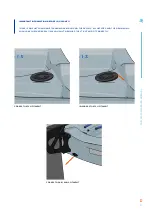
Страница 6: ...ore you launch There is one hatch and one transom drain bung on the Cascais All hatches and the drain bung should be checked every time you sail to ensure they tight and fit correctly Correct Hatch Fitment InCorrect Hatch Fitment Correct Drain Bung Fitment ...

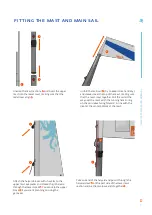
Страница 7: ...sail all the way over the mast with the cunningham D ring on the sail sleeve facing forward in line with the cleat at the center bottom of the mast 3 Attach the halyard blocks with shackles to the upper mast eye plates and thread the jib halyard through the lower block You can skip the upper block if you aren t planning on using the gennaker 4 5 Take one end of the halyard and pass it through the ...

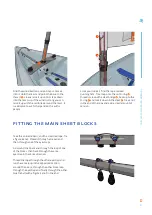
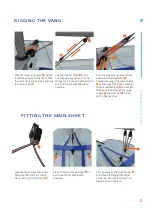
Страница 8: ...f the eye straps Go around the boom and through the loop of one of the blocks then back through the same eyestrap in the same direction Thread the rope through the other eyestrap and run the same loop in the opposite direction around the boom through the other block loop through the eyestrap and finally through the other blue tie ball with a figure 8 knot in the end From your rope kit find the rop...

Страница 9: ... clew outhaul and secure it on the cleat in the middle of the boom 2 7 8 Tie the clew outhaul line to the small fairlead on the outboard end of the boom with a bowline loop Run through the eye of the clew hook back round the fairlead and up the cleat on the boom 3 2 3 Take the long piece of shockcord pass it through the eye of the hook and tie a large knot or bowline 2 Take the tail end of the cle...

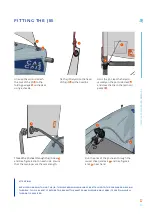
Страница 10: ...s of the jib sheets through the swivel sheet jammers and tie a figure 8 knot in each end 7 8 Unwrap the sail and attach the tack of the jib to the folding pad eye on the deck using a shackle 2 1 Tie the jib halyard to the head of the jib with a bowline 3 ATTENTION Even if you are not using the jib the halyard should always be attached to the folding pad eye on the deck This is a safety feature to ...

Страница 11: ...ne to the third block Thread it through the small sheave on the large block then through the the middle block and back to the large block through the large sheave and the cleat Finish with a figure 8 knot 4 5 4 6 7 Take the main sheet bridal rope find its center and tie it to the block with a girth hitch knot 1 Tie both ends to the pad eyes on each side of the cockpit with bowlines 2 Tie a bowline...

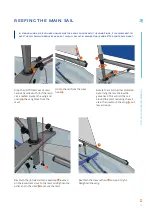
Страница 12: ...ll roll the sail around the mast reducing the sail area Then reattach the vang but leave it loose 3 Reattach the jib halyard to the eyestrap located on the lower deck close to the mast and tighten the other end in the cleat to secure the mast 4 5 Reattach the clew outhaul and pull it tight Retighten the vang 6 In strong winds or if you are unsure whether you can cope with the conditions it is alwa...

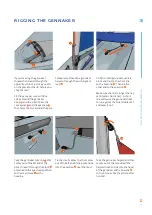
Страница 13: ... a bowline Then tie the other end to the eyestrap Make sure the line is longer than 25 centimeters 10 inches A short line will cause the gennaker sheet to rub against the blue middle seat and wear it out 5 6 Take the gennaker tack line that comes out of the aft end of the pole thread it through the block attached to the eye strap and then to the small block with a bowline 7 3 8 Tie the small yello...

Страница 14: ...r sock eyelet 13 14 15 16 Take the tack line that comes out of the gennaker pole and make sure it has a figure 8 knot like in the picture Tie the line to the tack of the gennaker with a bowline 21 22 Finally thread it through the lower eyelet of the gennaker from starboard to port then through the upper eyelet from port to starboard with a figure 8 knot in the end This will be your downhaul 19 20 ...

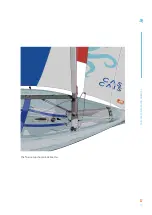
Страница 15: ...15 CASCAIS FUN RIGGING MANUAL The final setup should look like this ...

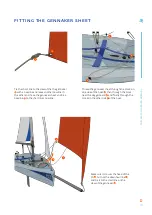
Страница 16: ...er sheet and tie a bowline to the short line s bowline 1 2 Thread the gennaker sheet through the block on one side of the boat then through the block near the daggerboard and finally through the block on the other side of the boat 4 3 5 Make sure it crosses the head of the jib but not the downhaul line and tie it to the small line on the clew of the gennaker 7 8 6 1 2 3 4 5 6 7 8 ...

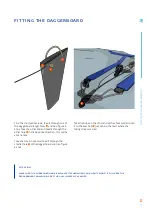
Страница 17: ...tion This will be your handle Take the black shockcord feed it through the smaller hole of the daggerboard and tie a figure 8 knot 1 2 3 Take the hook on the other end of the shockcord and clip it to the eyestrap just behind the mast where the hiking straps are tied 4 ATTENTION Make sure the shockcord hook is always attached when you go out sailing It will keep the daggerboard from sliding off the...

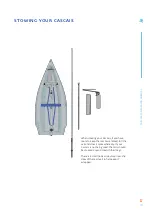
Страница 18: ... Cascais if you have room to keep the mast assembled furl the sail and stow it somewhere dry If your Cascais is not being used the sails should be stowed dry and clean in their bags There is a small hook and a strap near the clew of the main sail to help keep it wrapped ...

Страница 19: ...verhead cables when rigging launching and recovering Launching Raise the rig with the boat facing into the wind Launch the boat using the appropriate launching trolley dolly Take the boat into the water with the bow facing into the wind Ensure that there is enough water to float the boat of the trolley dolly When there is enough water below you lower the daggerboard and rudder fully Cleat the rudd...

Страница 20: ... set up trailer or trolley are not covered under warranty When securing your boat to a trailer for transport be very careful that ratchet straps and ropes are not over tightened and that there is sufficient padding under the strap or rope to prevent the hull deck from being damaged through abrasion or pressure Top covers must not be allowed to flap when driving at speed This can abrade the surface...

Страница 21: ...l code City state country Phone number Boat Hull identification number Hull color Purchased from Date of purchase Road trailer Registration Information Trailer vin number License plate number Registration number State country registered in Insurance Information Maintenance Record Notes ...

Страница 22: ...ormance LaserPerformance and associated logos are trademarks CASCAIS is a trademark used under license LaserPerformance reserves the right to make design and or specification changes to any of their products as part of their continuous development programme ...

Отзывы: