background image

SYSTEM SETUP 

Play USB and SD/MMC  Card 

1.  Plug in the USB device noting correct orientation. Press [DVD/SD/USB], then choose 

USB to select the content. 

2.  Insert a memory card to the SD/MMC  slot. Press [DVD/SD/USB] and select SD to 

play memory card. 

SYSTEM SETUP 

1.  Press "SETUP" on the remote to bring up the SYSTEM SETUP MENU. 
2.  Press the◄  or  ► buttons to go to or return to the required settings page. 
3.  When the required page is shown press the "OK" button to enter the page. 

4.  Use the £ or T buttons to navigate to the feature to be changed and then press the 

► button to enter the submenu. 

5.  Use the £ or T buttons to select the submenu item and then press the "OK" 

button to confirm. 

6.  Press the ◄  button to return to the previous menu or press the "SETUP" button to 

close the Setup Screen. 

Note: Not all discs contain these features. Some features are disc dependent. 

General Setup Page 

TV Display 

•  4:3: When the player outputs signal to a normal monitor or TV. Wide-screen images 

are shown on the screen. But with some parts cropped automatically. 

• 

Normal/ LB: 

Normal/LB: When the player outputs signal to a normal monitor or TV, 

a normal picture is shown on the screen with a black strip at both the top and 
bottom of the screen. 

•  16:9: Wide: When the player outputs signal to a wide screen monitor or TV, a wide 

picture is shown on the full screen. 

Angle Mark 

• 

ON: 

The screen 

will 

show the angle mark icon. (If an angle option is available). 

• 

OFF: 

The screen will not display the Angle Mark. 

DVD-PT-10

C


USER MANUAL

Содержание DVD-PT-10C

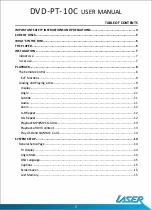
Страница 1: ...Laser 10 Screen Portable DVD Player 2 0CHANNEL O 1 MPEG4 ffl rnl 8 6 11111 1 1 t REMOTE UNIVERSAL SERIAL BUS CONTROL 4 BUILT IN SPEAKERS Please read carefully before use DVD PT 10C USER MANUAL...

Страница 2: ...Remote Control 8 Key Functions 9 Loading and Playing a Disc 9 Display 10 Angle 11 Subtitle 11 Audio 11 Zoom 12 A B Repeat 12 ALL Repeat 12 Playback MP3 MPEG 4 Disc 13 Playback ofDIVX content 13 Play...

Страница 3: ...16 Preferences 16 TVType 16 Audio 16 Subtitle 17 Disc Menu 17 Parental 17 Password 17 Default 17 TROUBLESHOOTING 18 Change the Remote Control Battery 19 Charging the DVD Player 19 SPECIFICATIONS 19 D...

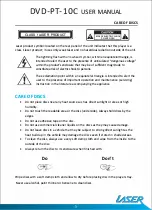
Страница 4: ...if you are in control of dangerous machinery such as a motor vehicle Remove any power or data cords by pulling them from the plug and not the cord Using this device near other electronic devices may c...

Страница 5: ...icing instruction in the literature accompanying the appliance CARE OF DISCS Do not place discs near any heat source such as direct sunlight or areas or high humidity Do not touch the readable area or...

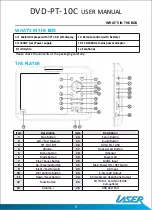
Страница 6: ...escription Item Description 1 Stop Button 14 Setup Button 2 Left Fast Forward 15 Audio Button 3 TFT On Off 16 DVD SD USB 4 Volume 17 Drive Access Button 5 Menu button 18 IR Sensor 6 Mode Button 19 Pow...

Страница 7: ...ff connect the supplied DC adaptor to the vehicle power outlet 2 Connect the other end to the DC power input on the side of the DVD player 3 Turn the vehicle ignition to ON or ACC to power the outlet...

Страница 8: ...VD Setup 6 Up Down Left Right 7 OK 8 Audio 9 Fast Rewind 10 Fast Forward 11 Mode 12 Angle 13 Mute 14 Display 15 Repeat 16 A B repeat 17 Search 18 Stop 19 Program 20 Volume 21 Zoom 22 Volume 23 Pause P...

Страница 9: ...2X 4X BX 16X and 32X normal playback speeds Mute Mutes the Audio Output on the Player Volume These buttons are used to increase or decrease the Audio Output Audio Select available audio language for t...

Страница 10: ...ime and Remaining Time A During playback press the DISPLAY button to display the current Title Number the total Number of Title The current Chapter Number The total Number of Chapters and the Playing...

Страница 11: ...nguage Number and the total Number of Subtitle Languages displayed If there are multiple languages press SUB again to select another subtitle language To turn subtitles OFF press the SUB button until...

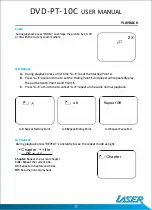
Страница 12: ...ay the part between Point Aand PointB C Press A B a third time to cancel A B repeat and resume normal playback UA U AB Repeat Off A B Repeat Starting Point A B Repeat Ending Point A B Repeat Cancelled...

Страница 13: ...DIVX content The DIVX format is capable of holding high quality video and sound in a highly compressed file format File types such as AVI are typically able to hold more data in a smaller file For exa...

Страница 14: ...ess the OK button to confirm 6 Press the button to return to the previous menu or press the SETUP button to close the Setup Screen Note Not all discs contain thesefeatures Somefeatures are disc depend...

Страница 15: ...yfive minutes if the same image remains on the screen Last Memory ON The unit will return to the last position on the disc OFF The unit will not return to the last position on the disc Speaker Setup D...

Страница 16: ...the option to change and the press the OK button 2 Press the or buttons to adjust the setting and then press the OK button to confirm the changes Options are Sharpness Brightness Contrast Preferences...

Страница 17: ...for disc with lock out function or multiple rating levels There are listed from the level 1 Kid Safe to the highest level 8 Adult The setting allows PLAYBACK to be restricted via password Note This fu...

Страница 18: ...number that is out of range Picture is distorted 3 The disc might be damaged Try another disc 4 It is normal for some distortion to appear during forward or reverse scan No forward or Reverse 1 Some d...

Страница 19: ...ring playback the player can be turned off to decrease charging times SPECIFICATIONS DVD Plaver Compatible Disc DVD VCD CD MP3 JPG MPEG 4 Signal System PAL NTSC Screen Size 10 Inch 254MM Frequency Res...

Страница 20: ...d refund or replace the product as per their store refund or warranty policy Step 2b If your place of purchase cannot be contacted then you can contact Laser Customer Service with details of your defe...

Отзывы: