5
2. A 10 A fuse and fuse holder
3. Vehicle cable with at least 1.5 mm
²
cross-section
4. Fixture material and cable connector/shoe suitable for switch and relay
First locate a suitable position on the vehicle to mount the LED working light. There are two fixture options:
1)
Using the screw base.
Use the screw base as a drill template to drill holes for fixing the LED working light at
an appropriate location. Pay attention to ensure that you do not damage any hidden cables, wires or other
components when drilling. It is not permitted to drill holes in carrying parts of the chassis such as the
longitudinal cross members or roof frames.
a)
When you have made the holes, screw the LED working light firmly and securely to the vehicle (fixture
materials not included in the scope of delivery).
2)
Using the magnetic foot.
To do this, remove the pre-mounted screw base by unscrewing the two Allen screws
and the long hexagonal screw (from the hinge) on the underside of the LED working light. Now you can remove
the central hexagonal screw from below the screw base. To mount the magnetic foot, use the supplied 20 mm
long hexagonal screw with washer and nut with spring washer. Then connect the holder back up to the light
housing. To protect painted surfaces, glue the supplied rubber ring to the bottom of the magnetic foot. The LED
working light can now be placed on an even, magnetic surface.
Connecting the LED working light
1.
First separate the battery from the on-board network of your vehicle. To do this, remove the ground cable
from the minus pole of the battery, usually labelled (-). To do this, read the manual of your vehicle or ask
your specialist workshop.
2.
Mount the switch in your vehicle at a location easy for the driver to access.
3.
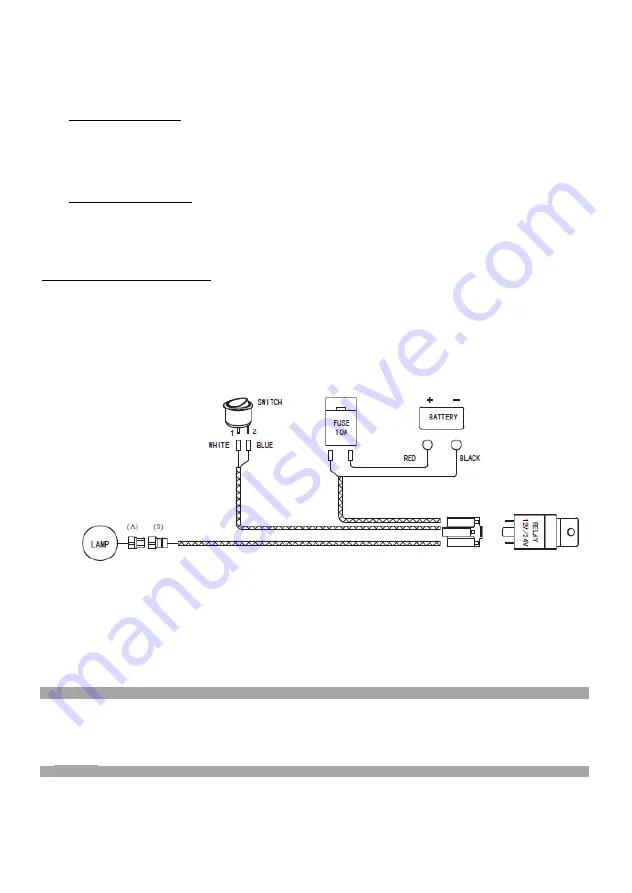
Now connect the LED working light and the switch to the on-board network of your vehicle with the help of
the working current relay and a fuse (not included in the scope of delivery) in accordance with the sketch.
Pay attention to ensure that the cable you use has a sufficient cross-section.
Lay the cable without creating sharp bends and avoid running over sharp edges. Secure the wires firmly and without
exerting considerable force on the cable. Use the existing cable harnesses to secure the wires. If possible lay cables
behind cladding or under the floor carpets.
If you need to lay cables in the engine compartment of your vehicle make sure that sufficient space is left to avoid
moving parts such as belt pulleys, drive belts, drive and steering shafts as well as the wiper drives, and do not lay the
cable close to heat sources such as exhausts and catalytic converters.
After installation of the LED working light connect the battery up again.
Switch the LED working light on and check the functionality.
7. Maintenance
If used in accordance with the intended purpose, the device does not require maintenance. Clean the device carefully
with a dry cloth.
In the event of damages to the housing or cables, immediately disconnect the power supply to the device and contact
the manufacturer or your supplier.
8. Disposal
Packaging materials are raw materials and can be recycled. Please recycle in the interests of environmental
protection.


