background image

29

DVD VIDEO PLAYER OPERATION

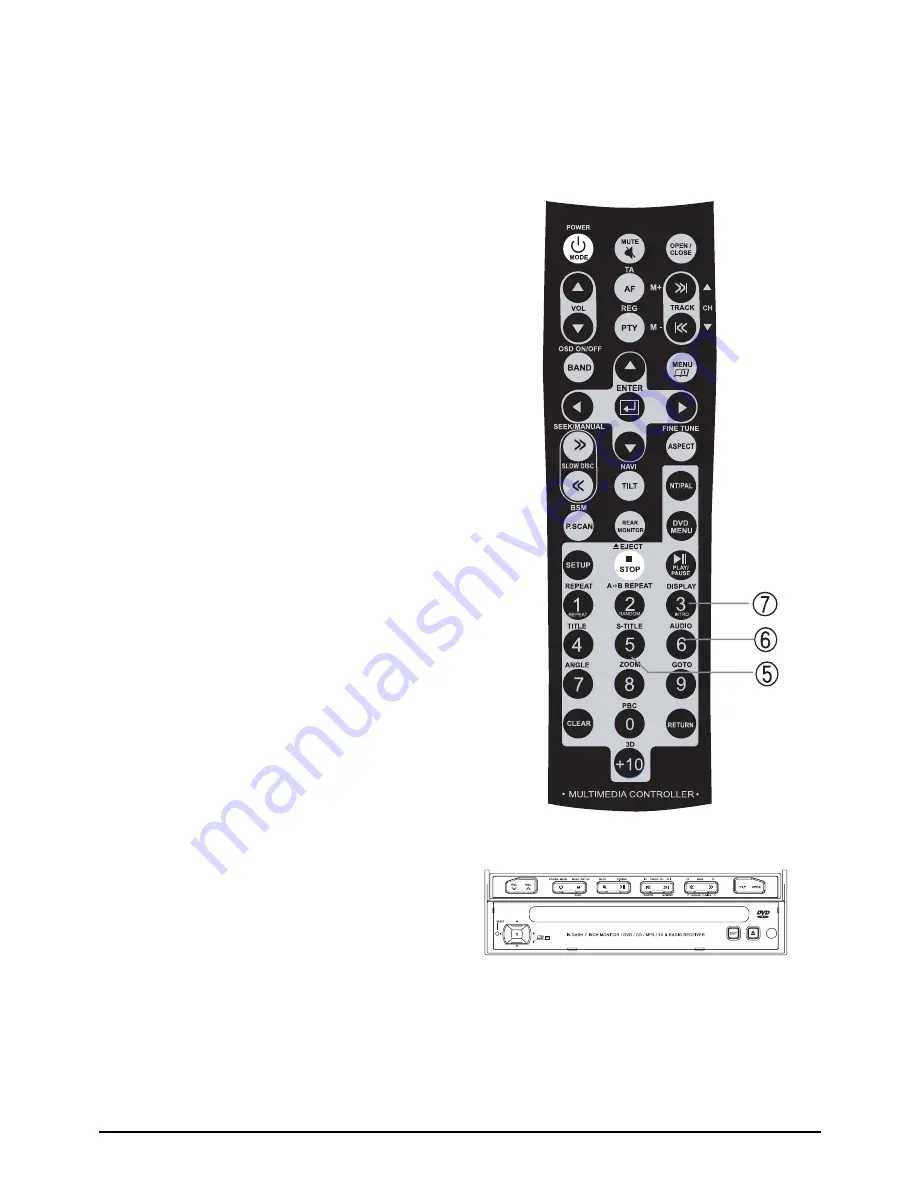
5) CHANGING SUBTITLE LANGUAGE (S

-TITLE)

It is possible to change the subtitle
language to a different language from the   
selected one. This operation works only 
with discs on which multiple subtitle 
languages are recorded.

·

Press S-TITLE button for 3 seconds

or longer during playback.

·

Press repeatedly S-TITLE until the 

desired language is selected.

·

To eliminate the On Screen Subtitle, please

press S-TITLE repeatedly to select OFF.

6) CHANGING AUDIO SOUND TRACK  

LANGUAGE  (AUDIO)

It   i s   p o s s i b l e   t o   c h a n g e   t h e   A u d i o  
Soundtrack Language to a different 
language from the selected one at the 

initial setting. This operation works only 
with discs on which multiple audio sounds

are recorded.

·

Press AUDIO button for 3 seconds or
longer during playback.

· D

esired Audio Soundtrack Language is

selected.

7) DISPLAY 

When pressing Display button for 2  
seconds or longer, there shows PlayTime   
s ta tu s  and i f press  it   one  more  for 

2 seconds or longer there shows all 
information for title like below. In CD 

Changer Mode, this button should be
operated by Intro Scan that each track 
playback for 5 seconds.

Содержание STVD7IN

Страница 1: ...OWNER S MANUAL MODEL SVTVD7IN IN DASH 7 INCH MONITOR DVD CD MP3 TV RADIO RECEIVER ...

Страница 2: ...s in construction of this device which is not expressly approved by the party responsible for compliance could void the user s authority to operate the equipment Warning Do not watch TV while vehicle in Motion it Can be Hazardous ...

Страница 3: ...the Unit take the following precautions Make sure to ground the unit to a negative 12V DC power supply Do not open the top or bottom covers of the unit Do not install the unit in a spot exposed to direct sunlight or excessive heat or humidity Also avoid places with too much dust or the possibility of water splashing When replacing a fuse only use a new one with the prescribed rating Using a fuse w...

Страница 4: ...onnecting to Multi Channel AV Control Unit System with Additional 6CH Amplifier p16 Basic Operation p17 18 1 Power ON OFF p17 2 Opening the TFT LCD Panel 3 To Change Password 4 Closing the Monitor 5 Picture Control 6 Audio Control p18 7 Pre Adjust Color System p19 8 Pre Adjust Adjust TV System 9 Pre Adjust Adjust Radio System p20 10 Pre Adjust Adjust Sound Mix 11 Pre Adjust Adjust Rear CCD p22 12 ...

Страница 5: ...lay on the actual equipment and some of the illustrations on the display may represent something impossible in actual operation Lens Fogging Right after you turn on the car heater in cold weather dew or condensation may form on the lens in the DVD player of the unit Called lens fogging CDs may be impossible to play In such a situation remove the disc and wait for the condensation to evaporate If t...

Страница 6: ...stain off with a cloth moistened with neutral cleaner and then wipe neutral detergent off Applying spray cleaner directly to the unit may affect its mechanical parts Wiping the front panel with a hard cloth or using a volatile liquid such as thinner or alcohol may scratch the surface or erases characters Cleaning the CD Slot Safety precaution As dust tends to accumulate in the CD slot clean it eve...

Страница 7: ... sunlight On the seat or dashboard etc and where the temperature is high Store CDs in their cases With the screen open a driver may not see the disc insertion slot For your safety insert a disc with the screen closed Handling CDs Don t touch the recording surface of the CD CD R and CD RW are easier to damage than a normal music CD Use a CD R or a CD RW after reading the caution items on the packag...

Страница 8: ... region A disc s Region Number must correspond to the Region Number of this Unit If the Region Number of a disc is different from the Region Number of the this Unit playback will not be possible This DVD Player is designed for use in Region 1 North America If a disc is identified as Region 0 it will work on any DVD Player Notice DVD Logo is a trademark of DVD Format Logo Licensing Corporation 1 Re...

Страница 9: ...ial Mode Joy Stick Check all functions with UP DOWN LEFT RIGHT for System menu and Press enter key Remote Sensor Remote Control infrared sensor Power Mode Use this button to turn on off For Turn off hold this button about 2 seconds or longer And use this button to switch the modes such as AV1 AV2 DVD Radio TV Menu Setup Band Menu Use this button to display menu stored on DVD disc Setup Use this bu...

Страница 10: ...eo Seek Tuning Up Down Radio Mode The unit starts to seek next station TV Mode Use this button to seek TV Channel Disc Mode Hold down to perform fast forward and fast backward on disc Press and hold this button to switch the Seek Manual Tuning Mode Eject Use this button to eject a disc in slot Vol Use this button to increase decrease Volume 2 2 WITH THE DISPLAY OPENED P S BSM Same as Track CH Up D...

Страница 11: ...e Remote Turn on Blue White Auto Antenna Blue Reverse Gear Orange Tel Mute Pink Parking Brake Brown Ground Black Ground Black 3 HEAD UNIT REAR PANEL 1 1 16 Pin Connector 2 2 Cooling Fan 3 3 Digital Out 4 4 Minet For RT Box INTRODUCTION 1 1 4 4 3 3 2 2 ...

Страница 12: ...y or if the operating range becomes reduced Should battery leakage occur clean the battery compartment with a soft cloth and replace with a new battery USING THE REMOTE CONTROL NOTICE REMOTE CONTROL The remote control should be aimed directly towards the remote sensor of the Unit Avoid dropping the remote control Avoid spilling liquids on the remote control or exposing it to extreme heat The remot...

Страница 13: ...Down Band OSD ON OFF Menu Enter Set Up DVD Menu Slow Disc Seek Manual Up Down Tilt Navi Navigation Function Rear Monitor NTSC PAL DVD ONLY P S BSM Play Pause Stop Eject Numeric Key Pad Repeat A B Repeat Random in CD Changer Display Intro in CD Changer Title S Title Audio Angle Zoom Goto PBC 21 Aspect Fine Tune 22 Clear 23 Return 24 10 3D ...

Страница 14: ...D UNIT Notice Make sure the connection of Parking Brake wire If it has no connection the unit will not show any picture Connect the Dimmer wire otherwise its illumination on button will not be lit When using the optional power amplifier connect to Amplifier s power control terminal with Power Control Wire Depending on what antenna you are using connect auto antenna wire either to the control termi...

Страница 15: ...13 Connecting to Power Multi Channel AV Control Unit System 2 RT BOX 16P CONNECTOR WIRING DIAGRAM ...

Страница 16: ...is linked each other It can be used either only for AV2 or only for DVD VCD Changer Input NOTICE Make sure that power is off before making signal connections Connect this Unit Mi Net output directly to the Mi Net input of the RT BOX In Case of Using Sub woofer you must use additional Power Amplifier with Sub woofer Line out WARNING Do not use the Digital Audio Output of this Unit unless you are co...

Страница 17: ...R input of RT Box when DVD Changer is Connected You can just use only AV2 Video input of RT Box from DVD Changer Video output In case of using CD Changer instead of DVD Changer the AV2 of RT Box can not be availed Connecting to Power Multi Channel AV Control Unit System ...

Страница 18: ...CH Amplifier The exact connection method will vary depending on the specific components selected for a particular installation Please also refer to the owner s and installation manuals supplied with the associated equipment NOTE In case of wanting more powerful 5 1CH sound system you have to add additional power Amplifier of 6CH or 5CH 1CH Connecting to Power Multi Channel AV Control Unit System ...

Страница 19: ... Yellowbar on Picture and press ENTER key POWER ON OFF 1 POWER ON 1 Press POWER button to turn the power on and the monitor will be automatically positioned vertically when the monitor is opened 2 You can also turn the power on by pressing the OPEN button The power will be turned on and the monitor will be opened 2 POWER OFF 1 Press the POWER button again to turn the power off over 2 seconds 2 If ...

Страница 20: ... 14 level to 14 level 3 Use key and place cursor Yellow bar on the item you want to adjust Ex Contrast and press ENTER key as picture above 4 Press key to adjust the level of the selected item as picture below 5 Press ENTER key at least for 2 seconds to return to the previous menu When no key is pressed for 5 seconds the menu will disappear 6 Do the same process as above to adjust Brightness Color...

Страница 21: ...PAL SECAM NTSC When no key is pressed for 5 seconds the menu will disappear 5 Press ENTER key at least for 2 seconds on current screen to return to the previous screen Press Menu key about 1second to turn MENU off directly 6 Do the same process as above to adjust Navigation Auto Dimmer and Beep Tone 7 Navigation Auto Dimmer and Beep Tone will be turned on and off by pressing ENTER key PRE ADJUST A...

Страница 22: ...e monitor displays following picture The monitor displays following picture 5 Each time you press ENTER key Field Standard should be changed at the same time as below U S A M CCIR1 BG CCIR2 BG Ireland II Australia BG China BG O I R T DK France BG When no key is pressed for 5 seconds the menu will disappear 6 Press ENTER key at least for 2 seconds on current screen to return to the previous screen ...

Страница 23: ...d press ENTER key as picture below 7 Each time you press ENTER key Center changes as below FRONT REAR ALL OFF 8 Press ENTER key at least for 2 seconds to return to the previous screen 9 Use key and place cursor Yellow bar on Navigation and press ENTER key as picture below 10 Each time you press ENTER key Navigation changes as below R L L R OFF 11 Press ENTER key at least for 2 seconds to return to...

Страница 24: ...R key 3 Use key to set Rear Monitor as DVD or Radio or TV or AV1 or AV2 or Off as picture below BASIC OPERATION 14 Press ENTER key at least 2 seconds on current screen to return to the previous screen Press Menu key about 1 second to turn MENU off directly When no key is pressed for 5 seconds the menu will disappear PRE ADJUST ADJUST REAR CCD FOR REAR VIEW CAMERA 1 Press MENU key and select Pre Ad...

Страница 25: ... for 5 seconds the menu will disappear Press ENTER key at least for 2 seconds on current screen to return to the previous screen Press Menu key about 1 seocnd to turn MENU off directly 4 Press PS BSM button to receive RDS stations as picture below AUTO TILT SYSTEM 1 Press MENU key until the monitor displays following picture 2 Use Key and place cursor Yellow Bar on Auto Tilt System and press ENTER...

Страница 26: ...lternative Frequencies REG Regional When pressed short AF switching mode is selected and the state of AF switching mode is displayed by AF segment in LCD Segment off AF switching mode off Segment on AF switching mode on Has RDS information Segment flashing AF switching mode is selected but RDS information is not received yet When AF switching mode is selected the radio checks the signal strength o...

Страница 27: ...ted When the unit was in CD mode it will switch temporarily to radio mode If the volume level was under the threshold point it will be raised to the threshold point but the user changed the volume level which was more than the threshold point Min TA volume level it will be set to the last level When TA mode is on TA of individual segment is turned on When a TP station is received TP of individual ...

Страница 28: ...h enables parents to remove scenes or prevent playback of discs by children DVD players are equipped with a password designed to prevent children changing the level Press SET UP button and then there should be shown 5 categories as Language Video Audio More Audio and Parental 1 Language As shown above Language for OSD can be changed to English French Japanese Korean and Spanish 2 Video In this vid...

Страница 29: ...ally after loading Note Never insert foreign objects into the disc insertion slot If the disc is not inserted easily there may be an other disc in the mechanism or the unit may require service Loading 8cm discs No adapter is required to play an 8cm disc Insert the 8cm disc into the center of the insertion slot DVD VIDEO PLAYER OPERATION ...

Страница 30: ...ll be worked by pause If a single sided disc is loaded upside down it will come out automatically in a few seconds If an Audio CD is loaded the CD indicator appears on LCD If an MP3 CD is loaded the MP3 indicator appears on LCD If you want to change folder press TITLE key for 2 seconds or longer and then select the folder you want When all chapters on the disc have played this unit will automatica...

Страница 31: ... OFF 6 CHANGING AUDIO SOUND TRACK LANGUAGE AUDIO It is possible to change the Audio Soundtrack Language to a different language from the selected one at the initial setting This operation works only with discs on which multiple audio sounds are recorded Press AUDIO button for 3 seconds or longer during playback Desired Audio Soundtrack Language is selected 7 DISPLAY When pressing Display button fo...

Страница 32: ...epeating sections between two specific points A B repeat Press A B during playback at the point where repeat play is to start A Press A B during playback at the point where repeat play is to be concluded B Repeat play of the selected section A B starts To return to normal play press A B once and then OFF will appear In CD Changer Mode this button should be worked by Random playback 10 DIRECTION BU...

Страница 33: ...wer by pressing the POWER button Do not remove the disc if you plan to use the LAST MEMORY function explained on the next page NOTES If appears on the screen when a button is pressed it means that the selected function is not available on the disc you are playing at that time Depending on the specific DVD disc some operations may be different or restricted For this refer to the jacket or case of t...

Страница 34: ...Press the GOTO button to move to any title chapter or elapsed time on the disc Time Input the desired elapsed time with the Numeric Keypad then press the ENTER button TITLE CHAPTER Input the desired title or Chapter with the Numeric Keypad then press the ENTER button 3 ZOOM Press the ZOOM button to Zoom in enlarging the picture on the screen Press the ZOOM button repeatedly to cycle Zoom between 1...

Страница 35: ... angles differ depending on the disc used 5 SLOW DISC Press and hold this button during playback Every time this button is pressed shortly its speed should be changed by x2 x4 x8 x20 with fast forward and fast backward And if it is pressed about 2 seconds and longer its picture will be moved by one frame 6 DVD MENU Press this button to show the menu of DVD Title and choose one of menus as desired ...

Страница 36: ...onds in sequence until you select one stored channel by pressing P S BSM one more 3 MANUAL SEEK UP DOWN To find out a desired station press this button until beep sound is heard and then press it shortly in no time moving to the very station step by step After above process at least 3 seconds is necessary to perform below process If you press it shortly tuner will seek and playback a next station ...

Страница 37: ...gth have been found and will store them into TFT LCD automatically in sequence 2 MANUAL UP DOWN To find out a desired TV channel press this button shortly 3 TRACK P SEEK CH UP DOWN Press this button to move to the stored TV channel you want 4 FINE TUNE Press this button for 2 seconds or longer to have desirable Air signals on a current channel TV OPERATION ...

Страница 38: ...NGLE ADJUSTMENT Adjust the mounting angle to less than 20º MOUNTING EXAMPLE Installation in the dashboard STRAP Be sure to use the strap to secure the back of the unit in place The strap can be bent by hand to the desired angle HOLDER After inserting the holder into the dashboard select the appropriate tabs according to the thickness of the dashboard material and bend them inwards to seccure the h...

Страница 39: ...secure the unit with the accessory screws 2 During installation do not use any screw except for these provided The use of different screws might result in damage to the main unit Damage may occur if a screwdriver or similar tool is used with excessive force during the installations SUPPLIED MOUNTING KIT BRACKET X2 MACHINE SCREW M4 X 6 X4 MACHINE SCREW M5 X 6 X4 FALT WASHER Ø5 X 0 5T X 4 FALT WASHE...

Страница 40: ... to 8Ω INPUT Audio input 780 50mVrms input impedance 10kΩ or greater Video input 1 0 0 2 Vp p input impedance 75Ω VIDEO OUTPUT Video output 1 0 0 2Vp p output impedance 75Ω LCD MONITOR Screen Size 7 inch wide type 166mm Width 100mm Height Display method Transmission type TN liquid crystal display Drive method TFT thin film transistor active matrix driving Pixels 336 960 1440 234 GENERAL Power sour...

Страница 41: ......

Страница 42: ...OPENED OR CLOSED OTHERWISE THE MOTORIZED MECHANISM WILL BE DAMAGED BEFORE WORKING THE UNIT READ THE OWNER S MANUAL CAREFULLY AND FOLLOW UP THE INSTRUCTIONS IN IT ALWAYS WORK THE UNIT WITH THE REMOTE CONTROLLER OR THE FUNCTION BUTTONS ON THE UNIT OTHERWISE THE UNIT CAN BE DAMAGED PRINTED IN KOREA ...

Отзывы: