background image

Improving asset tracking through Untethered Dead Reckoning 


Figure 1: 

Use the Control-box for connection of a FOX3-2G/3G/4G series device to a PC 

1.3.2


Installing the Workbench software and loading the configuration into the device 

To be able to communicate with the FOX3-3G-DR device and load configuration onto the device, you need 
to 

install 

the 

Workbench


software. 

Go 

to 

the 

following 

link 

to 

download 

it: 

https://www.lantronix.com/products/workbench/


System requirements for using the Workbench software: 

(a)


PC with 700 megahertz or higher processor Intel Pentium II or compatible processor recommended, 

(b)


512  megabytes  (MB)  of  RAM  or  higher  recommended  (512MB  minimum  supported;  may  limit 
performance and some features), 

(c)


90 megabytes (MB) of hard disk space available (recommended 2 gigabytes), 

(d)


Keyboard and Mouse. 

After downloading the Workbench software, double click on the file to install it. An install shield will guide 
you through the installation. Integrated online help can be found once the installation is completed. 


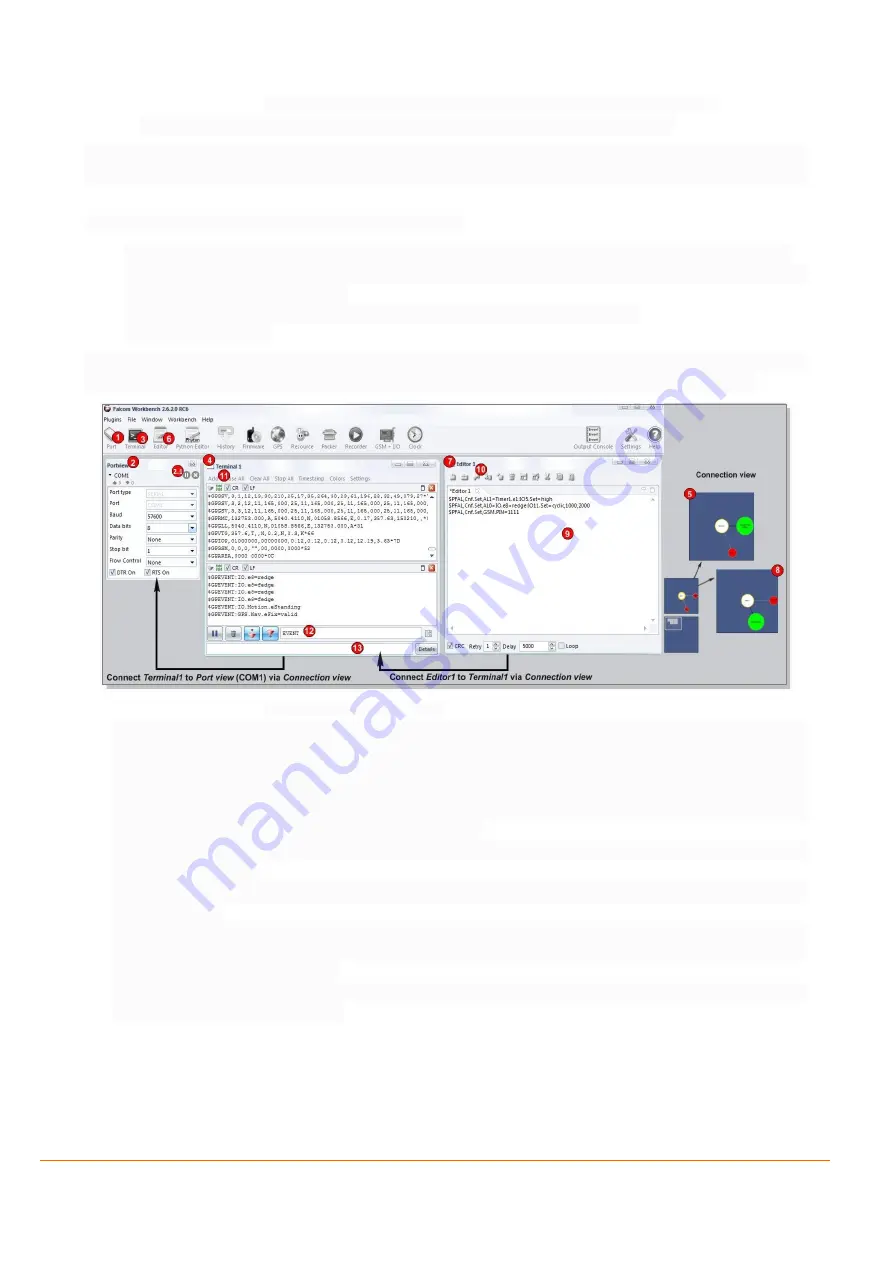
Figure 2:


Workbench software 

1.


After completing the installation, double-click on 

Workbench.exe

 to start it. Open a new 

COM Port 

from 

the Toolbar 

(1)

, on the 

COM Port view 

(2)

, choose the port where FOX3-2G/3G/4G is connected (go to 

Device Manager > Ports > USB Serial Port (COMxx), where 

xx

 is the COM port to use), define the port 

settings  (

115200

  bps, 

Data  bits, 

No 

Parity  bit, 

1

  Stop  bit, 

None 

Flow  control)  and  finally,  click  the 

connect (play) icon 

(2.1)

 to open that COM port. You can also get an online help in HTML format if you 

click the "

Help

" button on the upper-right hand corner. 

2.


Open a new 

Console

 from the Toolbar 

(3)

, click on the 

Console1 

(4)

, then go to 

Connection view

 and 

click on 

COMPort 

(5)

.


3.


Open a new 

Editor

 from the Toolbar 

(6)

, click on the 

Editor1 

(7)

, then go to 

Connection view

 and click 

on 

Console1 

(8)

.


4.


To load the configuration or send commands to the FOX3-3G-DR device, type them in the 

Editor 

(9)

, then 

click on

 Start sending configuration 

(10)


or double-click with the left mouse key on each configuration 

line individually, in the

 Editor 

(9)

.  

5.


Now, copy the configuration lines (in green) from the table in chapter 

1.3.2.1

 and past them in the 

Editor 

(9) 

and perform the step 4, above. 


Содержание FOX3-3G-DR

Страница 1: ...Application Note Improving Asset Tracking Through Untethered Dead Reckoning with FOX3 3G DR Part Number APP 0008 Revision A October 2019...

Страница 2: ...upport Sales Offices For a current list of our domestic and international sales offices go to the Lantronix web site at www lantronix com about contact Disclaimer All information contained herein is p...

Страница 3: ...ion December 2018 1 0 1 FOX3 3G DR must be used with the external antenna ANT 14 October 2019 A Initial Lantronix document Added Lantronix document part number logo contact information and links For t...

Страница 4: ...1 3 Hardware setup 6 1 3 1 Connecting a FOX3 3G BLE device to your PC 6 1 3 2 Installing the Workbench software and loading the configuration into the device 7 1 3 3 Installing the device in the vehic...

Страница 5: ...tion based on how far and in what direction they have travelled from a last known location typically the last harbor 1 Combining multi GNSS GPS GLONASS BeiDou Galileo with the Untethered Dead Reckonin...

Страница 6: ...eader to the 1st RS 232 serial 8pin connector port of the FOX3 3G BLE 5 Device configuration The device should be configured for using Untethered Dead Reckoning function 6 Workbench software It is nee...

Страница 7: ...nstallation is completed Figure 2 Workbench software 1 After completing the installation double click on Workbench exe to start it Open a new COM Port from the Toolbar 1 on the COM Port view 2 choose...

Страница 8: ...Nav eFix invalid SYS Timer0 stop PFAL CNF Set AL3 SYS Timer e0 GPS Nav Position s0 200 GPS Nav Position0 current TCP Client Send 08 device position PFAL CNF Set AL4 SYS Device eShutdown GPS Nav Posit...

Страница 9: ...f Untethered Dead Reckoning in FOX3 3G DR If you would like to know the position fix status before starting and during the driving calibration then you need to store load both alarms AL5 into the devi...

Страница 10: ...sts and describes all PFAL commands supported by the AVL devices FOX3_3G_4G_HardwareManual pdf Contains instructions for safety and operation of the FOX3 3G device AppNotes_AVL_Installation_Guide pdf...

Отзывы: