background image

28

29

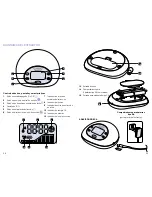
1

  Botón encendido/apagado (On/Off)

2

  Botón de aumento del nivel de succión

3

  Botón modo de estilo de extracción de leche

4

  Pantalla de LCD

5

  Botón de estimulación/extracción 

6

  Botón de disminución del nivel de succión

7

  Indicador de la fase de 

estimulación/extracción

8

  Indicador del tiempo

9

  Indicador de estilo de extracción 

de leche 

10

  Indicador de energía CA

11

  Indicador de baterías

12

  Indicador del nivel de succión

DIAGRAMA DEL EXTRACTOR

7

11

10

9

8

12

13

  Entrada del tubo

14

  Compartimiento para 


6 baterías tipo AA (no incluidas)

15

  Entrada para el adaptador de CA

ADAPTADOR DE CA

Compartimiento para baterías 

tipo AA 

(parte inferior del extractor)

14

13

15

Controles básicos, pantalla y características

1

2

3

4

5

6

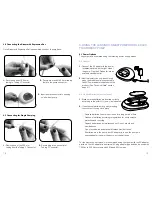
Содержание Smartpump

Страница 1: ...1 INSTRUCTIONS FOR USE DOUBLE ELECTRIC BREAST PUMP...

Страница 2: ...drop or insert any object into any opening or tubing Do not use this product if it is broken or any parts are missing Do not allow small children or pets to play with the pump unit AC adapter etc Do n...

Страница 3: ...ind comfortable Increase suction by pressing the button Decrease suction by pressing the button Lansinoh is here to support you If you have questions please do not hesitate to contact us at 800 292 47...

Страница 4: ...nd Features 1 Power On Off button 2 Suction Level Increase Control Button 3 Pumping Style Toggle Button 4 LCD Display 5 Let Down Expression Toggle Button 6 Suction Level Decrease Control Button PUMP D...

Страница 5: ...tmilk expression set 2 Before assembling the breastmilk expression set be sure that all of the parts are completely dry 3 Visually inspect the individual components for cracks chips tears discoloratio...

Страница 6: ...Holding the base of the white valve gently secure the valve into the bottom of the breast flange body 6 Attach end of 300 mm tubing to back of diaphragm cap Ensure that tubing is pushed all the way t...

Страница 7: ...can only be achieved when the breast pump is connected to the AC Power adapter supplied with the product See Technical Data section page 21 AA Alkaline Batteries not included 1 Make sure the batterie...

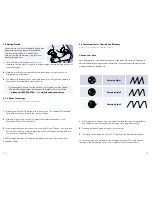
Страница 8: ...Indicator will appear in the display to signify that you are in the Expression Phase Choose your style Each baby is unique right down to the way he or she feeds The Lansinoh Smartpump offers three dif...

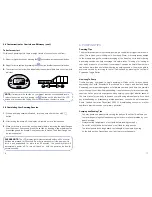
Страница 9: ...uble pumping compared to single pumping will reduce the time you spend expressing your milk Breastmilk is produced on a supply and demand basis Expressing your breastmilk regularly will stimulate your...

Страница 10: ...the Breastmilk Expression Set is securely connected on both breasts before starting the pump Increased suction level for single pumping If it feels like the suction is higher than usual when single p...

Страница 11: ...ow feeding nipple to come into contact with solvents or harsh chemicals Damage could result Fill with the required amount of liquid and tighten the screw cap before using Do NOT overfill Heating in a...

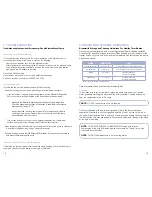
Страница 12: ...been tested and found to comply with the limits for a Class B digital device pursuant to part 15 of the FCC Rules These limits are designed to provide reasonableprotectionagainstharmfulinterferencein...

Страница 13: ...al agua Mantenga el cable alejado de las superficies calientes Nunca lo utilice mientras duerme o si tiene somnolencia No deje caer ni introduzca ning n objeto en los orificios o tubos No utilice este...

Страница 14: ...ya la succi n oprimiendo el bot n Lansinoh est a su disposici n si necesita ayuda Si tiene alguna pregunta no dude en llamarnos al 800 292 4794 NO lave ni esterilice los tubos Cada beb se alimenta de...

Страница 15: ...extracci n 8 Indicador del tiempo 9 Indicador de estilo de extracci n de leche 10 Indicador de energ a CA 11 Indicador de bater as 12 Indicador del nivel de succi n DIAGRAMA DEL EXTRACTOR 7 11 10 9 8...

Страница 16: ...Enjuague todas las partes con agua fr a inmediatamente despu s de cada uso 3 Lave a mano todas las partes del set de extracci n de leche materna utilizando agua tibia y jab n Puede utilizar un cepillo...

Страница 17: ...teniendo la base de la v lvula blanca f jela con cuidado en la parte inferior de la base de la copa de succi n 6 Coloque un extremo del tubo de 300 mm en la parte posterior de la tapa del diafragma As...

Страница 18: ...de CA en un tomacorriente disponible 2 Por su seguridad siempre utilice el extractor con el adaptador de CA suministrado con el producto Ver la secci n Datos t cnicos en la p gina 21 Bater as alcalin...

Страница 19: ...n El indicador de tipo de modo aparecer en la pantalla para indicarle que est en la fase de extracci n Elija su estilo Cada beb es nico al igual que la manera en la que se alimentan El Lansinoh Smart...

Страница 20: ...nto debe durar la extracci n Si en lugar de la extracci n en un solo seno utiliza la doble disminuir el tiempo que dedica a la extracci n La producci n de leche materna depende de la demanda Por eso s...

Страница 21: ...de leche materna Revise la informaci n de ensamble en la secci n Instrucciones para ensamblar el set de extracci n p ginas 10 12 Revise que la v lvula blanca no tenga alguna rasgadura o agujero Esta p...

Страница 22: ...juste la tapa con rosca antes de usarlo NO lo llene demasiado NO se recomienda calentar el l quido en el microondas ya que puede provocar que el calentamiento no sea homog neo y altas temperaturas loc...

Страница 23: ...rte 15 de las normas FCC Estos l mites est n dise ados para proporcionar una protecci n razonable contra interferencias perjudiciales en una instalaci n residencial Este equipo genera utiliza y puede...

Страница 24: ...46 47...
Страница 25: ...menos gratis a la l nea de servicio al cliente al 800 292 4794 Nuestro representante tendr mucho gusto de ayudarle Distribuido por Lansinoh Laboratories Inc Alexandria VA 22314 USA 800 292 4794 Lansin...

Отзывы: