background image

www.lanpro.com

Active Products - Cameras - LP-355ir

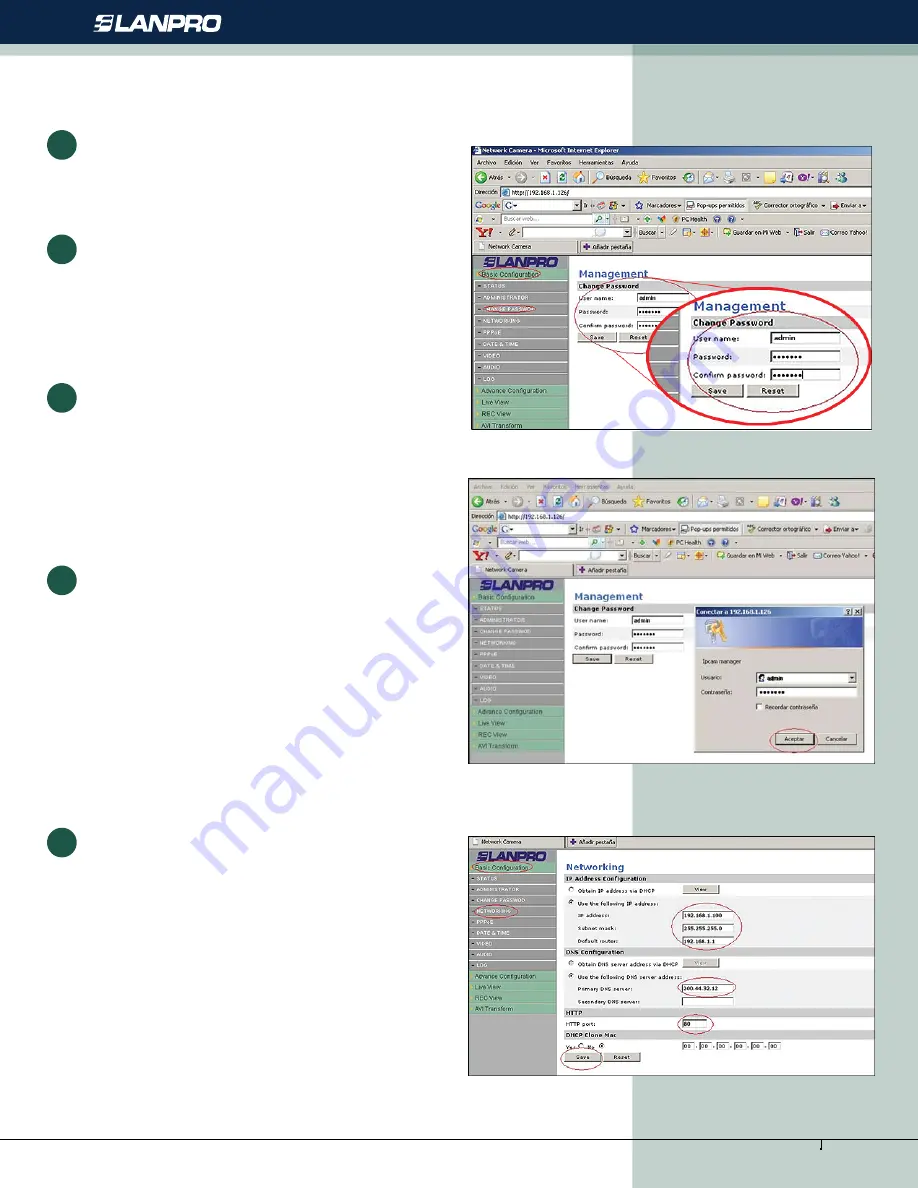
The  LanPro´s  camera  management  window  will  pop-up  as 

shown in figure 8. 

Select the 

“Change password”

 option and place the new 

password in the 

“Password”

 box, repeat it in the

 “confirm 

password”

 box, remember to take note of it and store in a 

safe place for future reference.

4

5

Proceed to select the 

“Save” 

option.

6

Figure 8

The validation window will pop-up again asking for the User, 

and the Password, as shown in figure 9, please fill the boxes 

with the user:

 “admin” 

and the new password.

7

Figure 9

The  camera´s  management  system  pops-up  a  window 

shown  in  figure  10.  In  that  window  select  option: 

“Basic 

Configuration”

  and  then:   

“Networking”

.  Place  the 

previously established address for the camera in the 

“Lan 

IP  Address”

  box,  remember  that  it  should  be  inside  the 

equipments network segment, I.E.: if your equipments have 

the following addresses: 192.168.10.x place a valid excluded 

address:  192.168.10.100  .  This  number 

“100”

  should 

be  alternated  for  each  camera  depending  on  the  network 

configuration.    Place  a  mask  in  the  box: 

“Lan  Netmask 

Address”

  and  your 

“Lan  Gateway  Address”

.  Continue 

by  selecting 

“Save”,

  a  counter  will  pop-up  showing  the 

progress of the change.

8

Figure 10

4

Содержание LP-355IR

Страница 1: ...Active Products Cameras www lanpro com LP355ir_M123_ENB01W LP 355ir Infrared IP Camera for indoors or outdoors LP 355ir 123 Fast Installation Guide without Router Basic...

Страница 2: ...ation A Insert one end of an UTP cable made to the required lenght As shown in figure 3 Attach the RJ45 connector as per the 568a 568b standard for patchcords make a joint between the power cable and...

Страница 3: ...m where you will configure the camera Go to the network card properties and change it s address to this one 192 168 1 1 subnet 255 255 255 0 as shown in figure 6 1 2 Figure 6 B Camera configuration an...

Страница 4: ...admin and the new password 7 Figure 9 The camera s management system pops up a window shown in figure 10 In that window select option Basic Configuration and then Networking Place the previously esta...

Страница 5: ...mera 1 192 168 10 100 camera 2 192 168 10 101 and so on 9 Figure 11 Run the Multi Windows LANPRO software that came with the camera a window like the one shown in figure 11 will pop up C Follow the in...

Страница 6: ...e 14 and press OK Note remember to use the password that you configured for each camera before the description is for reference purposes only 3 Figure 14 Placing the pointer in each black frame of eac...

Страница 7: ...order to be able to access your cameras from your browser you must enable the Activex controls installation in your browser s security properties Tab Then use the IP address you established in the st...

Отзывы: