background image

16 

● ● LP-1540ai ● User Guide

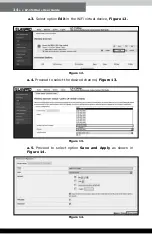
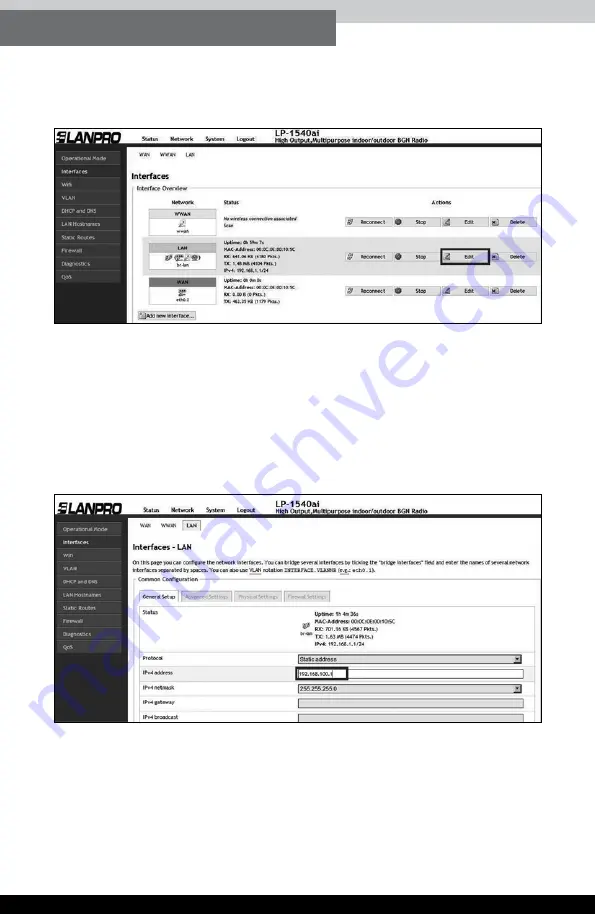
b.3.

 Select option 

Edit

 in the 

LAN Interfaces

Figure 18.

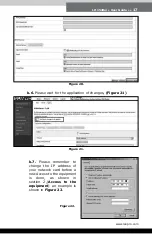
b.4.

 Proceed to change the IP address to the desired one in the 

corresponding  box  (as  shown 

Figure  19

), please remember 

that this change affects the DHCP service’s delivery of addresses 

because it automatically switchs to the same segment and access 

the equipment under the new IP address. For this to happen you 

must adjust it as shown in section 2 (

Access to the equipment

mentioned before. 

b.5.

 Proceed to select option 

Save and Apply

Figure 20

.

Figure 18.

Figure 19.

Содержание LP-1540ai

Страница 1: ...LP 1540ai User Guide Initial configuration www lanpro com LP1540ai_UG_ENB01W...

Страница 2: ...www lanpro com...

Страница 3: ...de www lanpro com Table of Contents LP 1540ai Main Features 05 1 LP 1540ai installation 07 2 Access to the equipment 10 3 Router Mode pre loaded template values modification 12 4 How to add additional...

Страница 4: ...www lanpro com...

Страница 5: ...wo air streams Supports advanced Firewall for physical and logical interfaces Global and Individual Supports automatic adjustment of air data transfer rate Good reception sensitivity with a peak of 67...

Страница 6: ...h independently made document If you require advanced functions please review the User Manual LP1540ai_UM_ENB01W in which a detailed description of all the configurations is explained please take in m...

Страница 7: ...P Etc 1 2 Please define if the equipment s power will be through the PoE input or through the DC Input connector An AC power outlet will be needed if you plan to power up the LP 1540ai through the DC...

Страница 8: ...ument in Router mode both LAN y WAN ports must be connected to the corresponding points From the LP 1540ai LAN port to the internal LAN Switch or the PC s Ethernet port or to the serviced equipment Fr...

Страница 9: ...IMPORTANT WARNING 1 3 Mounting the equipment on the selected location Outdoors Place the equipment with the connectors are located in the lower part of the equipment so there is no water return that c...

Страница 10: ...min password admin Please refer to the User Manual for administration and configuration via SSH Go to Properties of your Network Card as shown in Figure 5 Please select the TCP IP protocol and select...

Страница 11: ...1 2 in our Network Card remember taking care of not duplicating IP addresses in the data network and proceed to select OK twice Figure 7 Proceed to open the Browser of your choice and input the LP 15...

Страница 12: ...with a valid time of 12 hours The LAN WLAN and Vlan lan interfaces are in Bridge Mode The encryption mode is WPA2 PSK CCMP The default password for the wireless connection is 1234567890 Router mode d...

Страница 13: ...he more common Proceed as follows once section 2 Access to the equipment of this manual has been performed a Wireless channel change b LAN port IP address c Wireless Access Password change d Equipment...

Страница 14: ...r Guide a 3 Select option Edit in the WiFi virtual device Figure 12 a 4 Proceed to select the desired channel Figure 13 a 5 Proceed to select option Save and Apply as shown in Figure 14 Figure 12 Figu...

Страница 15: ...0ai User Guide 15 www lanpro com a 6 Wait for the equipment to re initialize Figure 15 b 2 Select Interfaces Figure 17 Figure 15 Figure 16 Figure 17 b LAN Port IP Address change b 1 Select Network Fig...

Страница 16: ...Figure 19 please remember that this change affects the DHCP service s delivery of addresses because it automatically switchs to the same segment and access the equipment under the new IP address For t...

Страница 17: ...the application of changes Figure 21 b 7 Please remember to change the IP address of your network card before a new Access to the equipment is done as shown in section 2 Access to the equipment an ex...

Страница 18: ...ser Guide b 8 Please access the configuration with the new IP address Figure 23 c 2 Select Wifi as shown in Figure 25 Figure 23 Figure 24 Figure 25 c Change the wireless Access password c 1 Select Net...

Страница 19: ...e 19 www lanpro com c 3 Select option Edit in the WiFi virtual device Figure 26 c 4 Select Advanced settings Figure 27 c 5 Proceed to change the password and select Save and Apply Figure 28 Figure 26...

Страница 20: ...until the equipment resets Figure 29 d 2 Select Administration Figure 31 Figure 29 Figure 31 Figure 30 d Change of the administration and configuration password of the equipment d 1 Select option Sys...

Страница 21: ...o change the password in both fields as shown in Figure 32 d 4 Select Save and apply to perform the changes as shown in figure 38 Figure 33 d 5 Wait for the equipment to reset and access it with the n...

Страница 22: ...option System Figure 35 b Select Backup Flash Firmware then select Restore Backup choose file Figure 36 c Explore the Template s folder and select the desired one then select Open as shown in Figure 3...

Страница 23: ...d Proceed to select option Upload archive Figure 38 e The equipment will proceed to upload the template s values and reinitialize as shown in Figure 39 please wait until the equipment asks for the cr...

Страница 24: ...www lanpro com LP1540ai_UG_ENB01W...

Отзывы: