background image

12

Driver  Installation

Appendix A

Network Application Platforms

Appendix A:  

Driver Installation

LAN Adapters Driver Installation

This  section  provides  the  instructions  on  how  to  install 

Intel® Gigabit LAN adapter drivers.

On the Windows OS

To  install  the  Intel®  Gigabit  LAN  controller  driver  on  a 

Windows Operating System:
To  install  the  Intel®  Gigabit  LAN  controller  driver  on  a 

Windows Operating System:

Restart  the  computer,  and  then  log  on  with 

1. 

Administrator privileges.
Insert the Drivers and User’s Manual CD  to the USB-

2. 

optical drive. 
Browse the contents of the support CD to locate the 

3. 

file PRO2KXP.EXE from the \Driver\LAN folder. Double-

click the Executable file.
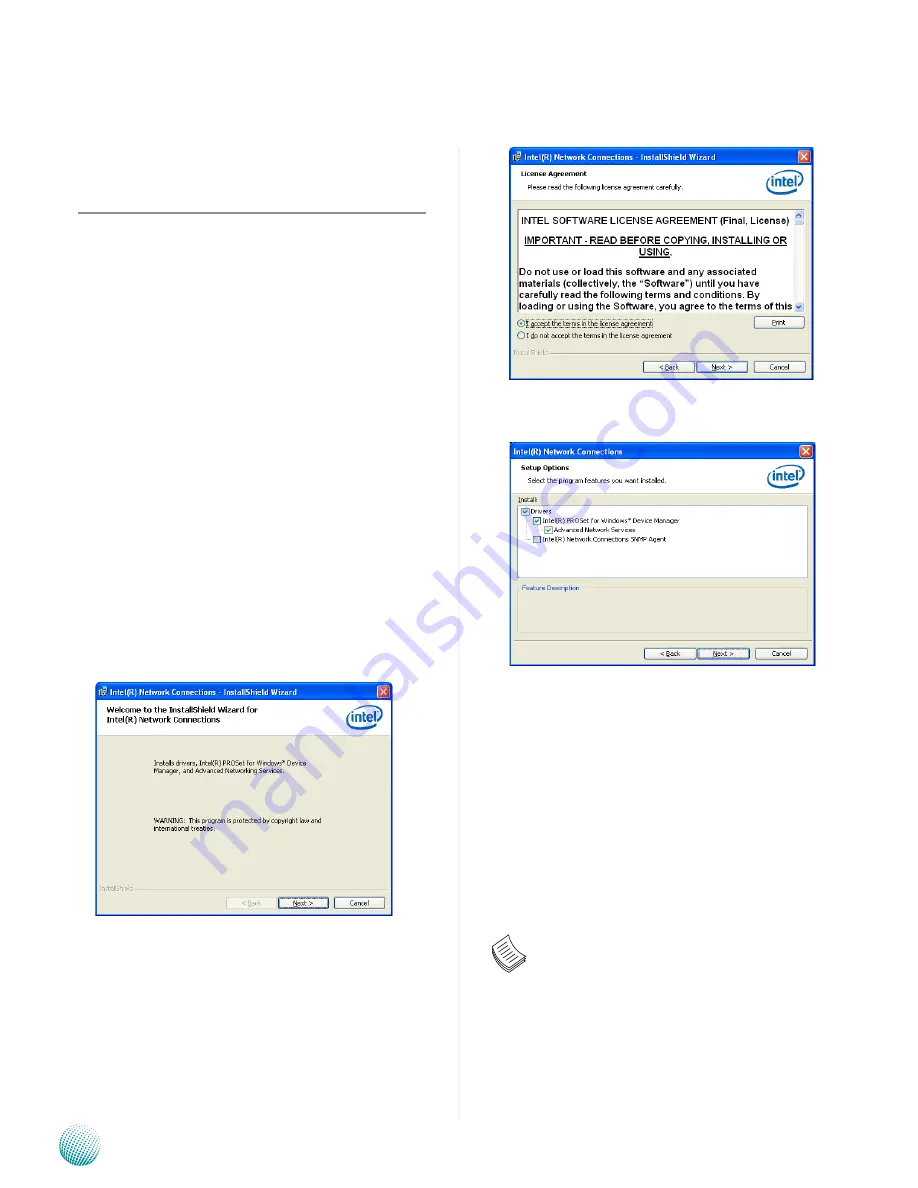
The

4. 


program starts by extracting the file. Click Next to 

continue the installation process. 
Click 

5. 

Next

 when the Intel® PRO Network Connections 

–InstallShield Wizard window appears.

Select the “I accept the terms in the license agreement” 

6. 

and then click Next.

Select the programs that you wish to install. Make sure 

7. 

that you have selected the drivers.

Click Nest and then 

8. 

Install 

to proceed the installation.

Click 

9. 

Finish

 to close the installation program.

To verify the LAN controller driver installation, do the 

following steps:
1.  Right-click on the My  Computer icon, and then select 

Properties form the menu.
Click the Hardware tab, then click the Device Manager 

button.
Click the + sign next to the Network adapters, then the 

Intel Pro/1000 [......................] adapter should be listed.

Note:  The system uses Intel 82574L  Ethernet 

controllers, you could obtain the latest drivers at 

the Intel download center:

http://www.intel.com/products/ethernet/

You could also use the web based utility to detect 

the needed drivers automatically by visiting the 

following website:

http://www.intel.com/support/network/detect.htm

Содержание FW-7581

Страница 1: ...Network Application Platforms Hardware platforms for next generation networking infrastructure FW 7581 User s Manual Publication date 2011 09 22...

Страница 2: ...inal manufacturer assumes no responsibility for its use nor for any infringements upon the rights of third parties that may result from such use Acknowledgement Intel Pentium and Celeron are registere...

Страница 3: ...and the Heat Sink Installation 6 Chapter 3 Motherboard Information 7 Block Diagram 7 Motherboard Layout 8 Jumper Settings 9 Appendix A Driver Installation 12 LAN Adapters Driver Installation 12 On th...

Страница 4: ...nition video playback without the need for add in video cards or decoders System Specification Features Description Form Factor 1U Rackmount Platform Processor Supports Intel Core2 Quad Core2 Duo Pent...

Страница 5: ...rossover Ethernet cable 1 8 meter 1 straight through Ethernet cable 1 8 meter 1 RJ 45 console cable Serial ATA power data cable 1 threaded screw set 1 name plate label Drivers and user s manual CD App...

Страница 6: ...connect to a computer terminal for diagnostic or configuration purpose Terminal Configuration Parameters 115200 baud 8 data bits no parity 1 stop bit no flow control F5 Two USB 2 0 Ports It connects t...

Страница 7: ...Power Switch R5 Low profile Expansion slot A slot for connecting the extended PCI E card The slot is for installing an additional adapter card which is connected to the main board via a riser card No...

Страница 8: ...of 1066 and 1333 MHz to meet the higher bandwidth requirements of the latest operating system and Internet applications It comes with two Double Data Rate DDR3 Dual Inline Memory Modules DIMM sockets...

Страница 9: ...ier this way because of the springiness of the bracket Placetheheatsinkcoverontopoftheinstalledheatsink 8 and screw the three screws to fasten it on the case Note The CPU heat sink could only be insta...

Страница 10: ...066 1333MHz 6x GbE RJ 45 Connectors w LED 6x PCI E x1 8 5GB s DDR3 1333 MHz Non ECC Unbuffered 1x 2 5 HD Bay DMI x2 x4 PCI 1 1 Compact Flash 2x USB PIN header 2x USB connectors USB 2 0 2x SATAII 2x SA...

Страница 11: ...Jumper SPI ROM1 Serial Cable Connector J13 VGA Cable Connector J9 System Power Button Connector CONN2 ATX Power Connector USB Cable Connector J8 SATA 1 2 Connectors J4 J3 Keyboard and Mouse Connector...

Страница 12: ...TX Mode Selection Jumper J11 Jumpers J10 J11 and J19 are used for switching power mode between AT and ATX Note that you have to adjust jumpers J10 and J19 accordingly AT ATX Mode Selection Jumper J19...

Страница 13: ...for connecting a 2 5 SATA hard disk to be served as your system s storage The system can support a maximum of 2 disks It conforms with SATA II 3 0 Gbs SerialInterfaceConnectors J13 COM2 A10 pinheader...

Страница 14: ...the Smart Fan control menu in the Hardware Health Configuration of the BIOS System Fan Connector FAN5 3 pin connector for connecting the system fan This one doesn t have a smart fan feature CPU Socket...

Страница 15: ...n the Intel PRO Network Connections InstallShield Wizard window appears Select the I accept the terms in the license agreement 6 and then click Next Select the programs that you wish to install Make s...

Страница 16: ...dule by typing the following 5 command make install The binary will be installed as 6 lib modules kernel_version kernel drivers net e1000 o The install locations listed above are the default locations...

Страница 17: ...video cards or decoders It has the following features Intel ClearVideoTechnology a combination of video processing hardware and software technologies designed to enhance the visual experience deliver...

Страница 18: ...counter that counts down from an initial value to zero The software selects the counter s initial value and periodically restarts it Should the counter reach zero before the software restarts it the s...

Страница 19: ...te Client System Configure the following settings in the BIOS Setup 2 menu BIOS Advanced Remote Access Configuration Serial Port Mode 115200 8 n 1 Configure Console Redirection on the client system 3...

Страница 20: ...ystem Status LAN Bypass for Port1 and Port 2 LAN Bypass 1 2 when power off PWR ON Enabled Disabled Disabled Non Bypass Non Bypass PWR OFF Non Bypass Non Bypass A sample program to control the GPIO 2 A...

Страница 21: ...rted by Lanner Bypass function include platforms based on Linux Kernel series 2 4 x and Linux Kernel series 2 6 x Install insmod plcm_drv ko mknod dev plcm_drv c 241 0 Note If you cannot install the d...

Страница 22: ...ll be returned at customer s expense The following conditions are excluded from this 5 warranty Improper or inadequate maintenance by the customer Unauthorized modification misuse or reversed engineer...

Страница 23: ...ing by Air Freight Sea Express ___ Others ________________ Item Model Name Serial Number Configuration Item Problem Code Failure Status Problem Code 01 D O A 02 Second Time R M A 03 CMOS Data Lost 04...

Отзывы: